Platform Installation Guide (printable)
1 Overview
This guide provides information on installation planning, configuration, and tuning of the platform for optimum performance and security. It is intended for installers who are building a fully-optimized, production installation.
Additional Resources
- For a searchable and printable version of this guide, see the Platform Installation Guide (printable)
- To learn more about the latest release, see the All Release Notes
- See also these additional resources for installation and configuration:
2 Installation Requirements
2.1 Hardware Requirements
| Application Server |
|
| Document storage |
|
| Database Server |
|
| Database backup |
|
2.2 Software Requirements
2.2.1 Installing MySQL Version 8.0.xx
| Operating System |
| ||||
| MySQL Server |
If you are a platform user, see Configure the MySQL Server.
| ||||
| Libraries | Download the third-party libraries and save them in a folder. You may want to integrate them into the system during the installation.
scrollTolerantForwardOnly=true
|
2.2.2 Installing MySQL Version 5.7.xx
| Operating System |
| ||
| MySQL Server |
If you are a platform user, see Configure the MySQL Server. | ||
| Libraries | Download the third-party libraries and save it in a folder. You may want to integrate them into the system during the installation. |
2.2.3 Required for Basic Platform Functionality
| Mail Server |
An email message should be received at the specified address. If the confirmation message does not arrive, check the mail log to discover the cause.
|
| Cache |
Ehcache is available in the Common Tomcat profile. For more information, see Configuring Ehcache. |
| Web Server |
The Apache web server can be placed in front of the Tomcat appserver to deliver static content more efficiently.
For more information, see Installing and Configuring Apache for Use with the Platform. |
| Java |
The installation and operation of the AgileApps Cloud platform requires Java 8. However, the custom code in Java Class continues to be validated against Java 6 syntax as the instrumentation engine responsible for monitoring resource utilization works only on Java 6 byte codes. |
| Browser Support |
As part of the security processes, the Remember me on this computer option is removed from the browser's login page.
|
2.2.4 Required for Additional Functionality
| OpenOffice (optional) |
| ||
| HornetQ (optional) |
The Messaging Server is an optional platform component that:
Get HornetQ from http://www.jboss.org/hornetq/downloads.html. For more information, see Installing the Messaging Server. | ||
| Charting Libraries (optional) |
Additional libraries are needed to email a chart or a report. For more information, see Install the Chart Handling Libraries. |
2.3 License Requirements
About licenses:
- One platform license is required for each instance of the Application Server.
- A short term license is included in the initial installation.
- An email notification is sent out 30 days before a license is due to expire.
- A grace period extends for an additional seven days after the expiration date.
Daily notifications are sent during that period, until the license is renewed or the grace period ends. - To obtain a long-term license, contact your Software AG representative. You will receive an XML license file.
To install the new license:
- Copy the XML license file to {install-dir}/profiles/IS_default/configuration/tomcat/conf/RN
- Restart tomcat
3 Installation Planning
3.1 Platform Components
These components that are part of a platform deployment:
- Application Server
- The Application Server is a web application that runs in the Common Tomcat Platform (CTP) container.
- (Optional) Apache HttpD
- Alternatively, the Apache httpd web server can be used to serve static content. In that case, the platform runs as an application server behind the Apache httpd web server. Those instances can be running on the same server, or on different servers, so either of these configurations is possible:
- (Optional) Messaging Server
- The messaging server provides for on-screen notifications when people are viewing the same case.
- MySQL Database
- MySQL is a relational database with capacities for redundancy, failover, backup, distributed access, and transactional integrity. That platform makes data look like Java objects to application developers. That makes applications easier to develop. But under the covers, the reliability and robustness of a mature relational database provides for data safety and rapid access.
- Replicated Database
- Database replication is a virtual necessity for any successful deployment. It safeguards data, and it allows for efficient backup and reporting from the replicated database, to minimize response time to users.
- Memcached
- The MEMory CACHE Daemon (memcached) is an optional, but highly recommended process that stores frequently-accessed data in memory, so it can be retrieved with maximum speed.
3.2 Platform Deployment Options
This section describes deployment options that increase scalability and reliability.
- Multiple Application Servers
- Instances of the platform can be deployed on different servers to improve response times.
- Separate servers for Apache httpd
- When the Apache httpd server is used to serve static content, the Apache httpd instances can be deployed on separate servers, while platform instances run on their own servers. Learn More: Installing and Configuring Apache for Use with the Platform
- Separate Messaging Server
- To further improve performance, the Messaging Server can be installed on a standalone system. Or it can run the same system as an appserver.
- Web App Accelerators
- Web Application acceleration services like those provided by Akamai can also be used to improve response times and throughput. Learn More: Web Application Accelerator.
- Multiple memcached servers
- The MemCache Daemon can also be run on one or more separate servers. In addition to the performance improvement, that configuration makes it somewhat easier to add application servers to scale capacity later. Learn More: Configuring memcached
- Certificate-authentication Server
- Adding a certificate-validation server to the network architecture, allows the platform to be accessed by browsers or by REST APIs without a login step, by supplying an identifying certificate.
- Learn more: Client Certificate Authentication in a private AgileApps Cloud (pdf)
- Separate Database Server
- Running the platform and the Database on different servers is highly recommended for a production deployment. Learn More: Configuring MySQL to Run on a Separate Server
- Separate Servers for Backend Processes
- The backend processes used by the application server can be (and should be) deployed to at at least one "backend server" to minimize response time in the customer-facing server they would otherwise be running on. Beyond that, heavily-used services can be deployed to servers of their own, to maximize performance. Learn More: Managing Backend Services
3.3 Prototype Deployment
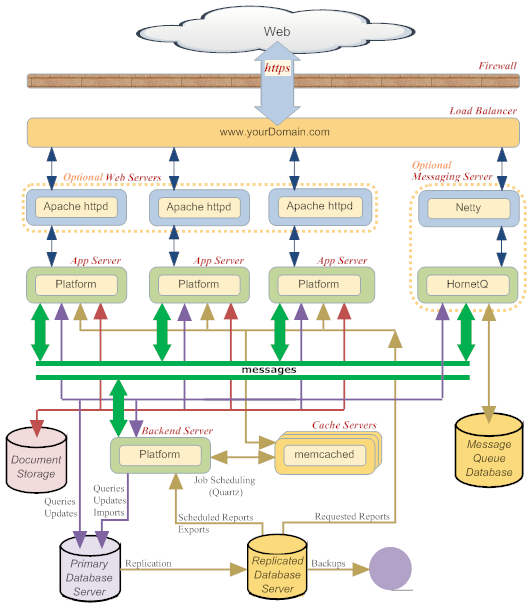
The following diagram shows the kind of architecture that is typical for a production system pre-10.11 release and post 10.11 release. With the 10.11 release, AgileApps uses the common Tomcat that comes along with the IS installation and does not use the stand-alone Tomcat anymore. This allows AgileApps access to the flow services on the co-hosted IS. The following images allow you to identify the difference in the architecture for pre and post 10.3 release.
- Architecture for pre-10.16 Release

- Architecture for post-10.16 Release
- Architecture for post-10.16 Release

The architecture is explained as follows:
- Node 1 and Node 2 are the AgileApps server instances available in the front-end.
- Node 3 serves as the backend AgileApps Server instance. The critical backend processes shown here (import, export, and scheduling, which uses quartz) are all run from a single platform instance. However, you can employ additional servers, as load demands.
Learn more: Managing Backend Services. - Document storage (which includes pictures and image files) is managed separately from the database. In the example above, it is housed as part of the backend server instance. The Document storage communicates with all the nodes.
Learn more: See the Document Server section in Service Provider Settings. - The user logs into AgileApps and the request comes to the Load Balancer which distributes the traffic across the web servers.
- The web server can be an Apache server or an Nginx server.
Learn more: Installing and Configuring Apache for Use with the Platform. - A Memcached server reduces response time by caching data in memory. Memcached servers are accessed by all Application servers, backend as well as front-end.
Learn more: Configuring memcached - All the nodes are connected to the primary database server. The primary database is running on its own server for better performance. It can also reside within one of the nodes VM1 or VM2 along with the AgileApps server. The database could be MySQL, Amazon RDS, or so on.
Learn more: Configuring MySQL to Run on a Separate Server - The replicated database is running separately on its own server. This ensures more reliability and for performing read-intensive operations like taking backups, generating reports, and exporting data.
Learn more: Running Reports and Storage Checks On a Replicated Database Server. - Requests that access and update the database, whether coming from a user or a backend process, go to the primary database server.
3.4 Additional Deployment Options
To further improve the performance of the system, data safety and data security, there are some additional things you can do:
- Send database backups to a distant, remote server.
Keep the replicated database on premise, for instant failover when needed. But for disaster recovery, keep the backup database 1000 miles away, or more.
- Send database backups to a distant, remote server.
- Allow only the backup server to connect to the backup port.
In addition to requiring the username and password to connect to the backup port, allow connections only from a specific IP address.
- Allow only the backup server to connect to the backup port.
- Add a Dynamic Site Accelerator--in effect, a giant cache in the cloud
For example, use the Akamai accelerator.
- Add a Dynamic Site Accelerator--in effect, a giant cache in the cloud
- Add Database Clustering.
With a database cluster, the application server sees a single database, but inside the cluster many database servers are at work.
- Add Database Clustering.

Note:
All of those options are in effect in the public cloud installation of the AgileApps Cloud platform, with the exception of database clustering. (So far, the performance profile has not required it, despite having thousands of users on the system.)
Additional DB Clustering Notes:
- Third party database clustering systems work well.
- The AgileApps Cloud platform currently supports MySQL version 5.5. But MySQL native clustering becomes stable only in version 5.6.
- Whichever system is used for DB clustering, it should support multi-master replication. Otherwise, separate replication nodes are needed for every system in the cluster, and failover procedures become tricky.
- The Quartz scheduler has yet to be tested for scheduled reports and backups when DB clustering is in effect.
3.5 Choosing a MySQL Replication Strategy
MySQL supports several replication formats:
- Statement-Based Replication (SBR), which replicates entire SQL statements
- Row-Based Replication (RBR), which replicates only changed rows.
- Mixed-Based Replication (MBR), which is a combination of the two.
With Statement-Based Replication, SQL statements are propagated using the standard statement-based, binary logging format. That is the default replication format in the version of MySQL that ships with the platform.
Row-based binary logging is a mechanism that logs changes in individual table rows. With row-based replication, the master writes events to the binary log that indicate how individual table rows are changed.
When mixed format is in effect, statement-based logging is used by default, but automatically switches to row-based logging when it is necessary to do so.
Learn More:
- Replication: http://dev.mysql.com/doc/refman/5.5/en/replication.html
- Replication formats: http://dev.mysql.com/doc/refman/5.5/en/replication-formats.html
- Comparison of Statement-Based and Row-Based Replication:
http://dev.mysql.com/doc/refman/5.5/en/replication-sbr-rbr.html - How To Set Up Database Replication In MySQL:
http://www.howtoforge.com/mysql_database_replication
3.6 Choosing a MySQL High-Availability Option
MySQL can be configured for High Availability using the following schemes supported by MySQL:
- MySQL Replication
- Replication provides data safety. It also lets you run reports and backups from the secondary server, reducing the load on the primary server and improving the response time seen by users. There is some exposure to data loss, since recently-seen data may not have been replicated when a failover occurs--but on the other hand, transactions don't incur the lag time added by serialized (synchronous) replication of data.
- MySQL Replication + Heartbeat
- Using Linux HA capabilities, MySQL can be configured for automatic IP-address failover.
- Learn More: http://dev.mysql.com/doc/refman/5.5/en/ha-overview.html
- DRBD + MySQL Heartbeat
- While the previous two schemes do statement-based replication, Distributed Replicated Block Devices (DRBD) does synchronous replication of modified disk blocks. The advantage is consistently fast failover times. And because it is synchronous, incoming data is virtually guaranteed to be replicated, for maximum protection against data loss. The disadvantage is that traffic-handling volume may be decreased, due to the serial writes (replication must complete before the original data write can finish). This mechanism is also expensive to set up and maintain.
- Learn More: http://dev.mysql.com/doc/refman/5.5/en/ha-drbd.html
- MySQL Replication + DRDB + MySQL Heartbeat
- Replication and DRDB are not mutually exclusive. They can be used in combination with one another.
3.6.1 Comparing the Options
The following table compares those replication schemes:
Requirements Replication Replication + Heartbeat DRBD + Heartbeat Replication + DRBD + Heartbeat Availability Automated IP failover No Yes Yes Yes Automated database failover No No Yes Yes Typical failover time User/script-dependent Varies < 30 seconds < 30 seconds Automatic resynchronization of data No No Yes Yes Geographic redundancy support Yes Yes No Yes Scalability Supports Read-intensive applications Yes Yes No Yes Supports Write-intensive applications No No Yes Yes Maximum number of nodes per group One master, multiple slaves One master, multiple slaves One active (primary), one passive (secondary) node Maximum number of slaves Unlimited (reads only) Unlimited (reads only) One (failover only)
- Note: This table is based on information obtained from http://dev.mysql.com/doc/refman/5.5/en/ha-overview.html
3.6.2 MySQL Cluster Not Supported
MySQL Cluster has functionality limitations that prevent it from working with the platform. Some of the more significant limitations include:
- Limitation on number of objects in an instance (around 20,000)
- Temporary tables are not supported
- Limitations on Index size
- Savepoint and Rollback to Savepoint are not supported
- Replication is not supported
- Online schema changes are not supported
4 Platform Installation
4.1 Installation Files
4.1.1 Post-Installation File Hierarchy
When the platform is installed, these additional folders are created:
- docs
- Store the documents, attachments, and other files uploaded to the platform.
- tmp
- A work folder used for temporary files.
4.1.2 Configuring the MySQL Server
These instructions apply to the version of MySQL specified in the Software Requirements.
-
Note: MySQL configuration is a pre-requisite for the AgileApps installation.
Terminology:
- MySQL Server
- The database server which has MySQL Server software installed, configured, and running.
- MySQL Client
- Any other computer which connects to the database server and has the MySQL Client software installed, configured, and running.
- The client connects to the database server to access data, for example, webserver.
- Configuration file
- my.cnf, a MySQL configuration file that may be edited and used in the MySQL client or MySQL Server installation.
4.1.2.1 MySQL Settings
- Storage Engine
- default-storage-engine = innodb
- Server System Variables Configuration
- It is observed that READ_UNCOMMITTED does not work well with Row-Based Replication. Use one of the following configurations:
- a) Either STATEMENT-BASED or MIXED replication with the Transaction Isolation level dictated by business needs.
- b) ROW-BASED replication with transaction_isolation = READ-COMMITTED
- User Configuration
-
- Create a user account with password in MySQL
The Application Server will use the user details.
- The user account should have all MySQL privileges enabled on all databases
- Use the default root account that is created during the installation of MySQL. You can also create a non-root MySQL user to run Agile Apps. For more information, see Creating a non-root MySQL User to Run Agile Apps.
- Create a user account with password in MySQL
- sql-mode Configuration
-
- Add the following code to the my.cnf file located in the MySQL Client:
- sql-mode="PIPES_AS_CONCAT,ANSI_QUOTES"
- Add the following code to the my.cnf file located in the MySQL Server:
- sql-mode="PIPES_AS_CONCAT,ANSI_QUOTES"
- MySQL Configuration for UTF-8 Unicode character set for 5.7 Version
-
- Add the following code to the my.cnf file, located in the MySQL Client:
- default-character-set=utf8
- Add the following code to the my.cnf file, located in MySQL Server:
- character-set-server=utf8
- collation-server=utf8_general_ci
- The character set defines how records can be alphanumerically ordered (or grouped, sorted, filtered, indexed). The list of supported languages is determined by the character set available at the server level. Hence, the UTF-8 Unicode character set configuration is required as part of MySQL configuration.
- To specify character settings at MySQL configuration time:
For MySQL Version 5.7, see https://dev.mysql.com/doc/refman/5.7/en/charset-applications.html
- To specify character settings at MySQL configuration time:
- MySQL Configuration for UTF-8mb4 Unicode character set for MySQL 8.0 Version
-
Note: For MySQL configuration v5.7 to v8 upgrade, refer Upgrading to MySQL v8.
- Add the following code to the my.cnf file, located in the MySQL Client:
- default-character-set=utf8mb4
- Add the following code to the my.cnf file, located in MySQL Server:
- character-set-server=utf8mb4
- collation-server=utf8mb4_0900_ai_ci
- The character set defines how records can be alphanumerically ordered (or grouped, sorted, filtered, indexed). The list of supported languages is determined by the character set available at the server level. Hence, the UTF-8 Unicode character set configuration is required as part of MySQL configuration.
-
Note: If user does not specific in my.cnf or my.ini file then default MySQL 8 character set and collation are utf8mb4 and utf8mb4_0900_ai_ci taken by server.
- To specify character settings at MySQL configuration time:
For MySQL Version 8.0, see http://dev.mysql.com/doc/refman//8.0/en/charset-applications.html
- To specify character settings at MySQL configuration time:
- max_allowed_packet Configuration
- Add max_allowed_packet = 64M to my.cnf or my.ini
- For MySQL Version 5.7, see https://dev.mysql.com/doc/refman/5.7/en/charset-applications.html
- For MySQL Version 8.0, see https://dev.mysql.com/doc/refman/8.0/en/charset-applications.html
- Restart the MySQL server to implement the changes
- regexp_time_limit Configuration
The regular expression limit is expressed as the maximum permitted number of steps performed by the match engine, and thus affects execution time only indirectly. It is defined in milliseconds.
- Add regexp_time_limit=2048 to my.cnf or my.ini
- For MySQL Version 5.7, see https://dev.mysql.com/doc/refman/5.7/en/charset-applications.html
- For MySQL Version 8.0, see https://dev.mysql.com/doc/refman/8.0/en/charset-applications.html
- Restart the MySQL server to implement the changes
4.1.2.2 Populate the Timezone Tables
- The platform uses MySQL's timezone tables for timezone conversions. These tables are not automatically populated when MySQL is installed, so it necessary to do so after installation.
- Run the following program to initialize the MySQL timezone tables:
- mysql_tzinfo_to_sql /usr/share/zoneinfo | mysql -u root mysql
- where /usr/share/zoneinfo is the standard Linux location for the time zone files. (Your system may differ.)
- For MySQL Version 5.7, see https://dev.mysql.com/doc/refman/5.7/en/mysql-tzinfo-to-sql.html
- For MySQL Version 8.0, see https://dev.mysql.com/doc/refman/8.0/en/mysql-tzinfo-to-sql.html
- mysql_tzinfo_to_sql /usr/share/zoneinfo | mysql -u root mysql
4.2 Installing and Upgrading the Application Server
4.2.1 New Installations
- Review the Installable Version Release Notes.
- Ensure that the Hardware Requirements are met.
- Ensure that the Software Requirements#Required for Installation are met.
- Configure the MySQL Server so it is ready for use.
- Ensure that all database servers and web servers are configured to be in the same timezone, regardless of where they are geographically located.
- Use the standard SoftwareAG webMethods installer to install the platform of your choice.
Learn more:- From the webMethods documentation page consult the respective Installation document.
- For the very first server that is installed, Start the Application Server to verify that everything is working.
- For subsequent servers, Configure Backend Services before startup.
- Install the Platform License
- Once installed, proceed to Configuring the Application Server
4.2.2 Upgrades

Important:
These are instructions are for version 10.5 and later.
If you are upgrading to 10.5, use the 10.5 Upgrade Process, instead.
- If you have not already done so:
- Review the Installable Version Release Notes.
- Ensure that the Hardware Requirements are met.
- Ensure that the Software Requirements#Required for Installation are met.
- Backup the platform databases.
- Use the standard SoftwareAG installer to install the 10.5 platform.
Learn more: In webMethods documentation page see the 9.9 Installation document. - Start the Application Server
- When done, proceed to Configuring the Application Server
5 Platform Configuration
5.1 Configuring the Application Server
- As described in Software Requirements#Required for Basic Platform Functionality:
- Configure an email server to enable email-based collaboration.
- To improve performance, install and memcached for caching. (You will configure it in a moment).
- Add the Apache HTTP server to further improve performance.
- All backend services are enabled by default. But they will cause performance problems if they are running on the customer-facing application server, and errors can result if they are running on multiple servers. After installing the platform, therefore, it is important to disable all backend services that are not required on the current server.
- Learn more: Managing Backend Services
- As described in Software Requirements#Required for Additional Functionality:
- To allow PDFs to be generated from documents, install OpenOffice.
- To allow for Collision Detection and Prevention, install HornetQ.
- To be able to email a chart or report, Install the Chart Handling Libraries.
- Additionally:
- Enable One-Click Document Viewing.
- Add Multibyte Character Fonts for PDF printing.
- To enable Java Code Governors on Red Hat 6, perform the steps mentioned in the Additional Step for RedHat article.
-
Note:
When making changes to an existing server, restart the server to read in the new values.
5.2 Managing Backend Services
The AgileApps Cloud platform has several backend services. Each of them can be run on a different server, to improve performance and scalability. They can be disabled, as well, if they are not used.
-
Important:
All backend services are enabled by default. But...- Backend services should not be enabled on a customer-facing web server, to avoid performance problems.
(The exception would be a single-user server used for development or proof of concept.) - With the exception of memcached, a backend service should not be enabled on more than one server, to avoid errors.
Immediately after installing a server, then, it is necessary to disable all backend services, except for those services that are intended to run on the current server--and then only if the current server is intended to be a backend server.
- Backend services should not be enabled on a customer-facing web server, to avoid performance problems.
5.2.1 About the Backend Services
An Application Server instance can run one or more of the following services. Enabling and disabling them determines which instance they run in--or whether they are available at all.
Service Default Status Description Report Scheduler Enabled Runs scheduled reports when they're due Import Enabled Imports of data into the database Export Enabled Exports data from the database Memcached Enabled Data caching mechanism (installed separately) Quartz Enabled Time keeper for all scheduled events.
5.2.2 Enabling and Disabling Backend Services
During installation, the networking.properties file is created. That file can be used to manually enable and disable backend services for an existing installation.
-
Important: Each background service should run on only one server.
- To view the server list
- Open {install-dir}/profiles/IS_default/configuration/tomcat/conf/RN/networking.properties
- Servers are listed in this format: xxxxx_manager_instance=1
where "xxxxx" is one of "import", "report", etc.
- Servers are listed in this format: xxxxx_manager_instance=1
- To Disable a service
- Add a "#" character before the xxxxx_manager_instance=1 command
- # report_manager_instance=1
- Save the file
- Restart the Application Server
- To Enable a service
- Remove the "#" character from the xxxxx_manager_instance=1 command
- report_manager_instance=1
- Save the file
- Restart the Application Server
5.2.3 Configuring Backend Services
During installs and upgrades, it is only necessary to enable or disable a service on a platform instance. The install/upgrade process takes care of making the connections.
To change a configuration for an existing installation, changes need to be made manually, by adjusting the networking.properties file(s) and restarting the Application Server(s).
-
Note: A change in the configuration for either memcached, quartz, or the document service requires a restart of all Application Servers.
The general process is:
- Make the changes to the networking.properties files for all Application Servers.
- Restart the Application Servers.
These sections describe the changes to make:
5.2.4 Configuring Document Services
-
Important: Changing the document service configuration requires a restart of all Application Servers.
Document uploads and downloads are handled by the document service. Managed documents include:
- Individual documents accessed through the documents tab
- Attachments to records
- File and image fields in records
The document service ensures that documents can be accessed from any application server. One of the App Servers should be designated as the document server. That server needs access to the storage device that will hold the documents.
-
Recommendation: A reliable storage device should be used for document storage--something on the order of a SAN or a RAID enabled disk array.
The URL of the document server can be configured by updating the following columns in the table relationals.NETWORK_GLOBAL_PROPERTIES:
- document_server - Stores documents that can be accessed only by authenticated users
- public_document_server – Stores public documents that can be accessed without logging into the platform
- import_document_server – Stores documents that are uploaded using data import
- Notes:
- The typical value for those properties is http://ip_address_of_document_server/networking
- Changing the document server location requires a restart of all platform instances.
-
Recommendation: All three values should be the same. In other words, exactly one server should be responsible for all of the document services.
5.2.5 Configuring the Quartz Scheduler
-
Important:
- Quartz must be enabled on at least one platform instance, or the platform won't run.
- It is recommended that you run Quartz on the back-end servers to avoid any performance issues in the front-end servers.
- If you have multiple instances, Quartz should run on only one of them, unless you follow the Quartz clustering instructions below.
- Changing the quartz configuration requires a restart of all Application Servers.
5.2.5.1 Enabling Quartz on a Platform Instance
- 1. Enable qrtz_manager_instance = 1. This is available at {install-dir}/profiles/IS_default/configuration/tomcat/conf/RN/networking.properties
- 2. Edit {install-dir}/profiles/IS_default/configuration/tomcat/conf/RN/AALSchedulers.xml
- 4. Add the following information:
- a. Database user name (an admin user)
- b. Password for that user
- Example:
<attribute name="org.quartz.dataSource.myDS.URL" value="jdbc:mysql:"/>
<attribute name="org.quartz.dataSource.myDS.user" value=""/> -- root user
<attribute name="org.quartz.dataSource.myDS.password" value=""/> -- password
-
Note: Do not change the value of org.quartz.scheduler.instanceName property.
5.2.5.2 Moving Quartz to Another Platform Instance
Suppose you have one application server instance, and you have decided to add another to handle the traffic volume. And let's say you also decide to move quartz to the new instance, to further reduce the load on the original server. To that, you disable Quartz on the first instance, and start it on the second.
- 1. Disable qrtz_manager_instance = 0. This is available {install-dir}/profiles/IS_default/configuration/tomcat/conf/RN/networking.properties
- 2. For the second instance, follow the steps above, in Setting up Quartz on a Platform Instance
5.2.5.3 Setting up a Quartz Cluster
By default, Quartz is pre-configured to run as a cluster of instances running on different servers. To run successfully, however, each server must have the settings shown here. Otherwise, a Quartz instance will not know that the others exist, and will not lock job records that are in progress. Perform this configuration on any server you later add to the cluster.
- 1. Open {install-dir}/profiles/IS_default/configuration/tomcat/conf/RN/AALSchedulers.xml
- 2. Check this line:
<attribute name="org.quartz.scheduler.instanceId" value="AUTO" [VERIFY THIS LINE]
- 3. Under # Configure JobStore, check these lines:
...
# Configure JobStore
<attribute name="org.quartz.jobStore.misfireThreshold" value="60000"/>          [VERIFY THESE LINES]
<attribute name="org.quartz.jobStore.isClustered" value="true"/>
<attribute name="org.quartz.jobStore.clusterCheckinInterval" value="20000"/>
In addition, MySQL must be configured to set the appropriate transaction-isolation level and to specify row-based replication:
- Edit {MYSQL_INSTALLATION}/my.cnf
- Use the following settings:
transaction-isolation = READ-COMMITTED
binlog-format = ROW
5.2.6 Configuring memcached
The MEMory CACHE Daemon is a high-performance, distributed-object caching system that minimizes user response time by caching application data and other elements required by programs running on the application server.
The platform uses memcached to store meta information which so that they can be obtained from the cache without accessing the database e.g. Object and field definitions, layout definitions, data policies etc. (Transactional customer data is not stored in memcached--that data is cached by the database.)
Data is stored in memcached using a lazy read mechanism. When some meta information is required, the platform checks to see if it is available in memcache. If it is available, the data is retrieved. If it is not available, a database read is performed, which in turn populates the entry in memcached. When the meta information changes due configuration changes by the user, the corresponding entry is flushed from memcached.
-
Important: The configuration for every instance must have the same memcached settings--otherwise, the caches won't be synchronized. Changing the memcached configuration therefore requires a restart of all Application Servers.
5.2.6.1 Managing memcached Servers
- To install memcached
- See http://memcached.org/ for installation instructions.
- To start memcached
-
- Execute the memcached script located in the /bin directory:
./memcached -d start -p 11211 -u root -m 25
- where:
- -p is the port number (11211)
- -u is the user (root)
- -m is the amount of memory in MB (25)
- (Change the parameters to the values used for your installation.)
- where:
- To stop memcached
./memcached -d stop</tt>
5.2.6.2 Configuring Application Servers to Use memcached
- To enable memcached
- Edit networking.properties
- Remove the leading # character from the line
#MemCachedServers=localhost:11211
- To change the default port
- The default port is 11211. To change the port assignment, modify the value(s) for MemCachedServers in networking.properties.
- To configure multiple memcached instances
- Multiple memcached instances are recommended, so that cache access is distributed. Do that by specifying the IP address and port for each memcache server in the networking.properties file.
-
Important: If there are multiple memcached servers, then:
- Every instance should have an identical list of servers.
- The servers should be in the same order in each list.
- If the configuration changes, all application servers should be restarted.
- Learn more: Adding Additional memcached Servers
- To bring up the servers
- After making the changes to the networking.properties files for all Application Servers, (re)start servers in the required Server Restart Sequence.
5.3 Enabling One-Click Document Viewing
- Ensure that OpenOffice is installed, as described in the Software Requirements.
- Enable one-click viewing in the networking.properties file,
5.4 Installing the Chart Handling Libraries
These libraries create an image of charts generated by reports, so the charts can be viewed when the report is sent in an email.
5.4.1 Install php-cli
- Install php-cli from PHP version 8.2.21, or later.
5.4.2 Install the FCImg Library
- Create the fcimg/ directory:
- cd ${TOMCAT_HOME}
- mkdir fcimg/
- Change the directory owner to the user who will be starting tomcat:
- chown {platform_admin_user} fcimg/
- Learn more: Running the Platform as a Non-Root User
- From the installation folder, copy the template.txt file to fcimg/
- cp ${platform_installation_dir}/template.txt fcimg/
- Download the appropriate library for your OS:
- Linux (32 Bit) https://agileappscloud.info/aawiki-src/download/files/fcimg-0.1.3-linux32bit.tar.gz
- Linux (64 Bit) https://agileappscloud.info/aawiki-src/download/files/fcimg-0.1.3-linux64bit.tar.gz
- Extract the FCImg library into ${TOMCAT_HOME}/fcimg/
(The directory is created by the installation process. It contains a template.txt file.) - For 10.5 versions and above, make the following changes in fcimg.php file in the fcimg folder .
- add $args = $args." --encoding utf-8"; right after the below mentioned lines.
- // configure the arguments
- $args = "--format $fileType";
- $args = $args." --crop-w ".($width - 1);
- $args = $args." --crop-h ".($height - 1);
- resultant text will look like
- // configure the arguments
- $args = "--format $fileType";
- $args = $args." --crop-w ".($width - 1);
- $args = $args." --crop-h ".($height - 1);
- $args = $args." --encoding utf-8";
- Make the files executable:
- cd ${TOMCAT_HOME}
- chmod +x fcimg/bin/*
5.4.3 Install MS True Type Fonts
On Windows, True Type fonts are pre-installed. For RedHat Linux:
- Make sure the following rpm packages are installed. (Any version should do.)
- rpm-build
- wget {a package that provides the ttmkfdir utility}
- For example:
- For Fedora Core and Red Hat Enterprise Linux 4, ttmkfdir
- For old redhat releases, XFree86-font-utils
- For mandrake-8.2, freetype-tools
- For example:
- Install the cabextract utility.
- For users of Fedora Core it is available from extras.
- Others may want to compile it themselves from source, or download the source rpm from fedora extras and rebuild.
- If you don't have an rpm-based distribution, compile the tool to extract the .ttf files from the .exe files, cabextract from the source files at http://www.cabextract.org.uk/
- Download the latest msttcorefonts spec file
- If you haven't done so already, set up an rpm build environment in your home directory:
- a. Edit $HOME/.rpmmacros
- b. Add the line %_topdir %(echo $HOME)/rpmbuild
- c. Create the directories $HOME/rpmbuild/BUILD and $HOME/rpmbuild/RPMS/noarch
- Build the binary rpm:
- rpmbuild -bb msttcorefonts-2.0-1.spec
- This command downloads the fonts from a Sourcforge mirror, and repackages them so that they can be easily installed.
- Install the newly built rpm as the root user:
- rpm -ivh $HOME/rpmbuild/RPMS/noarch/msttcorefonts-2.0-1.noarch.rpm
- Take additional steps to finish the installation, as needed:
- You might need to reload the X font server. Normally this is done as a part of the installation process (by chkfontpath). However in some situations it seems like you need to reload or restart the font server manually. (On Mandrake 9.0, the last argument needs to be restart rather than reload.)
- /sbin/service xfs reload
- A bug in RedHat 8.0 makes the X server lose the connection to the font server if the font server is restarted instead of reloaded. producing assorted strange behaviors (changed fonts in newly opened applications, applications hanging). Logging out and logging in again solves the problems, or just use 'reload' instead of 'restart'.}}
- Verify that the installation succeeded:
- xlsfonts | grep ^-microsoft
- The list includes many microsoft and monotype font names.
- Restart all programs that need to be aware of the new fonts.
Learn more: An easy way to install Microsoft's True Type core fonts on Linux
5.5 Adding Multibyte Character Set Fonts for PDF Printing
Single-byte fonts print properly but, while multibyte display properly on screen, an additional configuration step is needed to make them available to the PDF rendering engine.
To install multibyte fonts:
- Identify the fonts you need.
For example, for any of the East Asian languages like Chinese, Korean, Hindi, or Japanese, you need the following font files:- batang.ttc
- simsun.ttc
- mangal.ttf
- mangalb.ttf
- Locate those files.
- If they are already part of your Linux installation, you should find them at /usr/share/fonts/msttcorefonts/
- If you do not see the files under /usr/share/fonts/msttcorefonts/,
- Download the files from web, and place them in /usr/share/fonts/msttcorefonts/ directory OR
- Copy the fonts file from /Windows/Fonts/ folder in your Windows 7 or Windows 8 installation to /usr/share/fonts/msttcorefonts/ directory in your Linux environment, as these files are OS-independent.
- Delete the pd4browser.properties file present under {INSTALL-DIR}/AgileApps/lib.
- Note: Take a backup of this file before this operation.
- Execute the commands to create that configuration file that the PDF rendering engine needs:
- <syntaxhighlight lang="text" enclose="div">
cd {install_dir}/AgileApps/lib java -jar pd4ml.jar -configure.fonts /usr/share/fonts/msttcorefonts/ </syntaxhighlight>
- This step creates the pd4fonts.properties file, which contains a list of fonts and pd4browser.properties file.
- Restart Tomcat.
The fonts are now available for use.
5.6 Additional Step for RedHat
Installations on RedHat version 7 and higher versions that plan to enable Java Code Governors must ensure that the 32-bit version of the gcc library is found on the Java path. If the 64-bit version is found with Java Code Governors enabled, a StaticProbeInstrumenterException, "Instrumentation Failed" occurs when attempting to compile a Java class in the platform.
To eliminate that problem:
- Login as a root
- Install the 32-bit instrumentation library:
- yum install libstdc++.i686 libstdc++.x86_64
- Verify that it is working:
- Go to ${TOMCAT_DIR}/profiles/IS_default/bin/instrumentation/os/linux/x86
- Execute the binary: ./probeinstrumenter
You should see usage instructions for the probeinstrumenter.
- Restart AgileApps instance
5.7 MySQL Replication and Tuning
5.7.1 MySQL Tuning Parameters
These section provides some typical MySQL configuration values that are appropriate for a production system. These values assume:
- 100Mb Primary Ethernet Card
- 32 GB Memory
- 2 Processors
- 2 Cores per Processor
- Switched Ethernet Port
- 64-bit Red Hat Enterprise Linux ES 4
-
Important:
- Before changing parameters, take the server and MySQL down.
Do not adjust parameters while MySQL is running. Doing so can potentially cause the database to be corrupted. - The settings shown here are an example. Consult the latest MySQL document for information on the best settings to use.
- Before changing parameters, take the server and MySQL down.
5.7.1.1 my.cnf / my.ini Options
interactive-timeout = 7200
wait-timeout = 7200
back_log = 200
max_connections = 350
max_connect_errors = 10
table_cache = 8192
max_allowed_packet = 48M
binlog_cache_size = 8M
max_heap_table_size = 120M
sort_buffer_size = 2M
join_buffer_size = 2M
thread_cache = 200
thread_concurrency = 24
query_cache_size = 500M
query_cache_limit = 1M
ft_min_word_len = 4
thread_stack = 256K
tmp_table_size = 120M
5.7.1.2 InnoDB-Specific Options
innodb_additional_mem_pool_size = 48M
innodb_buffer_pool_size = 23G
innodb_data_file_path = ibdata1:10M:autoextend
innodb_file_io_threads = 4
innodb_thread_concurrency = 24
innodb_flush_log_at_trx_commit = 1
innodb_log_buffer_size = 8M
odb_log_file_size = 256M
innodb_log_files_in_group = 3
innodb_max_dirty_pages_pct = 90
#innodb_flush_method=O_DSYNC
innodb_lock_wait_timeout = 300
5.7.2 Setting Up a MySQL Replication Server
It's a good idea to set up a replication server, for the sake of data safety. That server is also known as a slave server. (The primary database server is also known as the master server.)
A full description of the process is outside the scope of this manual, but here is some information to get you started:
- The Percona backup system makes it relatively painless, and it's fast.
http://www.percona.com/doc/percona-xtrabackup/2.1/howtos/setting_up_replication.html
- The Percona backup system makes it relatively painless, and it's fast.
- For additional information on replication, see:
MySQL version 5.5, see http://dev.mysql.com/doc/refman/5.5/en/replication.html.
MySQL version 5.7, see https://dev.mysql.com/doc/refman/5.7/en/replication.html.
- For additional information on replication, see:
6 Messaging Server Installation
About the Messaging Server Installing the Messaging Server Managing the Messaging Server
7 Platform Security
7.1 Managing SSL Certificates
7.1.1 Obtaining an SSL Certificate
The platform provides a default self-signed certificate which is used by the Application Server.
To obtain and install your own SSL Certificate, make a request to a Certificate Authority (CA). An SSL certificate authenticates a website to a web browser, part of a security protocol to manage secure data exchange.
The CA will accept your Certificate Signing Request and generate a certificate which identifies your website as a secured website.
To create a Certificate Signing Request (CSR)
- 1. Create a keystore and a private key:
cd {install-dir}/profiles/IS_default/configuration/tomcat/conf/RN

keytool -genkey -alias tomcat -keyalg RSA -keysize 2048 -keystore {keystore_filename}
- 2. Create a CSR from the keystore
keytool -certreq -keyalg RSA -alias tomcat -file certreq.csr
        -keystore {keystore_filename}
- 3. Submit the resulting file, certreq.csr, to the CA to obtain a certificate.
(When the certificate arrives, you are ready for the next step of steps.)
To Install the Certificate Obtained from the CA
Once you have obtained a certificate, you need to import it into the keystore.
But first, in addition to your certificate, the CA might provide a Chain/Root Certificate, which must also be imported. If you have received a chain certificate from the CA, then:
- 1. Copy the contents of the chain certificate into a file called chain
- 2. Import the chain certificate into your keystore:
keytool -import -alias root -keystore {keystore_filename}
        -trustcacerts -file chain
When the chain certificate (if any) has been imported, you are ready for the final step:
- 3. Import the certificate received from the CA:
keytool -import -alias tomcat -keystore {keystore_filename}
        -trustcacerts -file {certificate_filename}
-
Note: If you have SSL certificate and private key, follow the below steps:
- 1. Convert the private key and certificate to PKCS#12 format using OpenSSL. Assuming you have the private key file in .key format (private.key) and the certificate file in .crt format (VMNX-AALIND22.crt), use the following command:
openssl pkcs12 -export -inkey <private.key> -in <certificate.crt> -out <keystore.p12> -name <alias>
The default alias is set to 1.
- 2. Replace <alias> with the desired alias for the key entry.
- 3. Import the PKCS#12 file into the Java keystore using the keytool command:
keytool -importkeystore -srckeystore <keystore.p12> -srcstoretype PKCS12 -destkeystore <keystore.jks> -destalias <alias>
- 4. Replace <alias> with the alias used in the previous step.
5. Enter the appropriate passwords when prompted, including the source keystore password for the PKCS#12 file and the destination keystore password for the Java keystore.
- 6. Once you have successfully completed these steps, the certificate and private key should be imported into the Java keystore with the specified alias.
7.1.2 To update a Customer SSL Certificate in AgileApps
- 1. Stop the Application server.
- 2. Update keystoreFile and keystorePass values in “com.softwareag.catalina.connector.https.pid-agileappsHttps-8284.properties” file available under
- {install-dir}/profiles/IS_default/configuration/com.softwareag.platform.config.propsloader folder.
-
Note: The keystorePass value provided by you in plain text is encrypted automatically when you restart the AgileApps application server.
- 3. After updating the properties, place the certificate in the {install-dir}/profiles/IS_default/configuration/tomcat/conf folder.
- 4. Restart the memcached server and start the AgileApps application server.
7.1.3 Learn More
- Certificate Signing Request (CSR) Generation Instructions-Tomcat, at
https://knowledge.verisign.com/support/ssl-certificates-support/index?page=content&id=AR227
7.2 Controlling Port Access
7.2.1 Firewall Ports
Platform Application Servers are typically deployed behind a Firewall. The firewall needs to open the ports those servers use.
The default ports are:
- Non SSL port 80
- SSL port 443
The SSL port always needs to be open. If the application is to be accessed only using https, the http port can be blocked. If the platform's Sites capability will be used to provide a public URL, then the http port needs to be open.
-
Note: For secure communication, you should always access the platform using SSL (https://yourdomain/networking/Service). The platform provides a default self-signed certificate which is used by the Application Server. This certificate can be replaced with your own certificate, purchased from a certificate-signing authority. For more instructions on that process, see Managing SSL Certificates.
7.2.2 Changing Port Assignments
To change port assignments:
- Edit the following files available in {install-dir}/profiles/IS_default/configuration/com.softwareag.platform.config.propsloader as follows:
- com.softwareag.catalina.connector.http.pid-agileappsHttp-8283.properties - In this file, set the port value to 80 and redirectPort value to 443.
- com.softwareag.catalina.connector.https.pid-agileappsHttps-8284.properties - In this file, set the port value to 443.
Note: If you change the http port (80), you will need to specify the port number in the URLs for the document servers recorded in the database. To see those values:
Mysql> SELECT document_server,import_document_server,public_document_server
       FROM relationals.NETWORK_GLOBAL_PROPERTIES;
Those URLs are read when an application server starts, and used as the forwarding-target for document-access requests.
7.3 Running the Platform as a Non-Root User
As a good security practice, it is recommended that the platform and the various software components that it required by the platform are run as a users other than root. This section explains about running the platform as a non-root user. For information on creating a non-root MySQL user in Unix Common Tomcat Platform installations, see Creating a non-root MySQL User to Run Agile Apps.
-
Important: The installer needs the same privileges as the root user, without actually being the root.
7.3.1 memcached
memcached accepts the command line argument –u {username}. With that argument, memcached assumes the identity of the specified user when running, after being launched by the root user. It is recommended that this username is set to nobody in the memcached startup command. For example:
- <syntaxhighlight lang="java" enclose="div">
/usr/local/bin/memcached -m 250 -p 11211 -d -u nobody </syntaxhighlight>
Here, memcached is configured to run as a daemon using 250MB of cache, listening on port 11211, and running as the user nobody.
7.3.2 MySQL
A typical mysql installation has the mysql server running as the user mysql. You can verify that setting using the ps command:
- <syntaxhighlight lang="java" enclose="div">
ps auxwww | grep mysql </syntaxhighlight>
7.3.3 Apache httpd server
Set the User and Group directives in httpd.conf to values other than root.
For example:
- Create a group called apache and add the user apache to that group.
- Set the values for User and Group in httpd.conf to apache
7.3.4 Platform
The AgileApps Cloud platform is based on Apache Tomcat. It can be run as a standalone AppServer or deployed behind the Apache httpd server. When run as a standalone server, the platform listens to ports 80 and 443 for http requests. To be run as a non-root user, the platform must be deployed behind Apache, and must be listening on ports > 1023 (since only the root user can bind to low-numbered ports).
When installing the AgileApps Cloud platform:
- 1. Login as the user tomcat instead of user root.
- That way, the ownership and permissions for the installation folders are set up properly.
After configuring the platform and Apache to work together:
- 2. Create the group tomcat and add the user tomcat to it:
- <syntaxhighlight lang="java" enclose="div">
/usr/sbin/groupadd tomcat /usr/sbin/useradd -g tomcat -d /home/tomcat tomcat </syntaxhighlight>
- 3. Change the password for the user tomcat:
- <syntaxhighlight lang="java" enclose="div">
passwd tomcat </syntaxhighlight>
- 4. Change the ownership in the folder where the platform is installed to the user tomcat.
- For example, if the installation folder is /opt/softwareag/agileapps:
- <syntaxhighlight lang="java" enclose="div">
chown -R tomcat:tomcat /opt/softwareag/agileapps </syntaxhighlight>
- 5. Restrict permission on the configuration folder to the user tomcat:
- <syntaxhighlight lang="java" enclose="div">
chmod -R 700 {agileapps}/tomcat/conf </syntaxhighlight>
- 6. Ensure that the user tomcat has sufficient permissions on the Temp Directory
- If the Temp directory configured in the Service Provider Settings is /tmp (the default), ensure that everyone has read and write permissions on that folder:
chmod –R 777 /tmp </syntaxhighlight>
- <syntaxhighlight lang="java" enclose="div">
- If upgrading an installation in which the Temp Directory configured in the Service Provider Settings is not /tmp, and is used exclusively by the platform, change the ownership of the folder to the user tomcat. For example, if the location is /var/platform_tmp:
chown -R tomcat:tomcat /var/platform_temp </syntaxhighlight>
- <syntaxhighlight lang="java" enclose="div">
- 7.Make it possible for the non-root user to run the startup command
- to become user tomcat before starting the platform.
- To do that, change this line:
- <syntaxhighlight lang="java" enclose="div">
{install-dir}/profiles/IS_default/bin/startup.sh </syntaxhighlight>
- to
- <syntaxhighlight lang="java" enclose="div">
sudo {install-dir}/profiles/IS_default/bin/startup.sh </syntaxhighlight>
8 Performance Optimizations
8.1 Configuring MySQL to Run on a Separate Server
This procedure sets up database connection pooling between the two servers.
- Enable permissions on MySQL, so web servers can access the database server:
GRANT ALL ON *.* to 'root'@'web_server_IP_Address' IDENTIFIED BY 'password'
- Direct the database server to the application server:
- Edit {install-dir}/profiles/IS_default/configuration/tomcat/conf/server.xml
- Replace url="jdbc:mysql://{yourDomain}/relationals" with
url="jdbc:mysql://IP_address_of_database_server/relationals" - Save the file
- If the Application server is currently running, then Restart the Application Server.
Learn More: http://dev.mysql.com/doc/refman/5.5/en/replication-solutions-backups.html
8.2 Installing and Configuring Apache for Use with the Platform
Apache can be installed in front of the tomcat server to serve static content like gif and jpeg images, Javascript files and stylesheets more efficiently, leaving the Application Server free to process incoming requests. This section tells you how to configure Apache to serve the platform's static content.
8.2.1 Overview
With this arrangement, Apache will be in front of Tomcat. Any request that comes to the platform first goes to Apache. Apache determines if the request is a valid request and, if so, will forward the request to Tomcat for processing.
Since Apache will be in front of Tomcat, it needs to be configured to listen on port 80 and port 443 for http and https traffic respectively. Apache also needs to be configured to forward traffic coming on those ports to the port on which Tomcat is listening.
8.2.2 Requirements
The following Apache modules must be enabled when installing Apache. They can be compiled as a static binary into apache or loaded as dynamic modules.
- mod_proxy
- mod_proxy_connect
- mod_proxy_http
- mod_ssl
- mod_expires
- mod_headers
8.2.3 Configuration Process
In outline, the process looks like this:
- Configure Apache Virtual host.
- Start Apache, Tomcat and memcached.
-
Important: Ensure that all database servers and web servers are configured to be in the same timezone, regardless of where they are geographically located.
8.2.4 Configure Apache Virtual Hosts
- 1. Add two virtual host entries
- - One in httpd.conf for Apache to listen on port 80 for HTTP traffic.
- - One in httpd-ssl.conf for Apache to listen on port 443 for HTTPS traffic.
- Any traffic meant for the platform coming on these ports is forwarded to Tomcat. This request forwarding is achieved using the mod_proxy module.
- The httpd.conf and httpd-ssl.conf configuration files can be found in the $APACHE_HOME directory. For each virtual host entry, make sure the following are set appropriately:
ServerAdmin root@localhost
DocumentRoot "/usr/local/apache/htdocs/"
ServerName example.com
ServerAlias www.example.com
- 2. Configure certificates for SSL virtual host on port 443
- Make sure the following points to your certificate and private key.
- httpd-ssl.conf:
SSLCertificateFile "{install_dir}/tomcat/conf/RN/<yourdomain>.cer"
SSLCertificateKeyFile "{install_dir}/tomcat/conf/RN/<yourdomain>_private_key"
- 3. Enable secure communications
- Set up a secure communications channel between Apache and Tomcat. The URLs for the Proxy are then https://, rather than http://, and all traffic is encrypted.
SSLProxyEngine on
ProxyPreserveHost On
- 4. Configure Proxy Paths in Apache
- Proxy paths need to be configured to enable mod_proxy to recognize the request and forward it to Tomcat appropriately as shown in the following examples:
ProxyPass /networking/* https://tomcat-host-name:8284/networking/*
ProxyPassReverse /networking/* https://tomcat-host-name:8284/networking/*
ProxyPass /networking/* http://tomcat-host-name:8283/networking/*
ProxyPassReverse /networking/* http://tomcat-host-name:8283/networking/*
For ace-lib components, make the updates as per the following examples:
ProxyPass /ace-lib/* https://tomcat-host-name:8284/ace-lib/*
ProxyPassReverse /ace-lib/* https://tomcat-host-name:8284/ace-lib/*
ProxyPass /ace-lib/* http://tomcat-host-name:8283/ace-lib/*
ProxyPassReverse /ace-lib/* http://tomcat-host-name:8283/ace-lib/*
- Note: These instructions assume that Tomcat and Apache are running on the same server. If they are running on different servers, change the settings appropriately.
- 5.Configure virtual hosts
- For each virtual host in httpd.conf and httpd-ssl.conf for ports 80 and 443, copy the settings from {install_dir}/httpd-proxy.conf, changing the standard port assignment of 8283 and 8284, if needed.
For more information on changing ports, see Controlling Port Access.
In case, you are trying to access AgileApps server without an Apache server and if you use any port number other than 80 and 443, you have to access the AgileApps URLs along with the port numbers. For example: https://{hostname}:8284/networking/servicedesk/index.jsp </noinclude>
8.3 Adding Additional Application Servers
Adding additional instances of the platform can help to load balance traffic and improve performance.
8.3.1 Considerations
- Paths: It's a good practice to use the same paths for platform installation folders and files on each server.
- Distribution of backend services: Running backend services on different servers can help to balance the load. For example, the Report, Bounce, and Import services can run on one server, while and the rest of the services run elsewhere.
- Learn More: Enabling and Disabling Backend Services
- Single-instance services: Each backend service should run on only one server. It is therefore important to ensure that no service is enabled on more than one server.
- An additional install behaves like an upgrade: When the installation process finds that the database already exists, it does an "upgrade", rather than a "fresh install". That consideration has several implications:
- The version of the platform installed on the new server must match the version installed on the existing servers. Otherwise, the database will be automatically upgraded, and the existing instances will find that they can no longer access the database.
- It is necessary to Configure Backend Services after the install.
(If the service is already running on an another server, you should Disable the Backend Service first.)
- Quartz is enabled on every install: The Scheduler service is required for platform operations, so it is enabled on every install, whether it is a fresh install or an upgrade. In consequence, you should Disable the Service on the existing server, before doing the new install.
8.3.2 Overview of the Process
- Disable conflicting services on the original server(s). (In particular, Quartz which will always be in "conflict".)
- Install the new server.
- Manually configure backend services it will be hosting.
- Manual configure changes to the original server(s), as needed, and restart them.
8.3.3 To Install an Additional Instance
- Disable all services on the original server(s).
- Install the platform on the additional servers.
- Verify database connections:
- Make sure the database server can be accessed from the new server.
- Verify the login credentials to the database server from the new instance.
- Configure Backend Services that will be running on the new server.
- Make the corresponding adjustments to the backend-services configuration on the original instances.
- Start/restart all servers.
8.4 Adding Additional memcached Servers
Adding an additional memcached servers helps to distribute the cache and balance the load across the memcached servers.
- To add an additional memcached server
- Edit networking.properties on all instances.
- Update the MemCachedServers entry
- Restart all servers, following the Server Restart Sequence
Note: The sequence is important!
- Example
There is one memcached server running on serverA (192.168.0.1) on port 11211. On each instance, the networking.properties has this:
MemCachedServers=192.168.0.1:11211
A second memcached server is brought up on serverB (192.168.0.2) on port 11211. The networking.properties file is edited on all instances so it looks like this:
MemCachedServers=192.168.0.1:11211 192.168.0.2:11211
After following the Server Restart Sequence, all instances are using the new, distributed cache.
If a 3rd memcached server is added (192.168.0.3), the networking.properties file will look like this:
MemCachedServers=192.168.0.1:11211 192.168.0.2:11211 192.168.0.3:11211
Again, the Server Restart Sequence is followed to enable the new configuration.
9 Application Server Operations
9.1 Server Restart Sequence
When an installation employs memcached or the Messaging Server, it is important to follow this sequence when restarting servers:
- <syntaxhighlight lang="bash" enclose="div">
- STOP THE MESSAGING SERVER, if one is running:
/etc/init.d/messaging stop {hornetq-folder}/bin/stop.sh
- STOP ALL APPLICATION SERVERS
- On each server:
{install-dir}/profiles/IS_default/bin/shutdown.sh
- STOP ALL memcached SERVERS
- On each server:
/bin/memcached -d stop
- START ALL memcached SERVERS
- On each server:
/bin/memcached -d start -p {port} -u {user} -m {MB_of_memory}
  # Typical values:
  #    Port: 11211,  User: root,  MB of memory: 25
- START ALL APPLICATION SERVERS
- On each server:
{install-dir}/profiles/IS_default/bin/startup.sh
- START THE MESSAGING SERVER, if you're running one:
{hornetq-folder}/bin/start.sh /etc/init.d/messaging start </syntaxhighlight>
- Considerations
-
- Stopping application servers ensures that they aren't adding entries to the cache.
- Stopping memcached makes sure that the cache is flushed.
- Those two steps can occur in either order. It is the next two for which order is critical:
- Restarting memcached first makes sure that a clean copy of the cache is available.
- When the application servers come up, they use the clean cache.
9.2 Start the Application Server
- Login as root
- {install-dir}/profiles/IS_default/bin/startup.sh
9.3 Restart the Application Server
- Login as root
- {install-dir}/profiles/IS_default/bin/restart.sh
9.4 Stop the Application Server
To stop the application server, you kill the Apache Tomcat container it's running in.
- Login in as root
- {install-dir}/profiles/IS_default/bin/shutdown.sh
9.5 Accessing the Application Server
After the application server has been started:
- 1. Access the Service Provider URL: http://{yourDomain}/networking/Service?t=1&targetpage=ViewPort.jsp:
- Where:
- {yourDomain} is the platform domain. For example: yourcompany.com
- Default username and password: Use the credentials you typed into the Software AG installer.
-
Note: These credentials are only applicable to the on-premise fresh installations of AgileApps and not for AgileApps cloud.
- The platform will request that you change your password after you login the first time.
- 2. Setup the Service Configuration with these required parameters:
- Configure the Service Settings and specify Service and Domain names:
Parameter Description Typical Value Service Name Name of the service provider Financiocorp Services Prefix for Service Domain Optional subdomain name Allowed characters: a-z, A-Z, 0-9, - (alphanumeric, plus hyphen)
Example: service
Service Domain The Domain Name part of the URL mydomain.com Domain URL Read Only
Automatically populated as:- Prefix + Service Domain
service.mydomain.com
9.6 Creating a Tenant
- After Login, create a new tenant from a web browser using the URL as follows:
- https://yourdomain.com/networking/Service?t=2308
- Where yourdomain.com is the name of your domain
10 Database Administration
10.1 Recognizing the Platform Databases
The platform installation contains the following databases:
- relationals - Holds information about all tenants and a global authentication table for all users.
- db1000 – A database-template used to create new tenants.
- db892085391 – The "administration tenant" used to administer other tenants. Admins for the platform log in here.
- db##### - Databases for other tenants, where the number in the name is the tenant's ID. (In the platform GUI, use the Accounts tab to find a tenant's ID number.)
10.2 Database Administration Tips
- Ensure that all database servers and web servers are configured to be in the same timezone, regardless of where they are geographically located.
- You should have different user accounts with different access permissions. These are typical:
- A root user with all permissions, accessed from a specific host only.
- For access from other web servers, one root user for each host.
- An admin user with limited privileges to do a DB dump, monitor the DB server, and/or monitor the replication server.
- A read only user who cannot modify the database for reports, backups, and exports.
- A replication user that is used only by the replication process.
- Always do DB dumps, reporting, and exports from the replication server, as those activities introduce locks that interfere with users.
- Analyze queries from the replication server. Do not login as root.
- Do not login as root on the production server unless executing a DML or DDL.
- Always use transactions when executing a DML (begin- and end-rollback).
10.3 Database Backup and Recovery
MySQL can be backed up using the mysqldump command - http://dev.mysql.com/doc/refman/5.5/en/mysqldump.html

Tip: The replicated database server should be used for backups.
To set up for it, see Configuring MySQL to Run on a Separate Server
10.3.1 Standard Database Backup
- Dump the database
mysqldump –uroot –pxxx –all-databases –quick –routines –result-file=dumpfile.sql
- Dump the database at regular intervals, using a Linux cron job
-
- Put the mysqldump command in a shell script - say, xyz.sh
- Setup cron job e.g. every day at 6 pm
0 18 * * * /yourscriptlocation/xyz.sh > /somedirectory/xyz.out 2>&1
- Use tar to compress the resulting dump file, to save space.
- Maintain daily backups for ten days or so, to reclaim the space they use.
- Maintain monthly backup. Save the dump of last day of the month, for example, and retain the dump file for a year or so.
- Store long-term backups offsite.
10.3.2 Standard Database Restore
- Restoring all data from a dump file
- Drop all the databases.
- Restart mysqld
- Start the restore process and run in background:
mysql –uroot –pxxxx < dumpfile.sql > dumpfile.out 2>&1 &
- Restoring a single database or table from a dump file
- Drop the old database/table:
mysql –uroot –pxxxx $database < dumpfile.sql > dumpfile.out 2>&1 &
10.3.3 Learn More
For more detailed information on database backup and recovery in MySQL, see:
11 Platform Administration
11.1 User Registration
The most common method to register for the AgileApps Cloud platform is via the Free Trial link provided in a web page provided by the Service Provider. This is called Self-Registration.
Optionally, Service Providers can create an account (Tenant), and register new users manually.
11.1.1 Self-Registration
Self-Registration consists of the following steps:
11.1.1.1 Create a New Account
- 1.To create a new account, enter the following details:
- First Name - Enter your first name.
- Last Name - Enter your last name.
- Title - Enter your job title or designation.
- Company - Enter your company information.
- State or Province - Enter the state or province information.
- Country - Enter the Country name.
- Phone - Enter your telephone number.
- Email - Enter your email address.
- Sub-Domain for Service Portal - Enter a name for the sub-domain. Ensure that the sub-domain name does not exceed 63 characters in length.
- Password - Enter a password.
- Re-Type Password - Confirm your password details.
- Promo Code - Enter the details of any promotional code that you may have.
- I agree to the Terms of Service - Select the checkbox to agree to the terms of service.
- 2. Click [Create My Account]
- The AgileApps Cloud platform validates the email address and creates a Tenant account.
- By default, you are given the Default Role of System Administrator, and you are designated as the account owner.
11.1.1.2 Sign In
The final step in the registration process is to Login with the specified User ID and Password.
- Learn more: First-Time Login
To Login: Open a web browser and use the link provided by your System Administrator and click the Log In button. Use your user name and password to gain access to the platform.

If you do not have an account, contact your System Administrator.
If you forgot your password, click the Forgot my password link. Complete these steps to get a temporary password.
11.1.2 Customer Support Login
A Service Provider's Customer support often needs to login to a tenant, so they can help with its configuration. The Customer Support Login lets them login as the admin user in the specified tenancy, to do that.

Users that have the Customer Support Login Permission permission can Login by Proxy to a Tenant
To Login by Proxy to a Tenant:
- Open the Tenants object
- Navigate to the Tenant of interest
- In the Quick Links section, click the Customer Support Login link to login as this user
- This Login by Proxy is tracked in the Audit Log, and is visible to the user
- When the investigation is complete, click the Switch Back link to exit the Proxy Login and revert to your last login state
After a successful Login, the AgileApps Cloud platform is available for use.
11.1.3 For Developers
Developers can use resources in the REST API for additional administration functionality.
11.2 User Support
To support other users, it is often necessary to log in as that user, to see the problem they are experiencing, identify the cause of the problem, and find a solution. But you need to do it without requiring the user's password, so it stays secure. The platform provides the ability to support users in just that way.
11.2.1 Customer Support Login for Admins
These support options are used by a sys admin, to support end users:
- Proxy Login as this User- To login as a different user
- Site Proxy Login - To login in as a Site user
11.2.1.1 Proxy Login as this User
As an administrator responsible for a number of Users, it is often convenient to diagnose user issues by logging in via proxy. With this login, you gain full access to all actions available to the user. (Each action performed during a Proxy Login is audited and logged.)
-
Users that have the Proxy Login Access permission can Login as another user to troubleshoot problems that may arise in a user's account
When a Proxy Login is initiated, a dialog box opens to remind the user that a record of these actions will be created. The user can opt to continue or cancel the action.
- To execute a proxy login
- Click
 > Administration > Access Management > Users
 - Select a user
If your role has the capability to do a proxy login, the [Proxy Login] button is visible. - Click the [Proxy Login] button.
A confirmation dialog appears. - Click [OK]
- If this is a first-time login, you may need to answer a Security Question
- The name of the user will appear on the screen, in place of your username
- Perform any necessary troubleshooting activities
-
Note: You can only login-by-proxy as a member of your team or one of its subteams, as specified by the Permissions Hierarchy restrictions.
- To close a proxy login session
- Click the down arrow next to your name at the top of the window.
- A drop down appears with additional options.
- Learn more: Using the Agent Portal#User Options
- Click the Switch Back link that appears above the Logout option.
- Confirm that your login name appears on the screen, which indicates that you have successfully closed the Proxy Login session.
11.2.1.2 Site Proxy Login
If you have a Site, you may need to login as an active user of that site to troubleshoot problems they may be experiencing.
-
Users that have the Proxy Login Access permission can Login as a Site user.
To log in to a Site by proxy:
- Go to > Administration > Access Management > Users
- Select an active user.
If Sites exist and your role has the capability to do a proxy login, the [Site Proxy Login] button is visible. - Click [Site Proxy Login].
A popup window opens. - Select a site
- Click [Submit].
A new browser window is launched, showing the Site home page as the selected user.
- Considerations
-
- Only one browser session can be active at a time, so the session in your original browser window is now devoted to the new user.
If you refresh that window, you will see the new user's login page.
- If the new user is both a platform user and a site user, you see their platform page.
- If the new user is a Site user only, you see the Site login screen.
- To return to your original login, log out of the platform and then log back in.
- Only one browser session can be active at a time, so the session in your original browser window is now devoted to the new user.
11.2.2 Customer Support Login for Installers
Platform installers can also login as the admin user in a customer tenancy. A Service Provider's Customer support often needs to login to a tenant, so they can help with its configuration. The Customer Support Login lets them login as the admin user in the specified tenancy, to do that.
-
Users that have the Customer Support Login Permission permission can Login by Proxy to a Tenant
To Login by Proxy to a Tenant:
- Open the Tenants object
- Navigate to the Tenant of interest
- In the Quick Links section, click the Customer Support Login link to login as this user
- This Login by Proxy is tracked in the Audit Log, and is visible to the user
- When the investigation is complete, click the Switch Back link to exit the Proxy Login and revert to your last login state
11.3 Global Import Queue
![]() > Administration > Monitoring > Global Import Queue (ISVs only)
> Administration > Monitoring > Global Import Queue (ISVs only)
The Global Import Queue option is available to ISVs. It shows Import Queue data for all Tenants.
12 Housekeeping
12.1 Regular Maintenance Ensures Top Performance
Regular housekeeping helps to keep the platform running at peak efficiency.
You'll know that housekeeping is necessary when your Platform Monitoring reveals a decreased level of performance, despite your Performance Optimizations and Platform Tuning.
But regular, planned maintenance can prevent such slowdowns from occurring in the first place.
As part of that process, you will be:
12.2 Purging and Archiving Data on the Platform
To keep storage requirements to a minimum, perform these actions at regular intervals, using the platform GUI:
- Audit logs are purged after a retention period which can be configured.
- Debug logs used for development are retained for a day.
- When a record is deleted, it is moved to the Recycle Bin where it is purged after 30 days.
- The platform provides a data export mechanism which can be used for data archiving.
- Data can also be read using the REST API and saved elsewhere.
12.3 Cleaning Up Temporary Files on the Server
Every few months, it's a good idea to remove old temporary files, to keep them from accumulating on the server. To do that:
- Delete old CSV files in the documents folder.
For example, delete *.csv files that are more than 5 days old. - Delete old files in the temp folder.
For example, delete files more than 5 days old.- To find the location of the temp folder:
- From the Service Provider URL: http://{yourDomain}/networking/Service?t=1&targetpage=ViewPort.jsp
- Go to Settings > Service Provider Settings > Service Configuration.
- To find the location of the temp folder:
- Delete old tomcat logs.
For example, delete files more than 10 days old in {install-dir}/profiles/IS_default/logs - Delete old apache logs.
For example, delete files older than 10 days in {apache-install-dir}/apache/logs
13 Platform Monitoring
13.1 Heartbeat Check
The Heartbeat Check checks to make sure that the platform is still running. It's accomplished by visiting a URL which gets processed by Tomcat. (This lightweight URL gets an gets an immediate response from Tomcat, if it is running.)
-
Note: If Tomcat runs out of memory is not responding for some other reason, you won't be able to tell by monitoring the port or the process. The Heartbeat Check is the only way to know.
If you happen to be logged in, you can visit https://{yourDomain}/networking/rest in your browser. If Tomcat is running, you get a list of REST APIs supported by the platform.
To run the same test without logging in, use a REST client to visit the URL and specify the HEAD method (rather than GET, PUT, or POST). If Tomcat is running, you get an http return code of 200.
13.2 Monitoring Servers
Any server in the system can become a bottleneck, at some point, so it's a good idea to continually monitor the health of the critical processes that run on them. This section lists the components to monitor on each server.
13.2.1 Monitoring Application Servers
- tomcat availability and CPU utilization. Check threads, connection pool size, sticky sessions, KeepAliveRequests, etc.
- GC – Allocation and de-allocation of memory on the JVM. (Monitoring and Tuning Garbage Collection)
- OS (Linux) CPU utilization, IO activity, swap ratio, context switches, etc. (Monitoring OS Statistics)
13.2.2 Monitoring Web Servers
- apache-httpd availability
- OS (Linux) CPU utilization, IO activity, swap ratio, context switches, etc. (Monitoring OS Statistics)
13.2.3 Monitoring Database Servers
- mysql availability. Check caches, buffers, connections, timeouts. (Monitoring and Tuning MySQL)
- OS (Linux) CPU utilization, IO activity, swap ratio, context switches, etc. (Monitoring OS Statistics)
- Note: If replication is employed, scripts can be written to check the health of the replication and report replication lag times.
13.2.4 Monitoring memcached Servers
- memcached availability
- OS (Linux) CPU utilization, IO activity, swap ratio, context switches, etc. (Monitoring OS Statistics)
13.2.5 Monitoring the Network
- Dropped packets
- Socket wear and tear
13.3 Monitoring Processes
These pages tell you how to monitor the critical processes on each server:
13.3.1 Monitoring and Tuning Garbage Collection
To monitor the frequency of Garbage Collection inside the JVM:
$java_home/bin/jstat  -gcutil pid <intervalmillis>
[root@web1]# /usr/local/java/bin/jstat -gcutil 12929 5000
     S0    S1      E      O      P      YGC   YGCT   FGC   FGCT    GCT
    0.00  42.66  37.32  12.82  26.96   4845  145.414  26  1.745  147.159
    0.00  42.66  37.78  12.82  26.96   4845  145.414  26  1.745  147.159
    0.00  42.66  57.70  12.82  26.96   4845  145.414  26  1.745  147.159
Tuning parameters are set in catalina.sh under CATALINA_OPTS
Learn More: http://java.sun.com/javase/technologies/hotspot/gc/gc_tuning_6.html
13.3.2 Monitoring and Tuning MySQL
- Running on a 64-bit machine, there should be plenty of memory.
- 20G of memory or more should be allocated to MySQL (highly recommended).
- Allocate a good amount of memory to innodb_buffer_pool_size - the combined cached for data and the index.
- TimeOuts
- interactive_timeout, wait_timeout,innodb_lock_wait_timeout.
- Number of file descriptors (number of files that MySQL can have open)
- Open_files_limit.
- Also: Check that you have a sufficient number of file descriptors available in the OS.
- To monitor the number of active threads, live threads, and open threads:
- show processlist or show full processlist
- After modifying tuning parameters in my.cnf, always restart mysql.
Learn More: http://dev.mysql.com/doc/refman/5.5/en/server-parameters.html
13.3.3 Monitoring OS Statistics
Before tuning any stack, whether for a web server or a database server, you should know how heavily system resources are being used. To get the information, use the following commands:
- top
top - 15:50:31 up 309 days, 21:10,  1 user,  load average: 0.06, 0.16, 0.15
Tasks: 134 total,   1 running, 133 sleeping,   0 stopped,   0 zombie
  PID  USER   PR  NI  VIRT  RES  SHR S %CPU %MEM   TIME+   COMMAND
12929  root   18   0 3680m 1.2g  12m S 17.6 32.3  76:19.02 java
- mpstat
03:51:30 PM  CPU   %user   %nice %system %iowait   %irq   %soft   %idle   intr/s
03:51:30 PM  all    1.79    0.00    0.29    0.43   0.01    0.06   97.42   425.80
03:51:30 PM    0    3.22    0.00    0.43    0.47   0.02    0.21   95.65   151.15
03:51:30 PM    1    1.08    0.00    0.21    0.68   0.00    0.01   98.02   103.64
03:51:30 PM    2    1.65    0.00    0.28    0.38   0.00    0.02   97.68    96.45
03:51:30 PM    3    1.24    0.00    0.23    0.19   0.00    0.01   98.33    74.56
- vmstat
procs  -----------memory----------- --swap-- -----io---- --system-- ----cpu----
 r  b   swpd   free   buff  cache    si   so   bi    bo    in   cs  us sy id wa
 0  0  22264 1110200 168460 1120660   0    0    1    39     0    0   2  0 97  0
- free –m
             total    used    free   shared  buffers  cached
Mem:          3945    2862    1083        0      164    1094
-/+ buffers/cache:    1603    2342
Swap:         1027      21    1005
Learn More:'
13.4 Monitoring Ports
Experience has shown that monitoring the processes and doing a health check tends to be a lot more useful than monitoring ports. But if you need to, here are the ports to monitor:
- Apache-httpd - tcp/80 and tcp/443
- memcached - tcp/11211
- MySQL - tcp/3306
- Tomcat - The ports Tomcat is listening on are listed in the following files available under {install-dir}/profiles/IS_default/configuration/com.softwareag.platform.config.propsloader folder:
- com.softwareag.catalina.connector.http.pid-agileappsHttp-8283.properties
- com.softwareag.catalina.connector.https.pid-agileappsHttps-8284.properties
13.5 Monitoring Memcached
Performance statistics can be retrieved using memcached commands.
Learn More: http://code.google.com/p/memcached/wiki/NewCommands#Statistics
13.6 Monitoring Cluster--Enabled Quartz Instances
This process sets up an automatic check that sends an email alert when Quartz is down.
- Verify that these lines are in the AALSchedulers.xml file. (They are present in new installations, but are not automatically added during upgrades.)
- <syntaxhighlight lang="perl" enclose="div">
<attribute name="org.quartz.scheduler.instanceId" = value="AUTO"/> # Automatically assigns instance IDs to prevent conflicts ... <attribute name="org.quartz.jobStore.misfireThreshold" = value="60000"/> # Prevent infinite loop if a job can't start, but keeps retrying ... <attribute name="org.quartz.jobStore.isClustered" = value="true"/> # Turn on clustering <attribute name="org.quartz.jobStore.clusterCheckinInterval" = value="20000"/> </syntaxhighlight>
- Download the monitor_quartz.pl (Perl) script from the platform downloads area.
- Set these variable values for your installation:
- $mysql_username - Database user name.
- $mysql_password - Database password.
- $mysql_host - Name of server the database is running on.
- $config_file - Absolute path to tomcat/webapps/networking/WEB-INF/web.xml
- $recipients - Comma-separated list of email addresses who will receive email status messages
- Run the script in the background.
You'll get an email alert whenever the script discovers that Quartz isn't running.
- How it Works
- The lines in the properties file cause quartz to put an entry into the relationals.QRTZ_SCHEDULER_STATE table in the database. The script checks the timestamp to verify that the last stamp was within 5 minutes. (Quartz should be running once a minute. If it hasn't run in five minutes, it is considered to be down.)
13.7 Monitoring MySQL Replication
13.7.1 Run the Monitoring Scripts
Use these scripts to track the health of the MySQL replication process:
-
- This script monitors the health of the replication process. It sends an email containing the quartz status (if quartz is configured), the last 20 lines from mysqld.log, and the status of the slave server.
- Run it periodically on the slave server, and check the reported values. (See below for information on what to look for.)
-
- Sends you an email if anything new has been placed into mysqld.log (error messages, warnings, or notices).
- Run it every 15 minutes on both master and slave servers.
-
- Sends a message if the Slave SQL thread is not working.
- Run it every 15 minutes on the slave server.
To use the scripts, substitute your values for the following strings:
- <username> - Database username.
- <password> - Database password.
- <path_to_mysql_log> - The path to the MySQL log. For example: /var/log/mysqld.log
- <support_email> - The email address that should receive the monitoring emails.
13.7.2 Cron Job Schedule
As root, use the crontab –e command to set up a regular monitoring schedule like this one:
 15  6,18 * * * $path_to_scripts/scripts/mail_replication_log.pl
*/15  *   * * * $path_to_scripts/scripts/monitor_mysql_log.pl
*/15  *   * * * $path_to_scripts/scripts/scripts/monitor_replication.pl
Those settings run the mail_replication script every day at 6:15 and 18:15. The other two scripts run every 15 minutes.
13.7.3 Reviewing the Messages
- monitor_replication sends a message only when the Slave SQL thread isn't running. At a minimum, you'll need to restart that process. Ideally, you'll find out what killed it and take preventative measures.
- monitor_mysql_log sends a message when the MySQL log has been updated. The last 20 lines of the log are included in the message. Scan it for errors, warnings, and notices.
- mail_replication_log provides a general indication of the health of the system. Things to look for:
- The Last_Errno and Last_Error values tell you the last error that occurred.
- The Seconds_Behind_Master value compares timestamps generated by the Quartz scheduler to give you the lag time between the master and server databases. That useful indicator is at the end of the message, where it's easy to find.
- Ideally, the value should be zero.
- If there is a large lag, then most likely replication is running, but the synchronization thread is not working properly. The solution is to run the STOP SLAVE and START SLAVE commands.
- Once running, it's a good idea to run the script manually a few times.
- You should see the lag time decreasing.
- If it isn't going down, it's a sign of deeper troubles that require investigation and resolution.
- (There might be network issues, for example, or database problems.)
13.7.4 Deciding when to Failover
The failover process turns the replication (slave) server into the new primary database (master) server.
- In general, this action should be taken only in an emergency situation.
For example:
- The master database is down and cannot be restored.
- The master can be restored from backups, but the restore process will take more than an hour.
Here are the decision criteria:
- How much time it will take to get the main database running again. (This is preferred option, when practical, as little data is lost. But the platform is non-operational until it happens, or until failover occurs.)
- How much data will be lost by switching to the replication server. (It will be a minute amount, if the replication process was healthy. But it is likely to be a non-zero amount.)
- How much time the failover process will take.
- How much data will be lost by restoring the main database from backups. (The data loss could be significantly higher, depending on when the last backup occurred. For that reason, the backups are best reserved for recovery from a catastrophe.)
13.7.5 Failing Over
Assumptions:
- Master and slave servers are configured properly.
- Both have a unique id in my.cnf
- The master server is not available, forcing a failover to the replication server.
Process:
- 1. Stop all application servers.
- 2. Disable replication on the slave server:
- Execute as root in mysql console: STOP SLAVE;
- Execute "RESET SLAVE;"
That command tells the slave server to forget it's position in binary log. - Add skip-slave-start to the my.cnf file.
That command prevents the replication thread from starting when MySQL is launched (as this server is now the master).
- 3. On each application server, edit $AGILEAPPSHOME/tomcat/conf/server.xml.
- Change the database IP address in the url parameter:
- <syntaxhighlight lang="xml" enclose="div">
<Resource name="jdbc/shareddbpool" auth="Container" type="javax.sql.DataSource"
 ...
 url="jdbc:mysql://$IP_ADDR_TO_CHANGE:3306/relationals?..."
/> </syntaxhighlight>
- 4. On each application server (if the slave server was configured to run reports),
- edit $AGILEAPPSHOME/tomcat/conf/server.xml.
- Change the url parameter:
- <syntaxhighlight lang="xml" enclose="div">
<Resource name="jdbc/REDUNDANTSRC1" auth="Container" type="javax.sql.DataSource"
 ...
 url="jdbc:mysql://$IP_ADDR_TO_CHANGE/relationals?..."
/> </syntaxhighlight>
- 5. On each application server (if quartz is configured), edit $AGILEAPPSHOME/tomcat/conf/RN/quartz.properties
- Change the database IP address in the url parameter:
- <syntaxhighlight lang="xml" enclose="div">
org.quartz.dataSource.myDS.URL = jdbc:mysql://$IP_ADDR_TO_CHANGE/relationals?... </syntaxhighlight>
- 6. On each application server, edit $AGILEAPPSHOME/tomcat/conf/RN/activiti.cfg.xml
- Change the database IP address:
- <syntaxhighlight lang="xml" enclose="div">
<bean id="dataSource" class="org.apache.commons.dbcp.BasicDataSource" >
 <property name="..." value=..." />
 <property name="url" value="jdbc:mysql://$IP_ADDR_TO_CHANGE/relationals?..." />
 ...
</bean> </syntaxhighlight>
- 7. Restart all memcache servers and start all application servers
- 8. Take a dump of the new master database.
- 9. Set up a new replication server.
- Learn more: Setting Up a MySQL Replication Server
14 Platform Tuning
14.1 Tuning Tomcat
The platform is a web application that runs in an Apache Tomcat container. The parameters listed in this section can be modified to optimize Tomcat's performance.
14.1.1 Connector Port Parameters
- Thread Allocation
- maxThreads, minSpareThreads, maxSpareThreads, maxkeepAliveRequests
- Timeouts
- connectionTimeOut, keepAliveTimeOut, connetionLinger
14.1.2 Connection Pooling Parameters
- initialSize, maxActive, maxIdle, maxWait, removeAbandoned, removeAbandonedTimeout
14.1.3 Learn More
14.2 Tuning Report Threads
The number of report threads can be configured in the networking.properties file:
- report_threads=2
- Assigns number of threads to be used by the report server.
Generally, two threads devoted to reporting is about right. If reports aren't arriving on time, consider incrementally expanding the number of threads to see if performance improves (while keeping an overall eye on system resources, to ensure that increasing the number of threads does't incur other bottlenecks.
For maximum reporting efficiency (if needed), setup a dedicated backend server for reporting. Learn More: Managing Backend Services
15 Troubleshooting
15.1 Adding MIME Types
When a Document or Static Resource is stored on the server, the appropriate MIME type must be specified when the file is sent to the user's browser, so the browser knows what to do with that file. Normally, that process happens automatically: The most common file extensions are already recognized by the platform, and the file extension determines which MIME type is specified.
When a file has an extension that the platform does not recognize, however, the file may be mishandled when it reaches the browser. That problem can be solved by adding a line to the server configuration file.
In {apache-install-dir}/conf/httpd.conf, add:
AddType MIME_TYPE FILE_EXTENSION
For example, to configure an HTML5 cache file with extension .appcache, add the following:
AddType text/cache-manifest .appcache
15.2 Watching Application Server Logs
The log files used by the platform are as follows:
- {install-dir}/profiles/IS_default/logs/relationals.log
- {install-dir}/profiles/IS_default/logs/sag-osgi.log
- {install-dir}/profiles/IS_default/logs/wrapper.log
- {install-dir}/profiles/IS_default/logs/platform.log
They contain informational messages as well as exceptions that help to troubleshoot specific problems. All messages are timestamped, with a prefix that indicates the module that recorded the message.)
- Examples
-
- A report scheduled to run at 2:00 is not created until much later. Examining the relationals.log for entries timestamped around that time can help to diagnose the problem. (The same applies to other scheduled events.)
- A java.lang.OutOfMemoryError exception in sag-osgi.log or wrapper.log indicates that tomcat has run out of memory.
Note: In general, the Heartbeat Check is the best way to monitor the availability of the application server.
15.3 Troubleshooting Quartz
If quartz stops processing jobs from the quartz queue, all scheduled jobs are listed in the NETWORK_SCHEDULE_POLICIES table. Ideally, there should be only 100 or so records/jobs scheduled in NETWORK_SCHEDULE_POLICIES.
Quartz lop entries can be viewed in relationals.log on the server where quartz is enabled. The log entries will look like this, where the worker threads are the ones that pick up and process jobs in the queue:
<timestamp> MasterScheduler ...
<timestamp> [PlatForm_Worker-1] ...
<timestamp> [PlatForm_Worker-2] ...
<timestamp> RelationalsSchedulerWorker-1 ...
<timestamp> RelationalsSchedulerWorker-2 ...
 ...
Here are some possible ways that quartz could get stuck:
- There are too many jobs/records in NETWORK_SCHEDULE_POLICIES
- Numbers in the 1,000's may cause quartz to become bogged down. You might want to determine what caused these many jobs to be inserted in the queue. If it is safe to delete them, they can be removed from the queue. Or they could be copied to a temporary table re-inserted later, at a time when there is no load on the server.
- Quartz might run into an error that causes the quartz thread to die.
- In that case, restarting the application server will bring the quartz thread back to life.
-
Tip: Set up a cron job that gets count of entries in the NETWORK_SCHEDULE_POLICIES. If the count hasn't changed after 20 mins or so, it usually means quartz is not picking up the jobs. (Alternatively use the REST APIs to create a task that monitors the status of that table.)
15.4 Imports Hang
In an On-Premise Installation, imports can hang if the import service is disabled. To enable imports:
- In networking.properties make sure that import_manager_instance=1 is present and uncommented.
Learn more: Networking.properties