Automating and Optimizing Your Activities
Customizing your application to automate activities adds more time to everyone's day. You can make it possible to do things quickly with the click of the mouse, and you can set up fully automated activities.
Create Fast Actions for Users
Once you set things up, you can accomplish a great deal with a single click.
Quick Text
Quick text is a convenience when composing a message for a Case, or adding a note to one. It allows a block of text to be added with a single click.

Note: Quick Text is available only in the ServiceDesk application.
Quick text is more than just fixed boilerplate, too. Here, one of the default bits of quick text that comes with the system ("Close Case") is customized with the support agent's name.

When a different Case Agent clicks that item, their name is inserted into the text. That feat is accomplished by adding template variables the text. When the quick text is inserted into a message, the variable is replaced with the appropriate case-related information.
To add your own quick text elements:
- Go to
 > Case Management > Quick Text Responses
 - Click [New Quick Text Response]
- Enter the Name that will appear in the list, and the text to be inserted.
- Uncheck the Enabled box, if you don't want the entry to be visible for the moment.
- Put the text to insert into the Response Text area.
- Use the template tool at the top of the page to get the name of a template variable that can be copied into the text area, as shown here for the case number:
- Finally, choose who can see the element--everyone, you alone, or selected teams.
- Click [Save]

Macros
About Macros
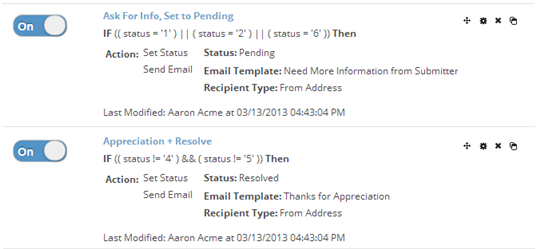
Macros appear in the list of actions that are available when working with a record. They can be set up to appear only when certain conditions are met, and they can perform one or more actions. Here, you see one of the default macros that comes with the system--one that marks a Case as Resolved and sends a note of appreciation for the report:

-
Note: Macros also appear on the record list view under Action in the AgileApps new user interface.

Using Macros for Testing
Macros can also be used for testing. For example, you can use a macro to:
- Send an email, to test a template
- Execute a rule set, to test conditions
- Start a process, to test an execution path
- Invoke a method, to test code
Working with Macros
- Go to > Case Automation > Macros
- A list of existing macros appears, showing the actions that are taken when each macro is selected.
- To enable or disable a macro, click the button that appears next to it:
- To create a macro, click [New Macro].
- To edit a macro, click either the macro name or the gear icon.
- You can also click items in the icon list to change the order of the macro in the list, delete it, or clone it.
(Hovering over the icons shows you which is which.) - When you're done, click [Save].
- The macro now appears in the Record Actions List when the specified conditions are satisfied.


Visibility Criteria
Visibility criteria determines when the macro can be seen and selected.
Unconditionally (Always)
- Use this option for actions that should occur whenever the Rule is invoked.
(This option is not present for Scheduled Rules.)When Specified Conditions are True
- Use this option to specify a series of conditions that determine whether the Rule's actions are carried out.
- All of the Conditions are met - Every condition in this category must be satisfied
- Any of the Conditions are met - At least one of the conditions in this category must be satisfied.
- For example, here are tests for a variety of conditions, to show the kinds of possibilities that exist:
- Learn more: Defining Conditions
When Specified Expression is True
- More complex conditions can be specified using the Formula Builder. For example, here is an expression that checks for either P1 or P2 priority on a new case:
- Expressions also allow the use of the platform's built-in Formula Functions. For example, this expression returns true only of a specific field has changed, and if had some specific value before it changed:
- AND( ISCHANGED('some_field'),
- IF(PRIORVALUE(some_field) == 'some_value', true, false) )
- Learn more:
- ISCHANGED function
- PRIORVALUE function


Actions
The two actions defined for this macro are to set the Case status, and to send an email:

When you choose the email option, you are prompted to select specify the template to use, and who to send it to. (In this example, the message is sent to the From Address -- the address of the person who reported the case.)
Set Up Automated Activities
Some small customizations can make a big difference.
Trigger Actions Automatically using an Event Rule
Specify Rules to execute when any of the following actions are taken, and specify the order in which they execute, if there is more than one. They are typically used for Cases object, but can be used for other objects, as well.
As a simple example, suppose that you want to send someone an email whenever a case comes in for a particular customer. It's possible to do that by setting up an Event Rule--an if-condition-then-action that is triggered whenever a particular event occurs in the lifecycle of a Case. (For example, when a case is created.
For example, the "if" condition could check for a particular customer account, while the action will be to send an email. (Rules can do quite a lot more. But here, we want to limit ourselves to something quick and easy.)
To create such a rule:
- Go to > Case Automation > Business Rules > Event Rules
or > Objects > {object} > Business Rules > Event Rules
- Select the Case Created event, and click [New Event Rule]

- The available choices include:
- Case (or Record) Created - A new record is created.
- Case (or Record) Updated -Record data is modified.
- Note:' Record-updated events do not occur when:
- A related record is modified (unless that change causes a Rollup Summary Field to be updated).
- An email is sent or a private note is added. (The change is to the History object, which does not trigger rules.)
- A file is uploaded. (The change is to an internal system object where attachments are stored, on which rules cannot be specified.)
- Note:' Record-updated events do not occur when:
- Case (or Record) Deleted - A record is deleted.
- Case Closed - Applies only to the Cases object.
- Case Reopened - Applies only to the Cases object.
- Process Start - The designated process has been initiated. For information about the actions performed when a rule condition is satisfied, see Rule Actions.
- Process Complete - The designated process has been finished.
- Case (or Record) Owner Changed - Someone new becomes responsible for the record.
- Pre-Import - A record is about to be imported into this object
- Post-Import - A record has just been imported into this object
- Batch Import - An import process is about to begin importing records into this object.
- In-Mail - Applies only to the Cases object. Occurs when an incoming message is added to a Case.
- This event provides additional fields related to the message, for use in Rules:
- Email To (__email_to_) - To address
- Email From (__email_from_) - From address
- Email Cc (__email_cc_) - Comma-separated list of "carbon copy" addresses
- Email Subject (__email_subject_) - Message subject
- Email Body (__email_body_) - Message body
- Email Reply To (__email_reply_to_) - Reply-to address
- Email Size (__email_size_) - Size of the message body
- The default for such rules is to run always. In this example, you want to run when specified conditions are met, so you make that selection and then click "Add Condition".
- When you click [Add Condition], a field chooser appears. In this case, you select the Account record associated with the case. From that record you select the Account Name, and click [Insert Field] to insert the field into the condition statement:
- The condition statement now appears in the Execution Criteria section of the Rule. You can now select the kind of comparison you want, and specify the value to compare to. (For example: XYZ Corp.)
- When you're done specifying conditions, you'll specify the actions to execute when the conditions are met. In this case, you'll choose to send an email, using the same process you used when defining a Macro.
- When done, click [Save]


Set up Automatic Reminders using Timer Rules
Timer rules let you set up a schedule of actions to be carried out at specific intervals before or after dates and times stored in a record. They help to prevent cases from falling through the cracks, by sending out emails, or even by reassigning a case. For more information about the behavior of timer rules, see Timer Rules Behavior.
Working with Timer Rules
-
Note: The structure of all Rules is pretty much the same--so if you have already seen how Event Rules work, you pretty much know all you need to know to work with Timer Rules.
To create or modify a Timer Rule:
- Go to > Case Automation > Business Rules > Timer Rules
or > Objects > {object} > Business Rules > Timer Rules - Select an existing event, or click [New Event]
- Fill in the Timer Rule Settings
- Click [Save]
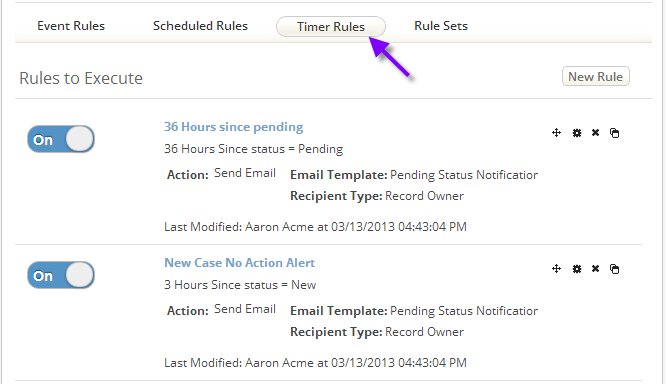
As an example, take a look at one of the Timer Rules that comes predefined with the system--in this case, the one that sends an email after a Case has been in the Pending state for 36 hours:
- Go to > Case Automation > Business Rules
- Click [Timer Rules].
- The list of timer rules is displayed.
- The process for working with Timer Rules is pretty much the same as that for Event Rules, with the exception that the Basic Information section lets you choose a time interval:
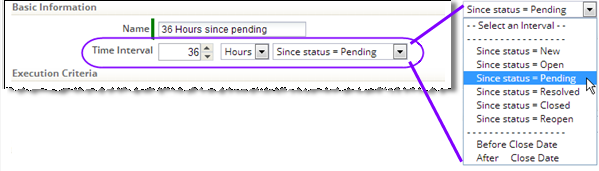
- In addition to specifying a time interval after a status change, you can also specify an interval in advance of any date that is stored as part of the case. For example, the due date for a case which is under a Service Level Agreement.
- (Here, the Close Date field is shown as one of the possible selections, simply because it is a date field in the case. That isn't a date you would generally select, but the system doesn't know that.)
- As always, when you're done, click [Save].


Timer Rule Settings
Basic Information
- Name - Give the timer event a name.
- Enabled - Designate the event as enabled or disabled. (Disable it to keep it from firing, without deleting it.
- Type -
- Case Timer Event - The elapsed time is relative to a Cases object record.
- Task Timer Event - The elapsed time is relative to a Tasks Object record (choose which).
- Calendar Event - The event occurs at a fixed (possibly repeating) date and time. (For example, every 3rd Friday of the month.)
- Execute - Execute the Rule Set(s) associated with the event:
- The specified number of Hours, Days, Business Days, Weeks, or Months
- Before or After
- The value of the specified date/time field associated with the Case or Activity:
- Case: Date Modified, Date Created, Completion Date, Target Date, or Deadline Date
- Activity: Date Started, Target Date, or Deadline Date
Rules
Specify one or more Rules to execute when the specified time has elapsed. Then rearrange their order of execution (top to bottom), add more, or remove entries from the list, as needed.