Cases
About Cases
Cases are the fundamental unit of a Case Management system. Everything revolves around a case, from the tasks that people carry out to bring it to completion, the communications they carry on to do so, the automated procedures and reminders that help to keep progress on track, to the analytic reports and dashboards that tell your organization how you're doing.

Note: From a design perspective, all of that functionality is built around the Cases object, plus a wide-ranging cast of supporting Objects.
Case States and Transitions
This article introduces you to the states a Case travels through, from the moment it arrives until the moment it is closed.
Case Status Values
The default values defined for the Case Status field are New, Open, Pending, Resolved, Reopened, and Closed. Each value defines a state that the case is in.
-
Note:
It is entirely possible to modify the list of case status values. It is then possible to define Rules that automatically transition between them, and set up procedures for Case Agents to follow for manual transitions. In most cases however, the default states will be sufficient.
State Transitions
The diagram below shows how a Case flows through the possible states, along with the actions that transition a Case from one state to the next. Automated actions taken by the system are shown with dashed blue lines. Manual actions taken by a Case Agent are shown with solid gray lines.
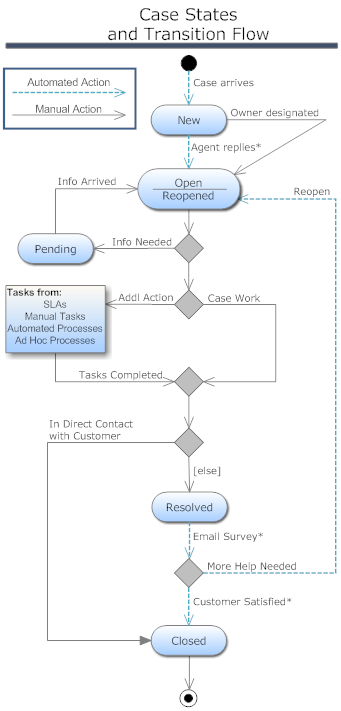
A new case is created with status = New. When assigned or claimed, status is typically changed to Open. (The case can also be assigned automatically when an agent responds to a case, changing the status in the process, if configured in the Company Information Case Settings.) When an agent needs more information from the customer, they mark the case Pending, to remove it from the current case list. When they receive a reply, they change it back to Open (or Reopened). Normal case work involves communicating with the customer, investigating, and answering questions. Tasks may also need to be completed after being created manually or as part of an automated process.
When case work and tasks are completed, the agent decides whether to mark the case Resolved or go directly to Closed. (If enabled, a Survey is sent out when the Case enters the Resolved state. It can also be sent when the case is Closed, depending on the Survey settings.) Depending on the customer's reaction to the survey, the Case is Reopened, or Closed. (A Timer Rule can also be set up to close the case automatically after a period of time has elapsed with no response from the customer.)

Working with Cases
Viewing Cases
Case Agents will spend the majority of their time in the Cases tab. This article explains what you're seeing, and tells you how to control your view.
Viewing a List of Cases
| The side bar gives you a choice of views to help you focus on the things that are important. The default view shows new cases that have not yet been claimed (Unassigned Cases).
The numbers next to each view show how many records it contains. When displayed, the records are displayed in the form of a table. You can also click [New View] to create a custom view. When you do, you'll see a popup with three tabs:
When you save the view, you give it a name, and it appears in the list of views you can select. |

|
Searching for Cases
When you put a value in the search field and click the magnifier , you get search results from across a variety of objects. You can also click on the down arrow to restrict the search:

Click the checkbox next to Cases and then click [Search] to limit the search results to Case records.
Case Colors and Priorities
In the case list, the cases are color coded:

all white - a new case - A new case is one that does not yet have an owner

all red - a critical open case - A critical case is a "Priority 1", shown as P1
- An open case is one that has an owner

all blue - a non-critical open case - P2 or lower, or the default P3 priority, as shown here

partial red - a critical case that is pending - A pending case is waiting on a response from the case submitter

partial blue - a non-critical case that is pending 
dark gray - a closed case.
Case Numbers
A number to the left of a case indicates the number of recent communications that have been received concerning that case.
A similar number occurs at the top edge of the screen. That value is the number of recent incoming communications for all cases. Click it to see a list of cases that received those communications, then click a link in that list to go to a case:

Working with a View
Clicking the down arrow next to the selected view presents you with a series of options related that view:

With those options, you can remove the view, edit it, export it's contents to a comma-separated values (CSV) list, or print the records.
Visiting a Case
You click on a case to view it. When it displays, the Case banner uses the same color coding that appeared in the Case List:

When done working with the case, click Return to List to go back to the Case List view:

(Since this particular case is in progress, rather than pending--or waiting on input from someone else--the banner displays with a solid color.)
Viewing the Case History
Below the case summary, you the Activity History -- a list of activities that have occurred for this case, with the most recent first. (The same information appears for any record in the system, in addition to records in the Cases object.)
Pinning a Case
When viewing a case, a case icon with a "pin" in it appears above the tabs.

You can now return to the case list or go to other tabs, and return to the case whenever you want by clicking that icon.
If you visit a different case, however, the case icon is replaced with one that points to the case you are currently visting. To keep the original case icon around, click the "pin" in the icon. Doing that fixes the icon so it stays in place, even when you visit a different case.
The image color then changes to reflect the case status, to distinguish it from temporary icons, and it contains an "X" instead of the pin. Click the "X" to remove the icon from the display area.

Connecting with Others Who Are Viewing the Case
When someone else is viewing a case that you are looking at, an alert pops up to let you know. When you click the down arrow next to the person's name, you can send a real-time "chat" message to that person, to help coordinate your efforts.

Working with Cases
Case Agents will spend the majority of their time working with Cases. This article shows how to perform the most common actions.
Creating a Case
When viewing a case list, the [New Case] button is conveniently at hand:

When viewing a case list, use Return to List to get back to where that button is displayed:
Or use the New (record) dropdown from the top of the page:

Assigning a Case to a User or a Team
Clicking on the arrow next to the owner shows the person who currently owns the case.

A popup appears showing the details of the current owner, if there is one. In the example shown here, the case has no owner:

You can then choose to claim the case yourself, assign it to another individual, or assign it to a team. When you choose an assignment option, a selection dialog appears. For example, here's the dialog you see when you click [Assign to User]:

Click the magnifier icon to select a record from the list of users. If you have typed any characters, only users whose names contain those characters will be shown.
For an even easier time, type three characters from the user's name, and wait a second. A list appears showing people with those names:

You can now select someone from that list.
Respond to a Case or Add a Note
In the heading of a case, you can choose to see more detail or add a comment:

When you click in the Reply or Add a note block, the message box appears:

In addition to the icons that appear at the top of the message box, a variety of Keyboard Shortcuts can be used when editing the message.
Other options appear at the bottom of the message box. Starting from the right:
- Use the Email setting to send an email to the person who submitted the case
- This is the default setting.
- The note you send automatically becomes part of the case, along with any responses that come back
-
Note: By default, the list of recipients includes all participants in the case, including the original requester. In the GUI, you can deselect participants to determine who receives the message. When someone responds to a message in their email client, the message is copied to all participants in the case (including the original requester).
- Use the Private Note setting to add a comment that is visible only to other case workers.
- Use the Quick Text feature to insert saved snippets of text into the message
- Use [Add Recipient] to copy others
- Recipients are considered collaborators on the case
- They automatically become "followers", and are copied on all future developments
- Use [Attach File] to include an attachment
- When done, click [Add Note] to add the note to the case and send it to any designated recipients
Filter the Case History
Below the area where you send a message or add a note, you see a history of activities that have occurred for this case. (The same information appears for any record in the system, in addition to records in the Cases object.)

You can also choose which kinds of activities appear in that area:

Changing Case Priority and Status
You can change many attributes of a Case when you click View Detail. But priority and status are the values you will probably modify most frequently. Those values can be changed using the convenient drop down lists in the upper right corner of the case:

To learn more about the possible states and the transitions between them, see Case States and Transitions.
Completing Tasks
Completing Tasks helps a team collaborate to move a Case forward to closure. Tasks can created manually, or they can be generated automatically by Processes or SLAs.
- Learn more: Working with Tasks
Taking Other Actions
Converting a Case to a KB Article
If the Knowledge Base is enabled, then when viewing a case, the Actions dropdown has a Convert to KB Article option. That action converts the current case into an article, where it can be further edited and made available to others in the Service Portal.
Viewing Customer Details / Creating a New Contact
At the right is the Case Summary, showing who submitted the case, and who currently owns it:

Clicking on the arrow next to the submitter brings up submitter details stored in the case:

If the submitter is not yet known to the system, [Convert to Contact] is displayed, in place of [Contact Details]. Use that button to easily create a Contact record when someone new submits a case.
Logging Hours
To track the time spent on a case, click Add Hours below the summary:

|
A dialog appears to specify the type of activity, the date, and the amount of time spent on it.
Note that the list of activity types can be modified by an admin, so it is custom-tailored for the kinds of cases you work on. |

|