Service Portal
About the Service Portal
The Service Portal is a place where both internal and external users can get information they need. Depending on its configuration, it can be used to access the knowledge base, get help from the community, or file a support case. (A Community is a place where users can ask questions and help each other. A Knowledge Base is a place where you can publish self-help articles. Customers can find publically available articles, while internal users have access to a broader set.)
To visit the Service Portal, customers and other visitors use the same URL you visit when you log in.
Your configuration settings tell which kinds of users are allowed:
- Guests are visitors who can access Support Portal features without logging in
- Registered Users are visitors who can log in to access Support Portal features
- Internal Users are Case Agents and other support staff who work with the system to manage support cases
The features that different users can access depends on the configuration choices made in the Service Portal Settings.
Working with the Service Portal
How Your Customers Use Your Service Portal
If customers are allowed to use the Service Portal without registering (an option you can configure) then they see service portal as a guest. Here's the interface that greets them when they arrive:

In this case, both the Knowledge Base and Community features have been enabled (you'll learn how to do that in a moment), so there are tabs for both of those options.
Registered portal users see an additional tab--the Cases tab, shown here:

This tab lets them add new Cases and view Cases they have previously filed.
How an Agent Gets to the Service Portal
External users go directly to the Service Portal when they browse to your ServiceDesk URL on the web. There, they'll see the features you have configured. If they're registered users, they'll also be able to browse their cases. Agents and other internal users, on the other hand, go to the Agent Portal when they log in.
To get to the Service Portal from the Agent Portal:
- Click the down arrow next to your login name, and then click Go to Service Portal
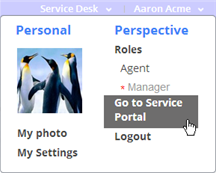
- (To get back, use the same process and choose Go to Agent Portal.)
- In the Support Portal, click the Knowledge Base or Community tab:
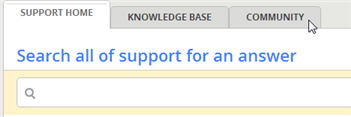
- (These tabs appear when they are enabled in the Service Portal configuration.)


Creating Categories
Categories help users to narrow their focus when searching or browsing for information. They can be featured in the Community page, the Knowledge Base, or both. When a user clicks on a category, they zoom into that subset of the community's messages and knowledge base articles. Initial categories for a community might include:
- Announcements
- General Questions
- Billing Questions
Initial categories for a knowledge base might include:
- Getting Started
- Tips and Tricks
- Troubleshooting
In both the Community pages and the Knowledge Base, categories are called topics. You can create a topic from either location.
To create a new category:
- In the Community or Knowledge Base tab, click the New Topic button:
- To create a new top-level category, leave the Parent Topic blank.
- To create a lower-level category, choose one of the existing topics as the parent.
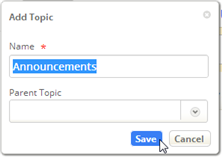
- Click Save.


Working with the Community
The community is a place where your customers can ask questions and get help from each other, as well as your support team.
Asking Questions
- In the Community tab, click Add Question
- Fill in the subject and body, and select a topic for the question:
- Click Save.


Answering Questions
When you view a question, click in the Post an Answer area to respond to it.

Previous answers are shown below the response area. Registered users can vote on an answer to move it up or down in the rankings. (Comments are ordered by their rank first, and by date second.)
Discussion Options
Registered users can subscribe or unsubscribe from a discussion, while Case agents can convert the original question to case, to make sure it gets the attention it needs.

Working with the Knowledge Base
With the knowledge base, your support team can publish articles where customers can find them. Customers can then search for articles and browse the article categories, and your support team can send links to articles that answer common questions.
Adding an Article
- In the Knowledge Base tab, click New Article:
- Adding an article is a lot like adding a community question except that:
- You can tag the article with multiple topics.
- You can make it a Featured Article, so it's listed on the first page.
- If you don't make it Publicly Visible, it can be seen only by internal users.
- You can add attachments.


Adding a Picture to an Article
Images from anywhere on the web can be inserted into an article using the HTML <img> tag. A basic version of that tag looks like this:
img alt="someImage.png" src="http://path/someImage.png"
Note:
The filename is typically put into the alt attribute to help with debugging, since that information appears only when the image can't be found.
Configuring the Service Portal
To configure the Service Portal, you start by selecting the features you want:
- Go to
 > Channels > Service Portal
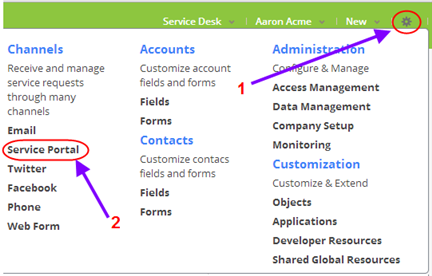
- The Configure Service Portal page opens.
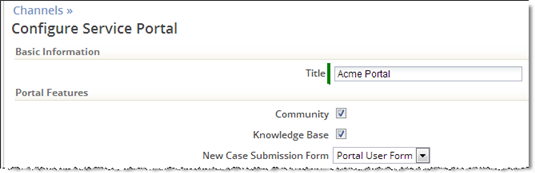
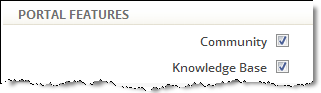
- Under Portal Features:
- Click the Community checkbox to let users interact with each other
- Click the Knowledge Base checkbox to give users access to articles you've published
- In the portal, the Cases tab lets customers create new cases and monitor cases they have created.
- These options create additional tabs that portal users can access.
- Next decide if you'll allow users to register themselves:

- Self-registration is generally useful for business-to-consumer (B2C) support, where customers may have purchased your products through a retail channel. When customers visit your Service Portal, they can then login using their Google ID--or they can create a new username and password at the portal site.
- For B2B support, this option is generally disabled. When it is, customers can register only when you send them an invitation.
- You can also upload a logo image and customize the Service Portal in other ways.
- Learn more:
- Branding Applications for Your Organization
- Service Portal Settings, for a complete list of settings
- Learn more:


Service Portal Settings

Note: For a sandbox tenant, only the Branding section is supported. Changes made to other sections are not applicable. Updates made to Branding section become applicable only post login.
Basic Information
- Title - Change the portal name if you like, or leave it as "{YourCompanyName} Support Portal". (It's only displayed internally.)
- Service Portal Domain- Displays the domain portion of the URL that customers will use to access the service portal.
Portal Features
- Community - Allow registered portal users to interact with each other.
- Knowledge Base - Allow registered portal users to access articles published in your Knowledge Base.
- Case Submissions - Allow portal users to submit new cases using the Support Portal, and view cases that they have submitted.
Cases and Case Type Forms
This section is enabled when the Case Submissions option is selected, above.
For Cases, and for any specialized Case Types that have been defined, specify:
- Authenticated User Form
- The form used by registered portal users who have logged in.
- When Do not show Form is selected, that kind of Case cannot be created.
- Authenticated User Form
- Unauthenticated Guest User Form
- The form used by customers who are not registered or who have not logged in.
- When Do not show Form is selected, that kind of Case cannot be created.
- Unauthenticated Guest User Form
- Display Name - The form title, and the name used to select the case type to create.
User Registration
- Add Registered Users to Team - Use the default Service Portal Users Team.
- Allow Users to Self Register - Allow someone who visits your portal to register themselves. Leaving this box unchecked means that only users who receive an invitation can become registered users.
- Learn more: Self Registration
Guest Features
- Allow Guests to Access Community - Otherwise, registration is required to engage.
- Allow Guests to Access Knowledge Base - Otherwise, registration is required to view articles.
- Create New Contact for Unmatched Email Address - When a guest user supplies an email address that doesn't match an existing Contact, create a new entry with that address.
- Select this option to expedite future email communications.
-
Note: Guest users are supported only when the KB or Community features are enabled. Otherwise, users are required to register in order to file a case.
Branding
- Header Logo - Upload your organization's logo image.
- Standard logo size is 98 pixels wide by 24 pixels high
- Realistic maximum size is up to 600 pixels wide by 32 pixels high
- Header Logo - Upload your organization's logo image.

Tip: At 28 pixels high, only simple images or stylized text are readable.
- Web Site URL - Enter the URL the users go to when they click on your logo.
- Typically, this is the organization's web site.
- Favicon - Upload a small favicon image that displays in the browser's address bar, in bookmarks, and in browser tabs.
- Page Background Color - Select a background color for the page.
- Web Site URL - Enter the URL the users go to when they click on your logo.
Email Templates
Click on these templates to customize them, or use them as they are:
- Invitation Email - Use this template when sending someone an invitation to use the Service Portal.
- Case Response Email - This template is used when an agent sends a message to customer.
- Different portals will use different templates, so that each template can contain logos and links that are appropriate for the product or service supported through that portal.
- Auto Acknowledgement Email - This template is used to acknowledge receipt of a case submitted through the portal.