HowTo:Import Data from an External System
|
For: Designers See more: |
If you have data in an external system, you can generally export it as a plain text file, with one record per line, where values in each line are separated by commas. That kind of file is known as comma-separated value (CSV) file. Using such files, you can import data into your application objects.
In this guide, you'll create a few items of data in a spreadsheet, and use that. But the data could come from any system that is capable of exporting CSV data. More importantly, you'll be learning how to establish relationships between records, as the data is imported.
Preparation
Use the Application Wizard to create an application called Movie Reviews. It should have the following objects and fields:
- Movies
- Title - Text Field
- Movies
- Reviewers
- Name - Text Field
- Email - Text Field
- Reviewers
- Reviews
- Rating - Number (a value in the range 1..5)
- Commentary - Text Area (not a text field)
- Reviews
And the following relationships:
- One Movie can have many Reviews.
- One Reviewer can have many Reviews.
After the application is created:
- Adjust the singular labels for the objects.
- In the Reviews object, modify the Rating field:
- Restrict its values to the range 1..5
- Change the display length to 3
- Learn more: Use the Application Wizard.

Note: You might have noticed that there was an option to create a new application by importing data. For a simple spreadsheet, that's the way to go. But when you need to construct relationships between object records, use the process described here.
Create a Spreadsheet with Sample Data
To start, create a spreadsheet with worksheets for some real movies, a whimisical list of reviewers, and sample reviews. (If you'd rather not deal with the spreadsheet, paste the data from the next section into CSV files.)
- Create a table of Movies
- Create a table of Reviewers
- Create a table of Reviews


In those worksheets, movies have identifiers that are referenced by reviews. Those identifiers are numeric, and none are smaller than 1001. By meeting those requirements, the movie identifier can be used as a Record ID in the platform.
Export the Data as CSV Files
Next, export the data into files that contain comma-separated values, or CSV data. (This process is based on Excel. The process for other spreadsheets is similar.)
- In the spreadsheet, go to the Movies tab.
- From the main menu, choose Save As.
- Specify the filename and type:
- File name - Movies.csv
- Type - CSV (Comma delimited) (*.csv)
- Click [Save]
A dialog appears, informing you that only the current worksheet can be saved. - Click [Ok] to save the current worksheet.
A dialog appears, telling that not all features are supported in this format. (For example, formulas.) - Click [Yes] to save in the specified format.
A file called Movies.csv is created. - Repeat the process for the Reviewers
- Repeat the process for the Reviews
You can now inspect the data files in a text editor. They should look like this:
- Movies.csv
- <syntaxhighlight lang="html4strict" enclose="div">
Index Num,Title 1001,The 300 1002,War Horse </syntaxhighlight>
- Reviewers.csv
- <syntaxhighlight lang="html4strict" enclose="div">
Name,Email Avery Goodview,avery@goodview Knota Goodseat,knota@goodseat Luvda Popcorn,luvda@popcorn </syntaxhighlight>
- Reviews.csv
- <syntaxhighlight lang="html4strict" enclose="div">
Movie,Rating,Commentary,Reviewer 1001,5,Awesome action,Avery Goodview 1001,5,Steamy and lovely,Knota Goodseat 1002,3,Rather predictable,Avery Goodview 1002,5,A real tear-jerker,Luvda Popcorn </syntaxhighlight>
Import the Data Files
Import the Movies
The process here is to start at the top of the lookup chain, so that the Lookups in the incoming record all resolve to an actual record. (It isn't strictly necessary to do things in that order, but it's good form.)
Start by importing data into the Movies object:
- Go to
 > Administration > Data Management > Import Data
 - You've already created the CSV file, so Step 1. Data Preparation is done.
- Under Step 2. Upload File, choose the object you'll be importing into: Movies.
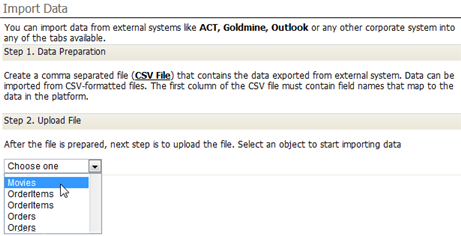
- A new tab appears: Upload CSV File
- Click [Choose File] and select the Movies.csv file you created.
- No column mapping has been defined, as yet, so click [Next].
The Map Columns tab becomes active. - Map the columns defined in the file to the object fields:
- Record Id - Index Num - column (1)
- Title - Title - column (2)
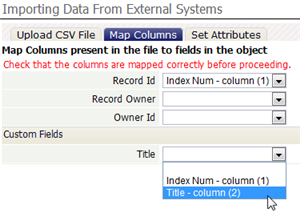
- Note that the labels defined in the heading row of the spreadsheet table are displayed in the dialog, to help you create the correct mapping.
- Click [Next].
A dialog appears asking you to confirm the mappings. - After checking to make sure they're right, click [OK].
The Set Attributes dialog becomes active. - Give the mapping profile a name (say, "Movie Mapping"), and optionally a description, in case you need to use it again.
- Click [Start]


At this point, the import job goes into the processing queue (because most imports tend to involve a lot of data.) At any time, you can go to ![]() > Administration > Monitoring > Import Queue to check the status of the job.
> Administration > Monitoring > Import Queue to check the status of the job.
After the message arrives:
- Examine the Movies object.
- Note that your data has been imported.

Import the Reviewers
Repeat the same process for the Reviewers, to complete the basic imports.
The mapping profile should look like this:

When the import completes, check the Reviewers object to see the newly-created records.
Import the Reviews
The Review records link to both the Movies and the Reviewers. Now that the setup is done, you'll see how to import that data, creating the relationships between those records.
Start the process with the familiar steps:
- Go to > Administration > Data Management > Import Data
- Choose the object you'll be importing into: Reviews.
- Under Upload CSV File, select the Reviews.csv file.
- Click [Next].
- Map the first two columns:
- Commentary - Commentary - column (3)
- Rating - Rating - column (2)
- For the record-relationship field, Related To Movies the system gives you an extra choice. The default is "Match by Record Identifier Field". You'll learn more about that in a moment. For Movies, recall that you imported index numbers into the Movie object's Record ID field. Choose Match by RecordID to tell the system to find the record whose record_id field matches the incoming data.
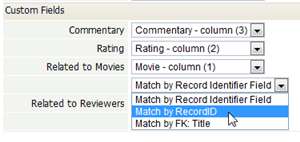
- Note that there is a third choice: Match FK: Title. That one would tell the system to use the data field as a "Foreign Key" (FK), and to examine the Title field in the Movie records (the only field available for that purpose, in Movie records).
- For Related to Reviewers, use the default choice: Match by Record Identifier Field.
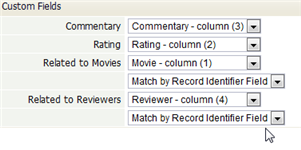
- The Record Identifier, in effect, is the "name" of an object record--a name you can use to uniquely identify it. It so happens that the platform uses the first field you define as a Record Identifier--but you are free to use any fields you wish.
- To see what's going on with this relationship:
- a. Go to the Reviewers object.
- b. Click Customize this Object
- c. Click [Record Locators]
- d. In the section, Record Identifier Fields, note that Name (the first field you defined) has been selected as the Record Identifier. (Other eligible fields are listed. You can choose a different field, or even select multiple fields.)
- In this case, the Reviews records contain the full name of each reviewer, which matches the Record Identifier defined for Reviewers. So you can use that.


Finish the process as you have done before:
- Click [Next].
A dialog appears asking you to confirm the mappings. - Check your settings in the confirmation dialog and click [OK].
- Give the mapping profile a name: Review Mapping.
- Click [Start]
Wrap Up
At this point, you've seen how to import data into an application, and how to establish record relationships in the process.