Enumerated Fields
Enumerated fields can provide a powerful visual impact by displaying a graphic image or color-coded label in place of field values.
About Enumerated Fields
Enumerated fields have an associated numeric value, which can be used to group, sort or filter data in Views and Reports.
Enumerated Types
These Field Display Types are enumerated:
Using Enumerated Fields with Other Platform Elements
Because Picklist Values can contain alphanumeric characters, additional functionality becomes available, as listed here:
- Sort order
- Use the Picklist value in Views and Reports to define sort order
- Grouping
- Use the Picklist value to Group records in Views and Reports
- Display in Views
- The Display Labels are shown when displaying a record and in Views. Based on the options selected, the image and the text colors are shown.
- Color coding in Views
- Criteria can be specified using Display Labels or Picklist values; The first match is done using the display label, followed by the Picklist value
- Searches/Filters in Views
- Criteria can be specified using display labels or Picklist values; The first match is done using the display label, followed by the Picklist Value
- Global Search
- Global search can use the Picklist values
- Display in Reports
- The Display Labels are shown (no images or color coding are displayed)
- Reports must not use the Group option
- REST or JAVA API
- The Picklist values are returned (not the display label)
- Conditional Layouts
- Layout rules can use the Picklist values
Manage and Reorder Values
The Enumerated Values section of the field-definition page, lets you specify the picklist values and the order in which they appear.
To specify which values appear:
- Click [Manage Values]
- Click the box under the Trash can to remove an item.
- Click [Add More Rows] to add additional items
- Click [Save] when done
- Settings
-
- Display Label - The label to display in the list.
- Value - The actual value that is stored in a record (or returned to a program) when the item is chosen from the list. When the field is used to group, sort, or filter records, it is the value of the field that determines the outcome.

Note: Alphanumeric Characters are allowed in labels and values, including special characters (+ / ' - _) and spaces.
Reorder Values
In the Enumerated Values section of the field-definition page, click [Reorder Values] to change the order in which the values appear:

-
Note: Reordering can be done only when the Sort List Alphabetically option is unchecked.
Checkboxes and Radio Buttons
Working with Checkboxes and Radio Buttons is almost identical to the process for Working with Picklists, described next. The only real difference is in the way that values are displayed, and the number of selections a user can make.
Picklists
A Picklist is a field that can contain a list of values. It appears as a dropdown list when displayed.
Create a Picklist
- Click
 > Customization > Objects > {object} > Fields
 - Click [New Field]
- Provide the information in the sections below.
- Click [Save]
The field is added, and the field-definition is shown.
Basic Information
- Specify the basic characteristics of the field:
- Label - The text that appears as the field name
- Display Type - Picklist
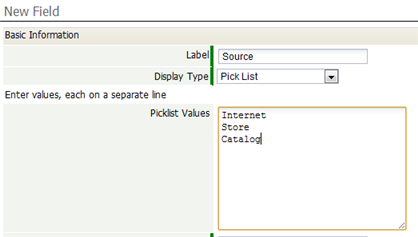
- Picklist Values - For a simple Picklist that returns the same values it displays, with no special colors, images, or groups for the display values, you can simply enter the values, as shown here:
- Otherwise, wait until the Picklist has been created, then Manage and Reorder Values.
- Maximum Storage Length - The String length of the longest value in the list.
- Use First Value as Default - Otherwise, the field is initially empty.
- Sort List Alphabetically - Otherwise, you manually arrange the order.
- Skip Value Validation - When checked there is no validation of the Enumerated Values. By default, this option is unchecked.

-
Note: This option is available only for custom fields and not for standard fields. For standard picklists, value validation cannot be turned off.
- Always Required - A selection must be made when adding or updating a record.
- Field Name - Automatically created by the system (but you can change it here)
Display Attributes
- Determine where the field is displayed in the default form, and whether or not the field is required when adding or updating a record.
Default Value
In general, the default value you specify will be a simple String. For example: 'rush'. But it is also possible to select functions and specify arguments, creating a formula expression that returns the default value.

- Considerations
-
- The default value must resolve to the value of an entry in the list of enumerated items (not a label).
- If the value resolves to a string which is not in the list of the enumerated items, it is as though no default were specified. Nothing is pre-selected in the Enumerated Field.
- Field Visibility determines which roles can see or edit the field.
Description Information
- Include a description of the field and its use. This information is only visible to users with rights to customize this field.
Global Picklists
Create a Global Picklist
- Click > Customization > Objects > {object} > Fields
- Click [New Field]
- Fill in the information in the sections below
- Click [Save]
The field is added, and the field-definition is shown.
-
Note: To Manage and Reorder Values, go to the field definition in the Global Picklists--but note that any changes made to a Global Picklist apply to all fields that reference it.
Basic Information
- Display Type - Global Picklist
- Picklist - Select one of the predefined Global Picklists, or one that you have created.
Display Attributes
- Determine where the field is displayed in the default form, and whether or not the field is required when adding or updating a record.
Default Value
In general, the default value you specify will be a simple String. For example: 'rush'. But it is also possible to select functions and specify arguments, creating a formula expression that returns the default value.
- Considerations
-
- The default value must resolve to the value of an entry in the list of enumerated items (not a label).
- If the value resolves to a string which is not in the list of the enumerated items, it is as though no default were specified. Nothing is pre-selected in the Enumerated Field.
- Field Visibility determines which roles can see or edit the field.
Description Information
- Include a description of the field and its use. This information is only visible to users with rights to customize this field.
Multi Select Picklists
Multi Select Picklists provide options in a field to make multiple selections from a list of values in a Global Picklist.
In the global picklist, although the labels for the enumerated values may contain commas, the enumerated values may not contain commas.
For Multi Select Picklist fields where the labels include commas, vertical orientation is the better choice
- Considerations
-
- The value stored in the database is a comma-separated list of labels, one for each selection. So:
- If you change the order of the values, new values may be stored differently than old ones.
- To avoid a Data Truncation Error at runtime, make sure the field is large enough to contain all possible selections.
- Calculate the size as the sum of the entry lengths, plus N-1 for the commas between them, where N is the number of entries.
- Use an expression like this one to mark a single box in a Rule action:
- IF( ISNULL(field), 'checkboxLabel', field+', checkboxLabel')
- If the field is empty, the label is assigned to it. If the field has a value, the checkbox label is appended to it.
- The checkbox label is case-sensitive, and must match the configured value exactly.
- Spaces are allowed between items in the value-list (but be sure to size the field appropriately.)
- IF( ISNULL(field), 'checkboxLabel', field+', checkboxLabel')
- To uncheck a box in a rule, you need one of two expressions:
- REPLACE(field, ', checkboxlabel', '') - for multiple selections, or
- REPLACE(field, 'checkboxLabel', '') - for a single selection
- The expressions then need to be placed inside of a nested IF statement to see if either one applies:
- IF (CONTAINS(field, ', checkboxLabel'), -first replacement-,
- IF (CONTAINS(field, 'checkboxLabel'), -second replacement-, field) )
- This expression does the appropriate substitutions of the label is present. Otherwise, it returns the original field.
- IF (CONTAINS(field, 'checkboxLabel'), -second replacement-, field) )
- IF (CONTAINS(field, ', checkboxLabel'), -first replacement-,
Dependent Picklists
A Dependent Picklist provides a list of choices, where the available options are determined by some other value.
About Dependent Picklists
A Dependent Picklist can be based on a set of Radio Buttons or a standard Picklist. The value of that field is the triggering value. When that value is present in the record, or when the user selects a value in that GUI, the value determines which options are present in the Dependent Picklist.
For example, suppose you have a request management system for a software application. In that application, you might set up radio buttons to specify the kind of request: Software (coding) or Documentation. A Dependent Picklist could then be used to set up a different set choices for each kind of request:
Kind of Request Request Type Software - Bug Report
- Feature Request
Documentation - Bug Report
- New Feature Writeup
- Documentation Enhancement
(for a new document, for example, or an improvement)
A single Request Type field can then be used for each kind of request, with an appropriate set of choices for each kind.
- Learn more: Enumerated Fields
- Considerations
-
- A field cannot be deleted if it is the triggering value for a dependent field.
- If the triggering field for a dependent field is changed, a message appears telling you that data will be lost if the change is executed. Confirmation is required to proceed.
Adding a Dependent Picklist
This is a four-step process:
- Create the triggering field (also known as the parent field).
- Create the dependent picklist.
- Specify the complete collection of options that will be available.
- For each possible triggering choice, specify which of the available options appear in the dependent picklist.
To add a dependent picklist:
- Create a triggering field with one of the following types, and add values to it:
- Create a new field of type Dependent Picklist
- Fill in the basic field settings:
- Label
- The field label that will be displayed
- Display Type
- Dependent Picklist
- Parent Field
-
- Select the "parent" field (the triggering field)
- Enter the picklist values
-
- Maximum Storage Length
- Specify a number of characters that is equal to or greater than the size of the longest value-string that can be selected. Otherwise, a Data Truncation Error may occur at runtime.
-
- Show First Value as Default
- This setting causes the first value in the presented list of values to be the default. Otherwise, there is no default.
-
- Sort List Alphabetically
- This setting causes the values in presented list to be sorted alphabetically. Otherwise, they are displayed in the order defined in the Manage Values section.
- Tip:
- It is the values that are sorted, not the display labels. A common practice is to add numbers to the values so the entries display in the order you want them.
- (The remaining attributes are standard Field properties.)
- Click [Save]
A new section appears: Enumerated Values. - In the new section, click [Manage Values]
- Specify the entire collection of possible values.
In the example given above, the list would consist of:- Bug Report
- New Feature Request
- New Feature Writeup
- Documentation Enhancement
- Click [Save]
A new section appears: Dependent Picklist Assiciations. - In the new section, click [Add Associations]
- In the Parent Values field, select one of the triggering values.
Two list boxes appear.- Note: Field values are shown, not their display labels.
- Note: Field values are shown, not their display labels.
- Move items from the Available Items list to the Selected Items list.
Selected items appear as options in the dependent picklist, for that particular triggering value. - Click [Save]
- Repeat the last few steps to add additional associations for each of the possible triggering values.
Learn more: Enumerated Fields#Manage and Reorder Values