Difference between revisions of "How to Create a Custom User Interface (CUI)"
imported>Aeric |
Wikidevuser (talk | contribs) |
||
| (31 intermediate revisions by 3 users not shown) | |||
| Line 1: | Line 1: | ||
== | ==Introduction== | ||
==Who can use this feature?== | ===What is a Custom User Interface (CUI) template?=== | ||
A Custom User Interface (CUI) implementation allows you to customize the look and feel of the run-time user interface of the AgileApps platform. Using this feature, you can design and deploy a CUI to an AgileApps application. | |||
The application developers can create a completly customized template and specify access URL(s), where the template will be rendered. A template is a zip file which constitutes of all the artifacts created for this CUI by the application developers. | |||
Some examples for artifacts include html, css, js files, and so on. The application developer uploads this template to the AgileApps platform and generates an Access URL. When the end user opens this Access URL, the template uploaded to the AgileApps platform is rendered for the configured application. The application developers can create a CUI template using any of the popular JavaScript frameworks and consume the components provided by AgileApps. | |||
{{Note|<br>See the FAQ section for important information on using an unauthenticated feature along with CUI templates.}} | |||
===Who can use this feature?=== | |||
Any application developer who meets the following requirements can view this feature: | Any application developer who meets the following requirements can view this feature: | ||
:*In the Manage Tenant Capabilities page for a tenant, the '''Developer Tools''' option should be enabled for the user. For more information, see [[Tenant Capabilities]]. | :*In the Manage Tenant Capabilities page for a tenant, the '''Developer Tools''' option should be enabled for the user. For more information, see [[Tenant Capabilities]]. | ||
:*Under '''Access Management''' ''' | :*Under '''Access Management''' > '''Access Profiles''' > '''Administrative Permissions''' > '''Development Controls''', the '''Use Development Features''' option should be enabled. For more information, see [[Access Profiles]]. | ||
Learn more: | |||
:*[[Setting up the Local Environment and Workspace]] | |||
:*[[Create a Template]] | |||
:*[[Deployment]] | |||
==Setting up the Local Environment and Workspace== | |||
This section provides you an insight into customizing the user interface for the AgileApps platform UI. It helps you understand how to setup the local development environment and a workspace, for a simple CUI template. It includes the following information: | |||
:*Prerequisites | |||
:*Installing the dependencies | |||
:*Creating an initial workspace and a starter app | |||
:*Running the starter app locally to verify your setup | |||
{{Note|<br>The instructions provided here describe only about how to setup the workspace for a simple template. If you consider using any frameworks, like Angular, BackboneJs, React or VueJs, and so on; you have to follow the workspace setup instructions pertaining to your choice of framework.}} | |||
===Prerequisites=== | |||
Following are the prerequisites for developing a CUI template:<br> | |||
:*Have Knowledge of HTML, CSS, JavaScript. | |||
:*Understand the file and directory structure for a CUI. | |||
:*Understand the AgileApps platform. | |||
:*Have a working installation of Node.js, npm package manager, and GIT. | |||
==Step 1 - Create a workspace== | |||
::Create a workspace and clone the boilerplate template from GIT hub.<br> | |||
::First, create a local directory as your workspace directory. Then, launch the Git bash and navigate to the workspace directory. Here, execute the following command:<br> | |||
::<code>git clone https://<code>github.com/agileapps-dev-com/quick-starter</code></code> | |||
== | ==Step 2 - Configure development server== | ||
'''Configuring the development server'''<br> | |||
::The webpack Dev Server is used as the development server. In this step, we make changes to the webpack server configurations present in the webpack.config.js file which is inside the cloned “agileapps-cui” directory.<br> | |||
:: | |||
::Navigate to the “agileapps-cui” directory and then open the “webpack.config.js” file using the Notepad or any other text editor. | |||
::Update the “target” value to your agileapps instance. | |||
: | |||
: | |||
{{Note|<br>If your AgileApps instance is enabled with a subdomain, then specify the subdomain in the target property. For example, https://{subdomain}.agileappscloud.eu}} | |||
: | |||
Configuration changes are as follows:<br><br> | |||
<nowiki> | <nowiki> | ||
/* Update the target value into your agileapps instance path include port as well, if any. */ | /* Update the target value into your agileapps instance path include port as well, if any. */ | ||
| Line 52: | Line 60: | ||
"changeOrigin": "true" | "changeOrigin": "true" | ||
}] | }] | ||
</nowiki> | |||
==Step 3 - Install the dependencies== | |||
'''Install package dependencies''' | |||
::In this step, install the internal package dependencies required for the workspace. | |||
::To install the dependencies using the command prompt, navigate to the “agileapps-cui” directory and execute the following command:<br> | |||
<code>npm install</code> | |||
{{Note|<br> This command installs only the internal dependencies required for the workspace.}} | |||
==Step 4 - Start the development server== | |||
'''Launch the boilerplate CUI template''' | |||
::In this final step, launch the boilerplate CUI template from the workspace. Use the following code to start the development server: <code>ng serve</code> | |||
'''Issues with server startup?''' | |||
::If you encounter any issues while launching the development server, refer to the exception shown in the command prompt that you use to launch the server. | |||
::All the webpack related configurations, including the host, port, and so on, can be modified in webpack.config.js. | |||
'''Access the application using a web browser'''<br> | |||
You can access the simple CUI template using the following URL: | |||
<nowiki> | |||
https://localhost:8054/simple/index.html | |||
</nowiki> | </nowiki> | ||
{{Note|<br> Use this link - https://github.com/agileapps-dev-com/agileapps-cui to access the “simple” CUI template present in “~/agileapps-cui/src/simple”.}} | |||
< | '''Modify the “simple” CUI template'''<br> | ||
You can modify the content inside “~/agileapps-cui/src/simple”. | |||
If you | |||
'''Important Notes''' | |||
:*Use index.html as the starting file. | |||
:*Create the js/css/html files as per your requirement. However, you should follow the directory structure guidelines. | |||
:*You can create a new folder under “~/agileapps-cui/src”. If you create a new folder, take a backup of the constitutent folders structure from the path “~/agileapps-cui/src/simple” | |||
:*If the custom UI is coded in a different folder under “~/agileapps-cui/src/", use the name of the folder to substitute {folderName} in the link http://localhost:8054/{folderName}/. | |||
==Create a Template== | |||
===Template File structure=== | |||
Following is the recommended file structure:<br> | |||
{{Note|<br> It is mandatory to have an index.html file and a template-details.json file in the CUI directory.}} | |||
[[File:recommended_directory_structure.png|500px]] | |||
=== | ===Boilerplate Template=== | ||
'''Creating index.html'''<br> | |||
{{Note|The content present in this | This is the boilerplate template you can use to create your CUI. Read the comments in this file to understand how to use this template to create a CUI. | ||
{{Note|<br>The content present in this boilerplate template file should be present in every HTML file that you create.}} | |||
<nowiki> | <nowiki> | ||
<!doctype html> | <!doctype html> | ||
<html lang="en"> | <html lang="en"> | ||
<head> | <head> | ||
<base href="./"> | <base href="./"> | ||
| Line 82: | Line 118: | ||
<meta charset="utf-8"> | <meta charset="utf-8"> | ||
<meta name="viewport" content="width=device-width, initial-scale=1, shrink-to-fit=no"> | <meta name="viewport" content="width=device-width, initial-scale=1, shrink-to-fit=no"> | ||
<link rel="stylesheet" href="/ace-lib/styles.css" /> | <link rel="stylesheet" href="/ace-lib/styles.css" /> | ||
<link rel="stylesheet" href="/ace-lib/assets/themes/default/css/main.css" /> | <link rel="stylesheet" href="/ace-lib/assets/themes/default/css/main.css" /> | ||
<!--CUI specified css files --> | |||
<link rel="stylesheet" href="assets/css/styles.css" /> | |||
<title>My Custom User Interface for AgileApps </title> | <title>My Custom User Interface for AgileApps </title> | ||
</head> | </head> | ||
<body> | |||
************************************************************************************************ | |||
* * | |||
* * | |||
* * | |||
* <!-- The Custom HTML template content goes here --> * | |||
* * | |||
* * | |||
* * | |||
************************************************************************************************ | |||
<!-- platform assets --> | <!-- platform assets --> | ||
<script type="text/javascript" src="/ace-lib/runtime.js"></script> | <script type="text/javascript" src="/ace-lib/runtime.js"></script> | ||
| Line 102: | Line 149: | ||
<script type="text/javascript" src="/ace-lib/vendor.js"></script> | <script type="text/javascript" src="/ace-lib/vendor.js"></script> | ||
<script type="text/javascript" src="/ace-lib/main.js"></script> | <script type="text/javascript" src="/ace-lib/main.js"></script> | ||
<!--CUI specified JS files --> | <!--CUI specified JS files --> | ||
<script src="assets/js/scripts.js"></script> | <script src="assets/js/scripts.js"></script> | ||
</body> | |||
</html> | |||
</nowiki> | |||
===Package a Template=== | |||
====Archive the developed CUI==== | |||
After you create the template, you have to package it for deployment. Archive the template you create by running the following command: | |||
</ | '''Archive command'''<br> | ||
<code>npm run package simple</code> | |||
</ | {{Note|<br> | ||
:* See the 'package.json' file to know the build commands under 'scripts'. | |||
:* '''simple''' is the directory name in ~agileapps-cui/src** | |||
:* If you change the directory name or create a new directory, use that value instead of simple. The packaged CUI template is available in the “~/agileapps-cui/dist/” directory.}} | |||
::After you run this command, the application prompts you to provide the following details: | |||
:*template package name: If you do not provide a value here, the default value simple is applied. | |||
:*template package version: If you do not provide a value here, the default value 1.0 is applied. | |||
=== | ===Deploy the package=== | ||
After you package the template, the next step is to deploy the package. | |||
Learn more about deployment into AgileApps. | |||
==Deployment== | |||
===Introduction=== | |||
To deploy your custom user interface (CUI) template, you have to package, install, and configure an access URL in AgileApps. While configuring an access URL in AgileApps, you can select an application, template, and other configurations. | |||
To know more about creating the CUI template, read the “creating CUI template document”. | |||
====Packaging the Template==== | |||
Before installing the CUI template, it needs to be packaged. Every template package should follow the file & directory structure guidelines and should contain the template-details.json file. A detailed information about how to package a template is available. | |||
: | ====Installing the Template==== | ||
To install a template package, you should have access permissions to '''Developer Resources'''. Follow these instructions to install a template in AgileApps:<br> | |||
#Go to '''Settings > Customization > Developer Resources''', and select '''Templates''' from the menu as shown in the following image:<br>[[File:template_menu.png|700px]]<br> | |||
#In the All Templates screen, click '''Install''' as shown in the following image:<br>[[File:install_template.png|600px]]<br> | |||
#On the Install Template page, click '''Choose File''' and select the zip file for your template. Only .zip file format is supported. Other compression formats like RAR is not supported. | |||
#:The template zip file has the following considerations for the characters used in the zip file: | |||
#::*The zip file name should only contain alphanumeric characters (a-z, A-Z, 0-9), hyphen(-), dot(.), or an underscore(_). | |||
#::* The folder name inside the zip file should only contain alphanumeric characters (a-z, A-Z, 0-9), hyphen(-), or dot(.), or an underscore (_). Also, the folder name cannot start with a dot(.) symbol. | |||
#::* The file name inside the zip file should only contain alphanumeric characters (a-z, A-Z, 0-9), hyphen(-), or dot(.), or an underscore (_). | |||
#::* The template version inside the '''template-details.json''' file should be in {major.minor} format. For example, 1.2. | |||
#::* The template name inside the '''template-details.json''' file should only contain alphanumeric characters (a-z, A-Z, 0-9), hyphen(-), or dot(.), or an underscore (_). Also, it should start with an alphabet and end with an alphanumeric character. | |||
#Click '''Next''' and then click Install. On successful installation, you will see a message on-screen conveying the same. | |||
#:'''Note:''' If any of the above considerations are not met, then the installation fails with the relevant error message.}} | |||
#This concludes the procedure for installing the template. | |||
{{Note|<br> | |||
You must be careful about of type of files included inside the package as the file types supported are limited. If you find any issues with this, you must raise a support incident ticket.}} | |||
====Updating | ====Updating an Existing Template==== | ||
#Go to '''Settings > Customization > Developer Resources''', and select '''Templates''' | |||
#In the All Templates screen, click '''Install'''. | |||
#In the Select Template File screen, select the template file which you want to update and click '''Next'''. | |||
#The platform does a validation for the selected template name and you will see a warning message stating that a template with the same name already exists. As a backup, you can download the existing template by clicking the '''Download''' button as shown in the following image:<br>[[File:template_backup.png|700px]]<br> | |||
#Select Install to proceed with the installation and the platform performs an update for the existing template.<br>{{Note|There is no restriction on higher or lower versions when updating the template.}} | |||
====Deleting a Template==== | |||
{{Note|Before you delete a template, ensure to remove all references to this template from any other entity in the platform.}} | |||
#Go to '''Settings > Customization > Developer Resources''', and select '''Templates''' | |||
#From the All Templates page, select the template you want to delete. | |||
#In the Template Information page, click '''Delete'''. | |||
#In the Delete confirmation dialog box, click '''OK'''. The template is deleted from the platform. The template is moved to the Recycle Bin. You can choose to restore this deleted template at a later time or delete it permanently from the Recycle Bin. | |||
{{Note|You can restore the template from the Recycle Bin; only when there is no duplicate template.}} | |||
===Configuring the Access URL=== | ===Configuring the Access URL=== | ||
Using the Access URL, you can access the AgileApps application to which you apply the custom templates. | Using the Access URL, you can access the AgileApps application to which you apply the custom templates. | ||
{{Note|The template that you install does not impact the look and feel of the application UI that you access using the default AgileApps URL. The template becomes applicable only when you access the application using the Access URL that you configure here.}} | {{Note|The template that you install does not impact the look and feel of the application UI that you access using the default AgileApps URL. The template becomes applicable only when you access the application using the Access URL that you configure here.}} | ||
:1. After you install the template, from the Templates list page, click '''Configure Access URL''' as shown in the following image: | :1.After you install the template, from the Templates list page, click '''Configure Access URL''' as shown in the following image:<br>[[File:configure_access_url.png|600px]] | ||
:2. In the All Configured Access URLs page, you will see a list of all the configured access URLs. You can enable or disable an access URL from this page. To configure a new access URL, click '''New Access URL'''. | :2.In the All Configured Access URLs page, you will see a list of all the configured access URLs for the applications to which you have access. You can enable or disable an access URL from this page. To configure a new access URL, click '''New Access URL'''. | ||
'''Note:'''If you have not updated a namespace in the '''Developer Configuration''' section of the Developer Resources page, then the system prompts you with a message to update the namespace. Click the URL to update the namespace. Provide a name and save it. This is a mandatory step as every tenant should have a unique namespace. For more information about the namespace, see [[Developer Configuration]]. | |||
:3. In the Configure Access URL page, provide the following details in the '''Access URL Information''' section: | :3.In the Configure Access URL page, provide the following details in the '''Access URL Information''' section: | ||
:{| border="1" cellpadding="5" cellspacing="1" | :{| border="1" cellpadding="5" cellspacing="1" | ||
! align=" | ! align="top" width="180em"| Field!! align="center"| Description | ||
|- | |- | ||
| Select Application | | Select Application | ||
| Line 162: | Line 240: | ||
|- | |- | ||
|Access URL | |Access URL | ||
|This is created dynamically based on what you provide for the ''' | |This is created dynamically based on what you provide for the '''Access URL Alias''' field. The format for the Access URL is '''https://{domain}/networking/{apps}/{namespace}/{alias_name}/''', where the Access URL Alias is appended at the end. | ||
|- | |- | ||
| Select Template | | Select Template | ||
| Line 168: | Line 246: | ||
|- | |- | ||
| Mandatory User Login | | Mandatory User Login | ||
| If you select this checkbox, the user is by default taken to the platform login page. This happens if the user is opening the Access URL for the first time. After successful login in the platform login page, the user is taken to the template landing page. If you | | If you select this checkbox, the user is by default taken to the platform login page. This happens if the user is opening the Access URL for the first time. After successful login in the platform login page, the user is taken to the template landing page.<br><br> | ||
If you don't select this checkbox, the users will be able to access the CUI without logging into the AgileApps platform.<br>You must perform the following steps for the user to access the platform as a Guest User: | |||
# The developer/administrator has to enable guest access to the platform in the '''Company Information''' page.<br><br>[[File:Company Information Enable Guest Access.png|800px]]<br><br> | |||
# On the '''Configuration''' > '''Customization''' > '''Objects''' > '''Object Properties''' page, enable guest access for the object by selecting '''Allow Guest Access''' checkbox under '''Guest Access Criteria''' section. | |||
# Expressional dialog boxes similar to Custom Access Criteria appear and allow you to provide regex expressions for specific actions. For example: Provide 'true' to the respective actions for all the users to be able to access the CUI as guest users.<br><br>[[File:Guest Access Criteria.png|800px]]<br><br> | |||
# Click '''Edit''' next to the text box and provide the regex expressions on the respective actions that the users can access from the CUI as a Guest User. | |||
'''Note''': For users who enter data through CUI without access to the AgileApps platform when the guest user is enabled, the records added or updated reflect in the platform as the guest user and not the actual user who does it. | |||
|- | |- | ||
| Enable Access URL | | Enable Access URL | ||
| Line 174: | Line 258: | ||
|- | |- | ||
|} | |} | ||
:4. This concludes the procedure for configuring the Access URL. | :4.This concludes the procedure for configuring the Access URL. | ||
====Editing the Access URL Configuration==== | |||
#Go to '''Settings > Customization > Developer Resources''', and select '''Templates''' | |||
#Select '''Configure Access URL'''. | |||
#From the list of Configured Access URLs, select the Access URL you want to edit. | |||
#In the Access URL Information page, click '''Edit''' and update the required fields. | |||
#:'''Note:''' You cannot change the application that you selected when configuring this Access URL. | |||
#After you make the changes, click '''Save'''. | |||
====Deleting the Access URL Configuration==== | |||
#Go to '''Settings > Customization > Developer Resources''', and select '''Templates''' | |||
#Select '''Configure Access URL'''. | |||
#From the list of Configured Access URLs, select the Access URL you want to delete. | |||
#In the Access URL Information page, click '''Delete'''. | |||
#In the Delete confirmation dialog box, click '''OK'''. The configured Access URL is moved to the Recycle Bin. You can choose to restore this deleted Access URL at a later time or delete it permanently from the Recycle Bin. | |||
{{Note|You can restore the Access URL configuration from the Recycle Bin; only when there is no duplicate Access URL Alias.}} | |||
===Packaging the CUI=== | |||
By means of packaging, you can deploy the Template and Access URLs created in one tenant into another tenant. For more information about Packages and Package Items, see [[Packages]] and [[Package Items]] respectively. | |||
===How to Access the CUI in Run-time=== | |||
#Go to '''Settings''' > '''Customization''' > '''Developer Resources''', and select '''Templates''' | |||
#Select '''Configure Access URL'''. You will see a list of all the configured Access URLs with the Application name and other details. | |||
#Click the Access URL Alias which you want to view in run-time. The Access URL format is https://{domain}/networking/apps/{namespace}/{AccessURLAlias}/ | |||
#From the Access URL Information page, copy the Access URL and paste it in any supported browser. You can now see the associated application render in your browser with the customized look and feel as defined in your custom template. | |||
====Single Sign-on Login URL for CUI==== | |||
You can perform single sign-on for accessing the CUI using the following URL pattern: | |||
https://{domain}/networking/saml/ssoRequest?ticket=<ticket_ID>&done=apps/{namespace}/{AccessURLAlias}/ | |||
===Deleting an Application=== | |||
When you delete an application, the platform deletes all the associated template Access URLs from the system permanently. | |||
===Limitations=== | |||
:*The email notifications sent to the user for an operation performed using the CUI may include links. If user opens this link, he or she is taken to the default Platform UI and not the custom UI. | |||
== | ==Helpful links== | ||
* [[CUI Components]] | |||
* [[Theme Templates]] | |||
* [[Theme Variables]] | |||
* [[Theme Components]] | |||
* [[CUI FAQs]] | |||
Latest revision as of 06:55, 22 November 2023
Introduction
What is a Custom User Interface (CUI) template?
A Custom User Interface (CUI) implementation allows you to customize the look and feel of the run-time user interface of the AgileApps platform. Using this feature, you can design and deploy a CUI to an AgileApps application.
The application developers can create a completly customized template and specify access URL(s), where the template will be rendered. A template is a zip file which constitutes of all the artifacts created for this CUI by the application developers.
Some examples for artifacts include html, css, js files, and so on. The application developer uploads this template to the AgileApps platform and generates an Access URL. When the end user opens this Access URL, the template uploaded to the AgileApps platform is rendered for the configured application. The application developers can create a CUI template using any of the popular JavaScript frameworks and consume the components provided by AgileApps.

Note:
See the FAQ section for important information on using an unauthenticated feature along with CUI templates.
Who can use this feature?
Any application developer who meets the following requirements can view this feature:
- In the Manage Tenant Capabilities page for a tenant, the Developer Tools option should be enabled for the user. For more information, see Tenant Capabilities.
- Under Access Management > Access Profiles > Administrative Permissions > Development Controls, the Use Development Features option should be enabled. For more information, see Access Profiles.
Learn more:
Setting up the Local Environment and Workspace
This section provides you an insight into customizing the user interface for the AgileApps platform UI. It helps you understand how to setup the local development environment and a workspace, for a simple CUI template. It includes the following information:
- Prerequisites
- Installing the dependencies
- Creating an initial workspace and a starter app
- Running the starter app locally to verify your setup
-
Note:
The instructions provided here describe only about how to setup the workspace for a simple template. If you consider using any frameworks, like Angular, BackboneJs, React or VueJs, and so on; you have to follow the workspace setup instructions pertaining to your choice of framework.
Prerequisites
Following are the prerequisites for developing a CUI template:
- Have Knowledge of HTML, CSS, JavaScript.
- Understand the file and directory structure for a CUI.
- Understand the AgileApps platform.
- Have a working installation of Node.js, npm package manager, and GIT.
Step 1 - Create a workspace
- Create a workspace and clone the boilerplate template from GIT hub.
- First, create a local directory as your workspace directory. Then, launch the Git bash and navigate to the workspace directory. Here, execute the following command:
git clone https://github.com/agileapps-dev-com/quick-starter
- Create a workspace and clone the boilerplate template from GIT hub.
Step 2 - Configure development server
Configuring the development server
- The webpack Dev Server is used as the development server. In this step, we make changes to the webpack server configurations present in the webpack.config.js file which is inside the cloned “agileapps-cui” directory.
- The webpack Dev Server is used as the development server. In this step, we make changes to the webpack server configurations present in the webpack.config.js file which is inside the cloned “agileapps-cui” directory.
- Navigate to the “agileapps-cui” directory and then open the “webpack.config.js” file using the Notepad or any other text editor.
- Update the “target” value to your agileapps instance.
-
Note:
If your AgileApps instance is enabled with a subdomain, then specify the subdomain in the target property. For example, https://{subdomain}.agileappscloud.eu
Configuration changes are as follows:
/* Update the target value into your agileapps instance path include port as well, if any. */
     proxy: [{
      context: ['/networking', '/ace-lib'],
      "target": "https://agileapps-instance-path",
      "secure": false,
      "changeOrigin": "true"
    }]
Step 3 - Install the dependencies
Install package dependencies
- In this step, install the internal package dependencies required for the workspace.
- To install the dependencies using the command prompt, navigate to the “agileapps-cui” directory and execute the following command:
- To install the dependencies using the command prompt, navigate to the “agileapps-cui” directory and execute the following command:
npm install
-
Note:
This command installs only the internal dependencies required for the workspace.
Step 4 - Start the development server
Launch the boilerplate CUI template
- In this final step, launch the boilerplate CUI template from the workspace. Use the following code to start the development server:
ng serve
- In this final step, launch the boilerplate CUI template from the workspace. Use the following code to start the development server:
Issues with server startup?
- If you encounter any issues while launching the development server, refer to the exception shown in the command prompt that you use to launch the server.
- All the webpack related configurations, including the host, port, and so on, can be modified in webpack.config.js.
Access the application using a web browser
You can access the simple CUI template using the following URL:
https://localhost:8054/simple/index.html
-
Note:
Use this link - https://github.com/agileapps-dev-com/agileapps-cui to access the “simple” CUI template present in “~/agileapps-cui/src/simple”.
Modify the “simple” CUI template
You can modify the content inside “~/agileapps-cui/src/simple”.
Important Notes
- Use index.html as the starting file.
- Create the js/css/html files as per your requirement. However, you should follow the directory structure guidelines.
- You can create a new folder under “~/agileapps-cui/src”. If you create a new folder, take a backup of the constitutent folders structure from the path “~/agileapps-cui/src/simple”
- If the custom UI is coded in a different folder under “~/agileapps-cui/src/", use the name of the folder to substitute {folderName} in the link http://localhost:8054/{folderName}/.
Create a Template
Template File structure
Following is the recommended file structure:
-
Note:
It is mandatory to have an index.html file and a template-details.json file in the CUI directory.

Boilerplate Template
Creating index.html
This is the boilerplate template you can use to create your CUI. Read the comments in this file to understand how to use this template to create a CUI.
-
Note:
The content present in this boilerplate template file should be present in every HTML file that you create.
<!doctype html>
<html lang="en">

<head>
  <base href="./">
  <!-- Required meta tags -->
  <meta charset="utf-8">
  <meta name="viewport" content="width=device-width, initial-scale=1, shrink-to-fit=no">

  <link rel="stylesheet" href="/ace-lib/styles.css" />
  <link rel="stylesheet" href="/ace-lib/assets/themes/default/css/main.css" />

  <!--CUI specified css files -->
   <link rel="stylesheet" href="assets/css/styles.css" />

  <title>My Custom User Interface for AgileApps </title>
</head>

<body>


    ************************************************************************************************
    *                                                                                              *
    *                                                                                              *
    *                                                                                              *
    *                 <!-- The Custom HTML template content goes here -->                          *
    *                                                                                              *
    *                                                                                              *
    *                                                                                              *
    ************************************************************************************************


  <!-- platform assets -->
  <script type="text/javascript" src="/ace-lib/runtime.js"></script>
  <script type="text/javascript" src="/ace-lib/es2015-polyfills.js" nomodule></script>
  <script type="text/javascript" src="/ace-lib/polyfills.js"></script>
  <script type="text/javascript" src="/ace-lib/scripts.js"></script>
  <script type="text/javascript" src="/ace-lib/vendor.js"></script>
  <script type="text/javascript" src="/ace-lib/main.js"></script>

 <!--CUI specified JS files -->
  <script src="assets/js/scripts.js"></script>

</body>

</html>
Package a Template
Archive the developed CUI
After you create the template, you have to package it for deployment. Archive the template you create by running the following command:
Archive command
npm run package simple
-
Note:
- See the 'package.json' file to know the build commands under 'scripts'.
- simple is the directory name in ~agileapps-cui/src**
- If you change the directory name or create a new directory, use that value instead of simple. The packaged CUI template is available in the “~/agileapps-cui/dist/” directory.
- After you run this command, the application prompts you to provide the following details:
- template package name: If you do not provide a value here, the default value simple is applied.
- template package version: If you do not provide a value here, the default value 1.0 is applied.
Deploy the package
After you package the template, the next step is to deploy the package. Learn more about deployment into AgileApps.
Deployment
Introduction
To deploy your custom user interface (CUI) template, you have to package, install, and configure an access URL in AgileApps. While configuring an access URL in AgileApps, you can select an application, template, and other configurations.
To know more about creating the CUI template, read the “creating CUI template document”.
Packaging the Template
Before installing the CUI template, it needs to be packaged. Every template package should follow the file & directory structure guidelines and should contain the template-details.json file. A detailed information about how to package a template is available.
Installing the Template
To install a template package, you should have access permissions to Developer Resources. Follow these instructions to install a template in AgileApps:
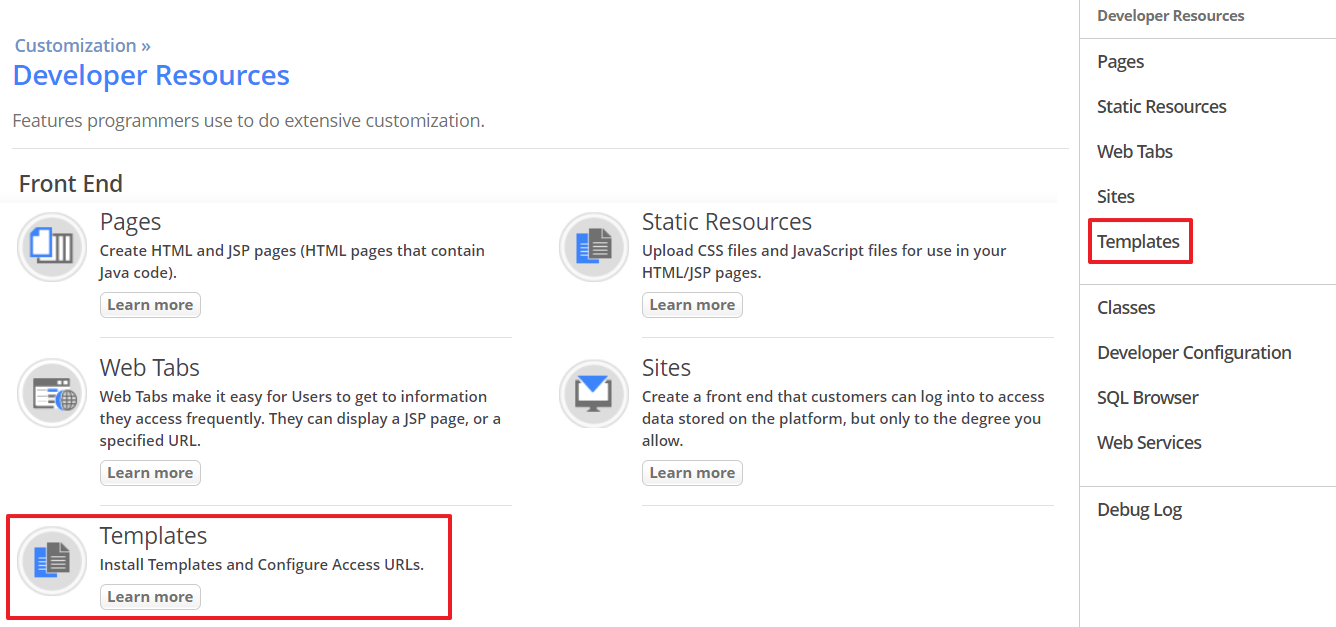
- Go to Settings > Customization > Developer Resources, and select Templates from the menu as shown in the following image:
- In the All Templates screen, click Install as shown in the following image:

- On the Install Template page, click Choose File and select the zip file for your template. Only .zip file format is supported. Other compression formats like RAR is not supported.
- The template zip file has the following considerations for the characters used in the zip file:
- The zip file name should only contain alphanumeric characters (a-z, A-Z, 0-9), hyphen(-), dot(.), or an underscore(_).
- The folder name inside the zip file should only contain alphanumeric characters (a-z, A-Z, 0-9), hyphen(-), or dot(.), or an underscore (_). Also, the folder name cannot start with a dot(.) symbol.
- The file name inside the zip file should only contain alphanumeric characters (a-z, A-Z, 0-9), hyphen(-), or dot(.), or an underscore (_).
- The template version inside the template-details.json file should be in {major.minor} format. For example, 1.2.
- The template name inside the template-details.json file should only contain alphanumeric characters (a-z, A-Z, 0-9), hyphen(-), or dot(.), or an underscore (_). Also, it should start with an alphabet and end with an alphanumeric character.
- The template zip file has the following considerations for the characters used in the zip file:
- Click Next and then click Install. On successful installation, you will see a message on-screen conveying the same.
- Note: If any of the above considerations are not met, then the installation fails with the relevant error message.}}
- This concludes the procedure for installing the template.


-
Note:
You must be careful about of type of files included inside the package as the file types supported are limited. If you find any issues with this, you must raise a support incident ticket.
Updating an Existing Template
- Go to Settings > Customization > Developer Resources, and select Templates
- In the All Templates screen, click Install.
- In the Select Template File screen, select the template file which you want to update and click Next.
- The platform does a validation for the selected template name and you will see a warning message stating that a template with the same name already exists. As a backup, you can download the existing template by clicking the Download button as shown in the following image:

- Select Install to proceed with the installation and the platform performs an update for the existing template.

-
Note: There is no restriction on higher or lower versions when updating the template.
Deleting a Template
-
Note: Before you delete a template, ensure to remove all references to this template from any other entity in the platform.
- Go to Settings > Customization > Developer Resources, and select Templates
- From the All Templates page, select the template you want to delete.
- In the Template Information page, click Delete.
- In the Delete confirmation dialog box, click OK. The template is deleted from the platform. The template is moved to the Recycle Bin. You can choose to restore this deleted template at a later time or delete it permanently from the Recycle Bin.
-
Note: You can restore the template from the Recycle Bin; only when there is no duplicate template.
Configuring the Access URL
Using the Access URL, you can access the AgileApps application to which you apply the custom templates.
-
Note: The template that you install does not impact the look and feel of the application UI that you access using the default AgileApps URL. The template becomes applicable only when you access the application using the Access URL that you configure here.
- 1.After you install the template, from the Templates list page, click Configure Access URL as shown in the following image:


- 2.In the All Configured Access URLs page, you will see a list of all the configured access URLs for the applications to which you have access. You can enable or disable an access URL from this page. To configure a new access URL, click New Access URL.
Note:If you have not updated a namespace in the Developer Configuration section of the Developer Resources page, then the system prompts you with a message to update the namespace. Click the URL to update the namespace. Provide a name and save it. This is a mandatory step as every tenant should have a unique namespace. For more information about the namespace, see Developer Configuration.
- 3.In the Configure Access URL page, provide the following details in the Access URL Information section:
Field Description Select Application Select an application from the drop-down list for which you want to apply this custom template. -
Note: You cannot change this selected application after you save this information.
Access URL Alias Provide an alias for the Access URL. This alias gets appended to the Access URL which is used to access the application. The Access URL alias should contain only alphanumeric characters [A-Z,a-z,0-9], or an underscore(_), or a hyphen(-) and must always start with alphabetical characters and cannot end with an underscore(_), or a hyphen(-).Also, it cannot contain spaces or be left blank. -
Note: The Access URL cannot have duplicates. You cannot create another application using the same application alias unless and until you delete the other application having this same alias.
Access URL This is created dynamically based on what you provide for the Access URL Alias field. The format for the Access URL is https://{domain}/networking/{apps}/{namespace}/{alias_name}/, where the Access URL Alias is appended at the end. Select Template Select a template for the drop-down list. This is the custom template which the platform applies to your application. Mandatory User Login If you select this checkbox, the user is by default taken to the platform login page. This happens if the user is opening the Access URL for the first time. After successful login in the platform login page, the user is taken to the template landing page.
If you don't select this checkbox, the users will be able to access the CUI without logging into the AgileApps platform.
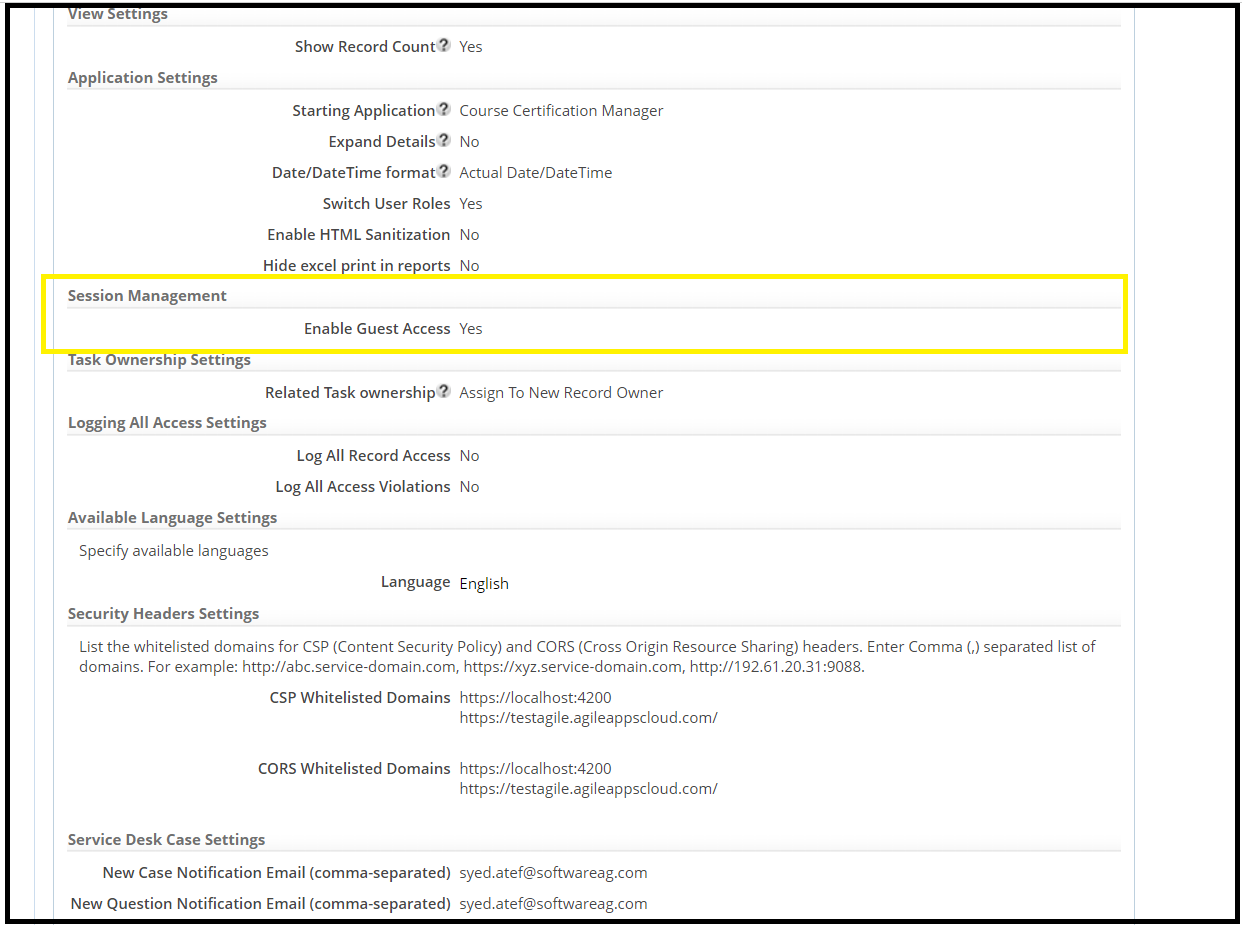
You must perform the following steps for the user to access the platform as a Guest User:- The developer/administrator has to enable guest access to the platform in the Company Information page.
- On the Configuration > Customization > Objects > Object Properties page, enable guest access for the object by selecting Allow Guest Access checkbox under Guest Access Criteria section.
- Expressional dialog boxes similar to Custom Access Criteria appear and allow you to provide regex expressions for specific actions. For example: Provide 'true' to the respective actions for all the users to be able to access the CUI as guest users.
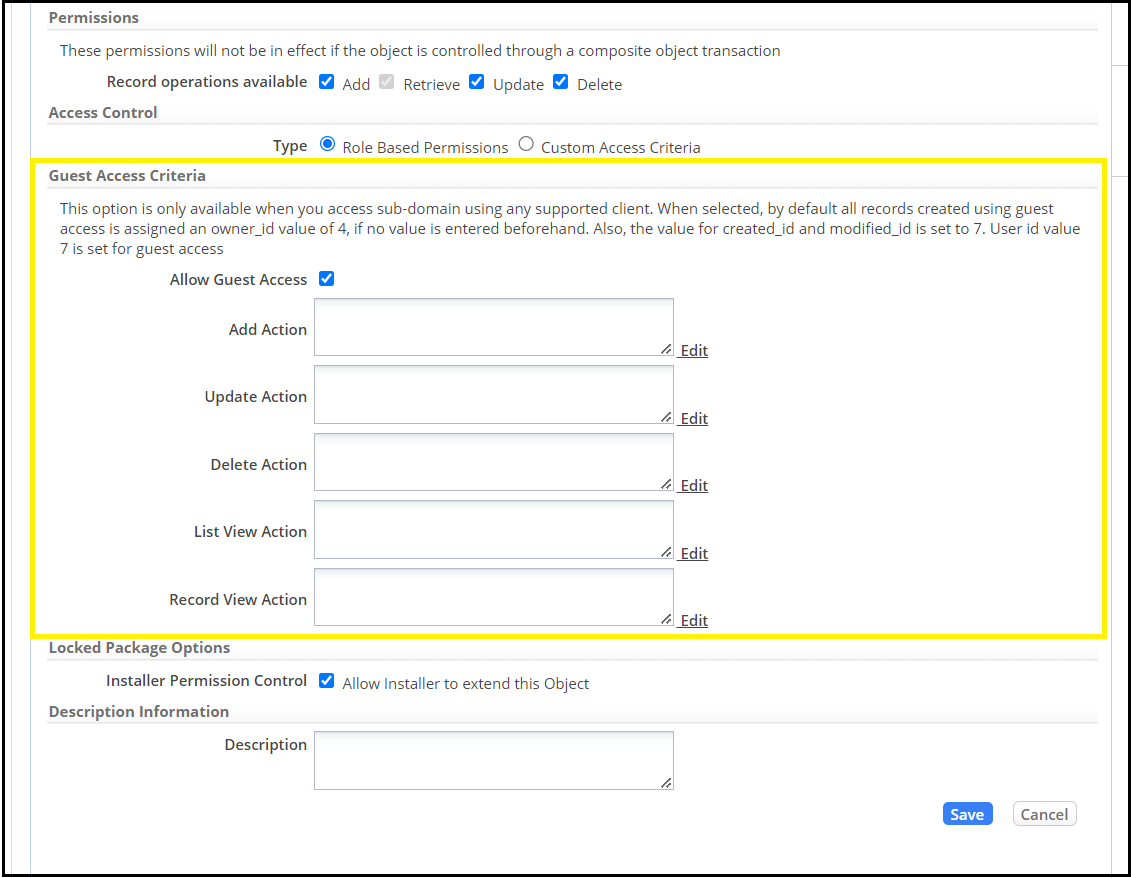
- Click Edit next to the text box and provide the regex expressions on the respective actions that the users can access from the CUI as a Guest User.
Note: For users who enter data through CUI without access to the AgileApps platform when the guest user is enabled, the records added or updated reflect in the platform as the guest user and not the actual user who does it.
Enable Access URL Use this checkbox to enable or disable the Access URL.


- 4.This concludes the procedure for configuring the Access URL.
Editing the Access URL Configuration
- Go to Settings > Customization > Developer Resources, and select Templates
- Select Configure Access URL.
- From the list of Configured Access URLs, select the Access URL you want to edit.
- In the Access URL Information page, click Edit and update the required fields.
- Note: You cannot change the application that you selected when configuring this Access URL.
- After you make the changes, click Save.
Deleting the Access URL Configuration
- Go to Settings > Customization > Developer Resources, and select Templates
- Select Configure Access URL.
- From the list of Configured Access URLs, select the Access URL you want to delete.
- In the Access URL Information page, click Delete.
- In the Delete confirmation dialog box, click OK. The configured Access URL is moved to the Recycle Bin. You can choose to restore this deleted Access URL at a later time or delete it permanently from the Recycle Bin.
-
Note: You can restore the Access URL configuration from the Recycle Bin; only when there is no duplicate Access URL Alias.
Packaging the CUI
By means of packaging, you can deploy the Template and Access URLs created in one tenant into another tenant. For more information about Packages and Package Items, see Packages and Package Items respectively.
How to Access the CUI in Run-time
- Go to Settings > Customization > Developer Resources, and select Templates
- Select Configure Access URL. You will see a list of all the configured Access URLs with the Application name and other details.
- Click the Access URL Alias which you want to view in run-time. The Access URL format is https://{domain}/networking/apps/{namespace}/{AccessURLAlias}/
- From the Access URL Information page, copy the Access URL and paste it in any supported browser. You can now see the associated application render in your browser with the customized look and feel as defined in your custom template.
Single Sign-on Login URL for CUI
You can perform single sign-on for accessing the CUI using the following URL pattern: https://{domain}/networking/saml/ssoRequest?ticket=<ticket_ID>&done=apps/{namespace}/{AccessURLAlias}/
Deleting an Application
When you delete an application, the platform deletes all the associated template Access URLs from the system permanently.
Limitations
- The email notifications sent to the user for an operation performed using the CUI may include links. If user opens this link, he or she is taken to the default Platform UI and not the custom UI.