Translation Workbench
![]() > Administration > Account Management > Translation Workbench
> Administration > Account Management > Translation Workbench
The Translation Workbench makes it possible to deliver an application in one or more of the languages supported by the platform, by mapping words and phrases defined in custom platform elements to a different language.
About the Translation Workbench
By default, the platform runtime user interface (UI) is labeled in English. In order to make the platform more usable for a global audience, these Eligible Platform Elements can be customized with language labels. These configurable platform elements are presented in a language that is more familiar to users, which improves their effectiveness. Any of the Supported Languages can be selected. The Audit Log will reflect language translation, if it has been implemented.
- The Multiple Languages option is enabled by your Service Provider.
- The default single sign-on setting on on-premises installation is Off.
- The default single sign-on setting on the cloud is Off. (Contact Support to make changes.)
Users that have the Manage Translation Workbench permission can View, Import or Export the translation tables.
Although generally intended for localization of Custom Objects, the translation workbench can also be used to modify the labels associated with System Objects.
Developers can specify Java-style i18n labels and default values for Custom Labels.
Multiple languages can be enabled for a single platform tenancy. Individual users can select a default from the list of available languages.
- Learn more: Language Translation
Load the Translation Workbench
In order to enable Multiple Language Translation, language labels must first be loaded to the Translation Workbench. Two methods are available to load the Translation Workbench:
- Manual Edit
- Use this option to change language labels individually
- Import and Export
- Use this option for mass changes to language labels
Manual Edit
To edit individual language translations:
- Click
 > Administration > Account Management > Translation Workbench
 - Use the following options to navigate to the element of interest:
- Language
- Choose one of the available languages from the list.
(The choices are determined by the Company Information settings.) - Elements
- Choose one of the Eligible Platform Elements for editing
- Type and Subtype:Optional, and are not presented with every Language + Element combination
- Click the [Edit] button
- Manually edit the Translated Display Label
- Click [Save]
Import and Export
To create a new language translation file in CSV format, follow this procedure:
- Step 1: Export an existing language set.
- Step 2: Change the language-designation for each entry in the file.
- Step 3: Add the translated entries into the file using an external translation system.
- Step 4: Re-Import the resulting file to create a new language option.
- Considerations
- Translation Id is unique to each tenancy
- The import will fail if:
- The order of the fields in the CSV file is changed
- The Translation Id field is changed
- Objects have two records in the translation export file, where Item Type is Object Singular Label and Object Plural Label
Export Translation Entries
To export an existing language to a file:
- Click
 > Administration > Account Management > Translation Workbench
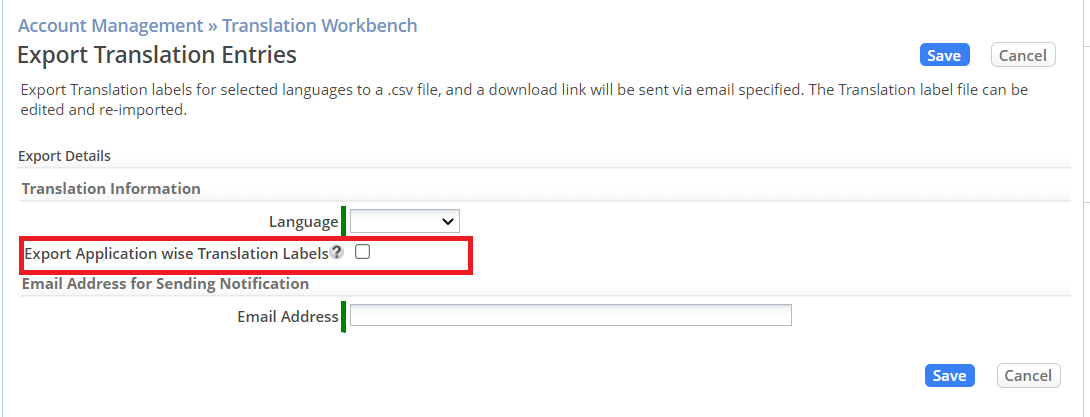
 - Click the [Export Translation Entries] button
- In the Translation Information section, select:
- Language: Choose the language to export
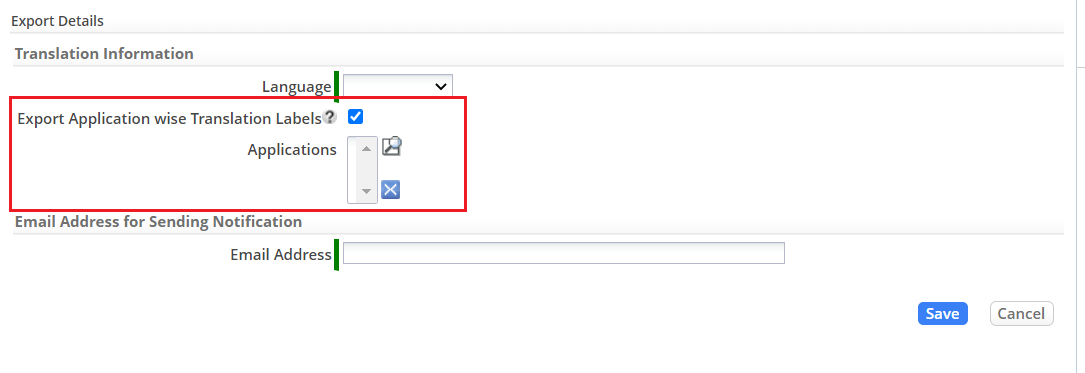
- Export Application wise Translation Labels: New properties are added in the translation export page. This option allows you to export application wise translation labels. Checkbox is unchecked by default.
- When you select the checkbox, you are shown a multi select application drop-down. You can choose the application that needs to be translated.
- In the Email Address Section, select:
- Email address
- Enter an email address
- A link to the CSV file is sent to this email address.
The contents of the CSV file can be translated to any desired language. It contains the labels for all Eligible Platform Elements.
Change Language Designation
A typical language translation files can contain thousands of records. Here is part of one exported from the platform:
<syntaxhighlight lang="text" enclose="div"> Translation Id,Language,Item Type,Additional Info,Base Label,Translated Label 11eb24840b494736933dfea6ed13b50a,en,Object Singular Label,,Account,, 11eb24840b494736933dfea6ed13b50a,en,Object Plural Label,,Accounts,,
60ed42521fd54de5a24d294ee8494db9,en,Object Plural Label,,Active Employees,, 5f13c0b09d93427eb073a38c31146f68,en,Object Plural Label,,Benefits,, 443eeb61c2cf4e6da297bf80b09a5c2a,en,Object Plural Label,,Cases,, 58f403513d8d40bb9f0190cb0974add5,en,Object Singular Label,,Company,, 11ee93bca9f649ceadbee7a66ec163d4,en,Object Singular Label,,Compensation,, c3d33c48ba104eefa2d56ae45f39c667,en,Object Plural Label,,Contacts,,
fa2d4a8bc6e24d4f8a3c6d2bcfcb6c1c,en,Section,Object:Contacts,Layout Name:Default Layout,Contact Information,, da7d3db7e078419ebc583a1a4f061ea0,en,Section,Object:Contacts,Layout Name:Default Layout,Description Section,,
.
.
.
</syntaxhighlight>
Note that the language-designation for each entry is "en" (English). When translating the language into Spanish, for example, you would do a search/replace to change each instance of ",en," to ",es,". (Adding the commas ensures that you don't make an unintended change.)
Import Translation Entries
To import the translation entries file:
- Click
 > Administration > Account Management > Translation Workbench
 - Click the [Import Translation Entries] button, and complete the following information:
- Language
- Specify the language to import
- Select the file to load
- Click the [Browse] button to navigate to the file
- Click [Save]
How to use the application wise translation effectively
- Export an existing language set from the development tenant.
- Change the language-designation for each entry in the file.
- Add the translated entries into the file using an external translation system.
- Re-Import the resulting file to create a new language option in the development tenant.
- While Packaging include Translation Work Bench for language.
- Install Package in TEST or PRODUCTION Tenant. This step inserts unique translation Ids for the selected applications into the target tenant.
- Repeat steps 1-3 if you need to translate the application into another language.
- Re-Import
- Re-import the resulting file to create a new language option in the development tenant.
- Re-Import the resulting file to create a new language option in TEST or PRODUCTION Tenant as Translation Ids are already inserted as part of package installation. New translation language import works only for those translation ids that match in the given CSV.
About Elements in the Translation Workbench
Each language translation file contains these elements:
- Language
- English (Default)
- Other languages, as available
- Element
- Type (of Element)
- Subtype (of Element)
Eligible Platform Elements
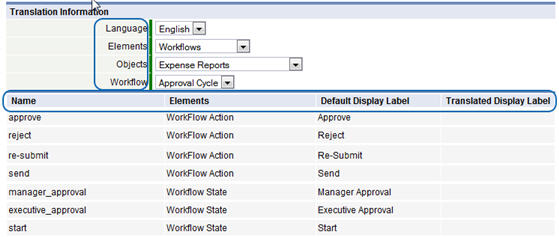
To view translation entries, you choose Language, Element, type, and subtype, where the type and subtype options depend on the Element.
For each item, the following information is shown:
- Name
- Elements (Optional)
- Default Display Label
- Translated Display Label
- Default Display Label (Plural), Translated Display Label (Plural) (Optional)
Types and Subtypes
Element Type, Subtype Actions Objects Applications Custom Labels Category - Category Name
Enumerated Fields
for:- Checkboxes
- Multiple Checkboxes
- Picklists
- Dependent Picklists
- Multi Select Picklists
- Radio Buttons
Objects Fields Objects Field Help Labels Objects Forms Objects Form Related Items Objects
Sub Type- Layout Field Help Labels
- Multi Value Lookup Labels
- Quick Links
- Related Information Section
- Related Information Button Labels
- Sections
Global Picklists Global Picklist Dashboards Applications - Label
- Widget Title
- Pages
Objects Report Folders Reports Sidebar - Label
- Widget Title
- Sidebars
Validation Objects Views View Type - Object Related Views
- Objects
- Other Views
Web Tabs - Label
- Widget Title
- Sidebars
Custom Labels
Custom Labels provide the the ability to create free-form messages, or alphanumeric text strings in:
- Onscreen help or tips
- Alert messages
- Warning messages
The custom labels are added via the Translation Workbench, and are used in these elements in the platform:
- Pages
- Classes
- Custom Form Actions
- Java API: showMessage, throwError
- JavaScript validation messages
- Web Tabs
To add custom labels:
- Click
 > Administration > Account Management > Translation Workbench
 - Specify the following information:
- Language
- Select the desired language
- Elements
- Custom Labels
- Category
- --New Category--
- Category Name
- Enter a name for the category
- Click the [New Category] button
- In the form that appears, enter the token and the Translated Custom Message
- A maximum of 100 tokens can be created for each Category
- Click [Save]
Custom Labels For Developers
Accessing a Custom Label in JAVA
The translateToken API accesses a Custom Label (a message) defined in the Translation Workbench.
- Syntax
- <syntaxhighlight lang="java" enclose="div">
String result = Functions.translateToken(String key) String result = Functions.translateToken(String key, String [] args) </syntaxhighlight>
- Parameters
-
- key
- The category and token (index key) for the message to retrieve, in the form: "#category.token_name".
- args
- An array of string-arguments to be substituted into the message, in the locations defined by the message format.
- Returns
- A string containing the selected message in the user's currently active language, with specified arguments substituted.
- Example
- In this example, go_msg is a Custom Label in the Translation Workbench created in the "custom" category, where the translation in the user's current language is "It's a {1} day for a {2}." Supplying the arguments then allows for variations on the message.
- <syntaxhighlight lang="java" enclose="div">
String [] args = {"nice", "walk"}; String msg = Functions.translateToken("#custom.go_msg", args));
// ==> "It's a nice day for a walk."
</syntaxhighlight>
Accessing a Custom Label in HTML
In HTML:
- The category and tokens defined in Custom Labels are used to construct a key.
- The key and related arguments are passed to a Message Tag, which returns a localized message.
Creating a Key
To access a Custom Label in HTML, you create a key, using the same format as Template Variables:
A category name, followed by '.' and a message or label identifier (a "token").
Example: #categoryname.tokenname
- where
- categoryname
- Name of the Category
- tokenname
- Name of the Token
- Example
For a category named webtab, create the following tokens:
- welcome_msg = Welcome to the {0}
- message = This application keeps track of your customer service requests quickly and easily
To create language labels using the custom label key, add arguments as follows:
- {#webtab.welcome_msg^ABC}
-
- Which displays in the UI as: Welcome to the ABC
- Considerations
- The carat (^) character is used to separate arguments passed to the function
- If the argument is missing ({#webtab.message}), the default message is displayed: This application keeps track of your customer service requests quickly and easily.
- Tokens are supported in:
- Web Tabs, using:
- HTML
- Raw HTML
- Example
<html>
  <head>
    <title></title>
  </head>

  <body>

    <h1>{#webtab.welcom_msg^ABC}</h1>

    <p>{#webtab.messge}</p>

  </body>
</html>
Using Message Tags
Message Tags support multiple languages, using Custom Labels created in the Translation Workbench.
- When a message tag is implemented, the message appears in the user's selected language.
- Message tags are part of the platform Tag library
- The platform Tag Library is a Java Custom Tag Library
- If the key is not defined in the Translation Workbench, the key defined in the call will be displayed.
- Syntax
- <syntaxhighlight lang="java" enclose="div">
<%@ taglib uri="/LJTagLib" prefix="lj" %> <lj:message key="#{category}.{token}" arg1="Julia" arg2="Jones"/> </syntaxhighlight >
- Example
Assume the following item is specified in the Translation Workbench:
Category webtab Token message Message Requester Name: {1}, {0}
Then this code:
- <syntaxhighlight lang="java" enclose="div">
<%@ taglib uri="/LJTagLib" prefix="lj" %> <html>
   <head>
       <title>Customer Details</title>
   </head>
   <body>
Customer Details
All the details
       <lj:message key="#webtab.message" arg1="Julia" arg2="Jones"/>
   </body>
</html> </syntaxhighlight >
Causes this text to be inserted into the HTML:
- Requester Name: Jones, Julia


