Difference between revisions of "Building an Advanced Two-Phase Case Management System in the AgileApps Cloud"
imported>Aeric |
Wikieditor (talk | contribs) |
||
| (20 intermediate revisions by the same user not shown) | |||
| Line 1: | Line 1: | ||
==== | :{| border="1" align="right" cellpadding="5" cellspacing="1" | ||
This | | | ||
* [[Building a Dynamic Case Management Application in the AgileApps Cloud|Previous Article]] | |||
* [[Customizing the ServiceDesk application in the AgileApps Cloud™|Next Article]] | |||
* [[Article Index|Back to Article Index]] | |||
|} | |||
== Overview == | |||
This article describes an advanced implementation of an '''Employee Onboarding''' application that creates a second case record and launches the attendant processes when the processes attached to the first record have been completed. It represents a deeper dive into the platform that demonstrates some of the things you can do with advanced rules and processes. | |||
{{Note|If you haven’t already read it, this article describes the basic application: | {{Note|If you haven’t already read it, this article describes the basic application: | ||
[[ Building a Dynamic Case Management Application in the AgileApps Cloud]] | [[Building a Dynamic Case Management Application in the AgileApps Cloud]].<br> | ||
Links to | Links to the article and other useful pages can be found in the support wiki’s [[Article Index]].}} | ||
==The Goal: Set Up a Two-Phase Onboarding Process == | |||
The goal of the implementation is to create a process suitable for onboarding new employees, in two phases. | The goal of the implementation is to create a process suitable for onboarding new employees, in two phases. | ||
=== Requirements and Strategy === | |||
*Manage the process in two phases, each with its own deadlines. | *Manage the process in two phases, each with its own deadlines. | ||
**In the first phase, the organization has a week to prepare for the new employee | **In the first phase, the organization has a week to prepare for the new employee. | ||
**In the second phase, the organization has a day to get the person into their new position | **In the second phase, the organization has a day to get the person into their new position. | ||
*Notifications should be sent if either of the two phases reaches 90% of its time limit. | *Notifications should be sent if either of the two phases reaches 90% of its time limit. | ||
=== Meeting the Challenge of Two-Phase Onboarding === | |||
The need for a two-phase approach represents a major challenge for this case study. | The need for a two-phase approach represents a major challenge for this case study. That is something the AgileApps case management platform was not originally designed to do. (It may do well so in the future, however, in response to needs like this one.) | ||
The strategy for meeting that challenge is to create two records for each case, and to use a combination of event-handing and rules to begin the second phase automatically when the first is done: | The strategy for meeting that challenge is to create two records for each case, and to use a combination of event-handing and rules to begin the second phase automatically when the first is done: | ||
:[[File:utl.png]] | :[[File:utl.png]] | ||
Here is how it works: | |||
# When a new case is created, a ''Case Created'' event occurs. | |||
::The Rules associated with that event check to see which kind of case it is: Phase I or Phase II. | #:: The Rules associated with that event check to see which kind of case it is: Phase I or Phase II. | ||
::For a Phase I case, processes associated with Phase II are disabled, so they | #:: For a Phase I case, processes associated with Phase II are disabled, so they cannot be launched inadvertently, and Phase I processes are initiated. For a Phase 2 case, the reverse is true. | ||
#Track process completion. | |||
::When a | #:: When a ''Process Completed'' event occurs, run rules to determine which process it is, and set the appropriate flag in the case record to record the fact that it has been done. | ||
#Determine when the next phase can begin. | |||
::When all processes in Phase I have been completed, Phase II can begin. | #:: When all processes in Phase I have been completed, Phase II can begin. | ||
#If all of the flags are set, mark the current case as ''Resolved''. | |||
::It could also be marked as Closed, which is almost the same thing, but when an HR | #:: It could also be marked as ''Closed'', which is almost the same thing, but when an HR representative sees the ''Resolved'' status in their list of cases, they immediately know that Phase II is in progress. | ||
#Create the child case record for Phase II. | |||
::The new record points back to the original one, so the two remain tied together. | #:: The new record points back to the original one, so the two remain tied together. | ||
::A flag is set to further indicate that this is a Phase II record. | #:: A flag is set to further indicate that this is a Phase II record. | ||
#Launch Phase II Processes. | |||
::Another flag in the record identifies it as a Phase II case, triggering the Case Created rule that disables processes for Phase I and enables those for Phase II. | #:: Another flag in the record identifies it as a Phase II case, triggering the ''Case Created'' rule that disables processes for Phase I and enables those for Phase II. | ||
#Close the case. | |||
::When all onboarding preparations are complete, the case can be closed. | #:: When all onboarding preparations are complete, the case can be closed. | ||
=== Mapping the Requirements to Platform Capabilities === | |||
The following table shows the functional capabilities used to implement the new system requirements. | The following table shows the functional capabilities used to implement the new system requirements. | ||
::{| border="1" cellpadding="5" cellspacing="1" | ::{| border="1" cellpadding="5" cellspacing="1" | ||
| Line 43: | Line 51: | ||
|} | |} | ||
== Customize the Application == | |||
Start by opening the Employee Onboarding application created in the companion article: [[ Building a Dynamic Case Management Application in the AgileApps Cloud]] | Start by opening the '''Employee Onboarding''' application created in the companion article: [[ Building a Dynamic Case Management Application in the AgileApps Cloud]]. | ||
=== Add Additional Case Fields === | |||
You must add some additional fields that the Cases object needs. The need for them will become more apparent when the ''Business Processes'' are created. For now, as you go through the process just note the different kinds of fields, and take a moment to examine many other field types that are available. (Note that adding fields here gives you many more field type choices than you had in the Wizard.) | |||
#Go to [[File:GearIcon.png]] > Case Management > Case Fields | #Go to '''Configuration''' [[File:GearIcon.png]] > '''Case Management''' > '''Case Fields'''. | ||
#Click | #Click '''New Field''' to create new fields. After you enter the details, click '''Save and New'''. | ||
(These values will be displayed as read-only. They are to be modified by the new processes.) | #:(These values will be displayed as read-only. They are to be modified by the new processes. Refer to the following table to create new fields.) | ||
#When done adding the last field, click '''Save'''. | |||
::{| border="1" cellpadding="5" cellspacing="1" | ::{| border="1" cellpadding="5" cellspacing="1" | ||
! <br>Field Label !! <br>Display Type !! <br>Notes | ! <br>Field Label !! <br>Display Type !! <br>Notes | ||
|- | |- | ||
|align=" | |align="left"| Onboarding Phase || align="left"| Picklist || Values: Pre-Boarding, Onboarding. (Will equate to 1 and 2, respectively.) | ||
Default : 'Pre-Boarding' (include the single quotes) | Default : 'Pre-Boarding' (include the single quotes) | ||
|- | |- | ||
|align=" | |align="left"| Parent Case || align="left"| Lookup ||Object Name: Onboardings | ||
Lookup Field Configuration: Default (none). | Lookup Field Configuration: Default (none). | ||
This field will be set by the system to connect the Phase 2 | This field will be set by the system to connect the Phase 2 | ||
case record to the Phase 1 record. | case record to the Phase 1 record. | ||
|} | |} | ||
=== Customize the Form === | |||
# Go to '''Configuration''' [[File:GearIcon.png]] > '''Case Management''' > '''Case Forms'''. | |||
Here, | #Click the '''Default Layout''' form. | ||
#Change the properties of ''Onboarding Phase'' and ''Parent Case'', to '''Read Only''', as they will be modified programmatically: | |||
#:*Click the '''Edit Field''' icon | |||
#:*For Field Attributes, select '''Read Only'''. | |||
#:*Click '''Save'''. | |||
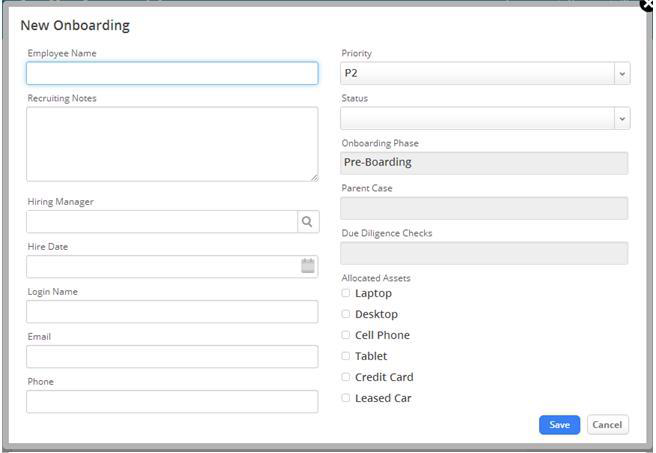
#Click and drag on the Move-arrows icons to change the position of the fields to create an arrangement like the one shown here:<br><br>[[File:aa.png]]<br><br> | |||
== Automating the Procedures == | |||
Here, you will set up two independent processes that will run as “parallel tracks” for a new employee. When both processes end, you will use events and rules to start the Phase II process. Later, you must add rules that use the case fields you added to track the process completions. | |||
===== Define the First Phase I Process ===== | ===== Define the First Phase I Process ===== | ||
Every active process in the system has a record associated with it. That record tracks the progress of the process for a given case. A Process is a template for those records. Underlying the template is a shared Process Model that defines the | Every active process in the system has a record associated with it. That record tracks the progress of the process for a given case. A ''Process'' is a template for those records. Underlying the template is a shared ''Process Model'' that defines the sequence of manual and automated tasks, potentially with conditional branching and other sophisticated features. | ||
This a simple two-step process, so the goal here is mostly to see how a process is constructed. | This is a simple two-step process, so the goal here is mostly to see how a process is constructed. | ||
'''Create the Process:''' | '''Create the Process:''' | ||
#Go to [[File:GearIcon.png]] > '''Case Automation''' > '''Processes''' | |||
#Click '''New Process''' | |||
#Drag in a '''Start Event'''. | |||
#Drag in a '''User Task''' and enter the task information:<br><br>[[File:ab.png]]<br><br> | |||
#:Here, you are telling the owner of the current case (the HR representative) to get the background-information form filled out and to deliver it to the security agency for verification. When this part of the process is reached, a task appears for the case in the Agent’s sidebar. When it is done, the Agent marks it as Complete. (You will see how that works in a moment.) | |||
Here, | #Click '''Save'''. | ||
#Create another User Task to get the results from the security agency.<br><br>[[File:ac.png]]<br><br> | |||
#:Here, we have simply left the '''Form''' and '''Change Status''' fields empty, rather than choosing '''None'''. The effect is the same. | |||
#:(Were the background check to fail, we’ll assume the agent adds a note to the case and changes its status. But we’ll focus on the “happy path” here, and assume that everything succeeds.) | |||
#Align the tasks, and draw the arrows between them. Then click the second task, and select the '''End Event''' icon:<br><br>[[File:ad.png]]<br> | |||
Here, we have simply left the Form and Change Status fields empty, rather than choosing | #:The end-event is added to the diagram, and an arrow is drawn to it:<br><br>[[File:ae.png]]<br><br> | ||
(Were the background check to fail, we’ll assume the agent adds a note to the case and changes its status. But we’ll focus on the “happy path” here, and assume that everything succeeds.) | #Click the '''Check Syntax''' button to validate the model:<br><br>[[File:af.png]]<br><br> | ||
#Finally, press '''Ctrl+S''' or click the disk icon in the upper left to save the process model. The '''Save''' dialog appears. | |||
#In the '''Save''' dialog, specify the '''''Process Name: Background Check'''''. | |||
The end-event is added to the diagram, and an arrow is drawn to it: | #Click '''Save'''. The process page appears:<br><br>[[File:nn.png]]<br><br> | ||
=== Create the Second Phase I Process === | |||
Here, | Here, you will create a process that asks the hiring manager to check references. This one includes an Approval Step to record the results. | ||
'''Create the Process:''' | '''Create the Process:''' | ||
#Go to [[File:GearIcon.png]]> Case Automation > Processes | #Go to [[File:GearIcon.png]]> '''Case Automation''' > '''Processes''' | ||
#Click | #Click '''New Process'''. The '''Process Model editor''' opens. | ||
#Drag in a Start event, as before. Then drag in an Approval | #Drag in a '''Start''' event, as before. Then drag in an '''Approval''' step. A dialog box opens for that step:<br><br>[[File:nm.png]]<br><br> | ||
[[File:nm.png]] | #::When this step is reached in the process, a task appears for the Hiring Manager that has two buttons: '''Approve''' and '''Reject'''. | ||
::When this step is reached in the process, a task appears for the Hiring Manager that has two buttons: | #::A comment is required this time, to encourage the manager to summarize the conversations. | ||
::A comment is required this time, to encourage the manager to summarize the conversations. | #If the reference check fails, we want to generate a task for the HR representative (case owner) to revoke the offer of employment. At that point, the HR rep will close the case. To do that, drag the '''User Task''' icon into the diagram, creating an arrangement something like this (for reasons that will be become clear in a moment):<br><br>[[File:Oo.png]]<br><br> | ||
#When the '''User Task''' dialog appears, provide the instructions for the HR representative: | |||
#::'''Step Title''': Revoke Offer | |||
#::'''Instructions''': Revoke the offer of employment. | |||
::'''Step Title''': Revoke Offer | #:::References were absent or not as good as claimed. | ||
::'''Instructions''': Revoke the offer of employment. | #::'''Due Date''': '''''8 hours Assigned To: Individual Owner''''' | ||
:::References were absent or not as good as claimed. | #::To test which button the '''Hiring Manager''' clicked, drag a '''Decision Switch''' icon into position, draw one arrow to the '''Revoke Offer''' task, and add an '''End Event''' coming from the other side of the decision switch, and one from the '''Revoke Offer''' task.<br><br>[[File:op.png]]<br><br> | ||
::'''Due Date''': 8 hours Assigned To: Individual Owner | #Double click the arrow going to the '''End Event'''. A dialog appears that lets you set conditions.<br><br>[[File:oq.png]]<br><br> | ||
:: | #::In general, any field in the record can be used. But since the last step was an '''Approval''' step, the top field in the list is '''Approved''', which has '''Yes''' and '''No''' values. Choose that field, with the value '''Yes'''. (So the process ends when the prospective employee’s references are good.) | ||
#::Note that you can use parentheses and you can add additional conditions by clicking the '''+''' icon. You can add AND/OR operators. Combined with the parentheses, those operators let you build up compound conditions of arbitrary complexity. | |||
#Click '''Save'''. | |||
#::A label now appears on the arrow to indicate the conditions under which it is taken.<br><br>[[File:or.png]]<br><br> | |||
::In general, any field in the record can be used. But since the last step was an Approval | #::Use the same procedure on the arrow going to the '''Revoke Offer''' task, but set the label to '''Rejected''' and select the value '''No'''. The process now looks like this:'''<br><br>[[File:os.png]]<br><br> | ||
#Click the '''Check Syntax''' button to validate the model:<br><br>[[File:af.png]]<br><br> | |||
::Note that you can parentheses | #Press '''Ctrl+S''' or click the disk icon in the upper left to save the process model. | ||
#Give the model a name: '''References Check''' | |||
::A label now appears on the | #Click '''Save''' | ||
:: | |||
=== Use Rules and Events to Transition between Phases === | |||
All the pieces we need are now in place to do the rules and events processing we discussed earlier, when we talked about Meeting the Challenge of Two-Phase Onboarding. | All the pieces we need are now in place to do the rules and events processing we discussed earlier, when we talked about ''Meeting the Challenge of Two-Phase Onboarding''. | ||
{{Note|It is also possible to sequence processes, using | {{Note|It is also possible to sequence processes, using '''Event Rules'''. A rule that is triggered when one process ends can start a new process, effectively sequencing the processes. Since each Rule can carry out multiple actions, the end of one process could trigger the start of many others. We’re not using that capability in this particular application, but it is worth noting that it exists.}} | ||
For the purposes of this application, there are several events that need to be handled: | For the purposes of this application, there are several events that need to be handled: | ||
*When a case is created, start the appropriate processes | *When a case is created, start the appropriate processes | ||
For Phase I, launch the 2 pre-boarding processes and disable the onboarding prep process. For Phase II, launch the Onboarding Prep process, and disable the pre -boarding processes. | For ''Phase I'', launch the 2 pre-boarding processes and disable the onboarding prep process. For ''Phase II'', launch the ''Onboarding Prep'' process, and disable the pre-boarding processes. | ||
*When a Phase I process ends, set the appropriate flag | *When a ''Phase I'' process ends, set the appropriate flag. | ||
Keep track of which processes have already been completed. | Keep track of which processes have already been completed. | ||
*When both flags have been set, launch Phase II | *When both flags have been set, launch ''Phase II''. | ||
In addition to starting the Phase II process, this step initiates the Phase II Service Level Agreement, which sets up important deadlines for the onboarding preparation, with reminder messages and escalation procedures. That part of the system is discussed in the next section. | In addition to starting the ''Phase II'' process, this step initiates the ''Phase II Service Level Agreement'', which sets up important deadlines for the onboarding preparation, with reminder messages and escalation procedures. That part of the system is discussed in the next section. | ||
:In each situation, | :In each situation, you must use ''Rules'' to test for the right set of conditions, and take the indicated actions. | ||
{{Note|In addition to the rules you will be building, it is worth noting that several additional rules are pre-built into the ServiceDesk system. Those rules are used to send messages when a case has been reopened, or when a significant amount of time (36 hours) has elapsed after a case has been created or been put into the Pending state. (We won’t discuss them any further, at this point. | {{Note|In addition to the rules you will be building, it is worth noting that several additional rules are pre-built into the ServiceDesk system. Those rules are used to send messages when a case has been reopened, or when a significant amount of time (36 hours) has elapsed after a case has been created or been put into the Pending state. (We won’t discuss them any further, at this point. You will find them under [[File:GearIcon.png]] > '''Case Automation''' > '''Business Rules''', if you explore a little.)}} | ||
=== Create a Rule Set to Launch Phase II === | |||
Each time a Phase I process completes, a rule will cause a flag to be set. When all of the flags are set, the application needs to launch Phase II (by creating a new case record). Each process-completed rule will set its own flag | Each time a ''Phase I'' process completes, a rule will cause a flag to be set. When all of the flags are set, the application needs to launch ''Phase II'' (by creating a new case record). Each process-completed rule will set its own flag. But after that, all of the process-completed rules need to do the same thing: Test the flags and create the second case record if all of them are set.</br> | ||
Right now, there are only two processes. But there could easily be more. It doesn’t make sense to duplicate the flag-testing and record-creation in each rule, so | Right now, there are only two processes. But there could easily be more. It doesn’t make sense to duplicate the flag-testing and record-creation in each rule, so we will use a '''Rule Set'''—a collection of one or more rules that can be triggered either by a process step or by another rule. (In this case, the rule set will be triggered by the process-completed rules.) | ||
::'''Create the Rule Set''' | ::'''Create the Rule Set''' | ||
#Go to [[File:GearIcon.png]]> Case Automation > Business Rules | #Go to '''Configuration''' [[File:GearIcon.png]] > '''Case Automation''' > '''Business Rules'''. | ||
#Click the Rule Sets tab | #Click the '''Rule Sets''' tab. | ||
#Click | #Click '''New Rule Set'''. | ||
:'''Name''': Begin Phase II when Phase I is complete | #:'''Name''': Begin Phase II when Phase I is complete. | ||
:'''Description''': If all Phase I processes are finished, create the Phase II record and fill in the important fields. | #:'''Description''': If all Phase I processes are finished, create the Phase II record and fill in the important fields.<br><br>[[File:za.png]]<br><br> | ||
#Click '''Save'''. | |||
The Rule Set summary is shown. You can now add one or more Rules to it. | The Rule Set summary is shown. You can now add one or more Rules to it. | ||
::'''Add a Rule''' | ::'''Add a Rule''' | ||
#Click | #Click '''New Rule''' | ||
#Under Basic Information, set Name: Begin Phase II when ready | #Under '''Basic Information''', set '''''Name: Begin Phase II when ready''''' | ||
#Under Execution Criteria, for Run this Rule choose: When specified conditions are true, buttons appear to let you add conditions. | #Under '''Execution Criteria''', for Run this Rule choose: When specified conditions are true, buttons appear to let you add conditions. | ||
#Next to All of these Conditions, click | #Next to All of these Conditions, click '''Add Condition'''. A field chooser dialog appears. | ||
#Select the Due Diligence Checks field, and click | #Select the '''Due Diligence Checks''' field, and click '''Insert Field'''.<br><br>[[File:Zb.png]]<br><br> | ||
#Choose the '''Contains''' operator, and test for Background Check. The first condition is created.<br><br>[[File:Zc.png]]<br><br> | |||
#::*The label you test for must be an exact match of the label specified when the field was defined. | |||
#::*For a single checkbox field, the operator would be equals, and the choices would be Yes or No. This checkbox is in a multi-checkbox group, so we test for the label. | |||
::*The label you test for must be an exact match of the label specified when the field was defined. | #::*We choose “contains”, because the field will eventually contain a comma-separated list of checkbox labels. | ||
::*For a single checkbox field, the operator would be equals, and the choices would be Yes or No. This checkbox is in a multi checkbox group, so we test for the label. | #Repeat the process for the References Check:<br><br>[[File:Zd.png]]<br><br> | ||
::*We choose “contains”, because the field will eventually contain a comma-separated list of checkbox labels. | #:The processes that cause these fields to be set run only for a Phase I case record, so there is no need to add a test to make sure we are in Phase I, as neither of these fields will ever be set in a Phase II record. | ||
#Click '''Save'''. You can see the expression that is created for the Rule.<br><br>[[File:Ze.png]]<br><br> | |||
#:You can write expressions like this one by choosing “When specified expression is true”, rather than “When specified condition is true”. The result is the same, but the procedure you just used is generally easier. | |||
:The processes that cause these fields to be set run only for a Phase I case record, so there is no need to add a test to make sure we are in Phase I, as neither of these fields will ever be set in a Phase II record. | |||
[[File:Ze.png]] | |||
:You can write expressions like this one by choosing “When specified expression is true”, rather than “When specified condition is true”. The result is the same, but the procedure you just used is generally easier. | |||
::'''Specify Actions''' | ::'''Specify Actions''' | ||
It is now time to specify the actions the Rule will take when the conditions are satisfied. | It is now time to specify the actions the Rule will take when the conditions are satisfied. | ||
#To resume editing, click the name of the rule you just created (Begin Phase II when ready). | |||
#Under Actions to Perform, follow the steps below to mark the existing (Phase I) case record as Resolved, and to create a new (phase II) case record that links to it: | |||
##Select Set Status and mark the current case record Resolved.<br><br>[[File:Zf.png]]<br><br> | |||
##:*As with any action that modifies a field, you can choose whether or not to trigger the execution of any record-update rules that may have been defined on this object. | |||
:*As with any action that modifies a field, you can choose whether or not to trigger execution of any record-update rules that may have been defined on this object. | ##:*Here, the choice is not to do so. | ||
:*Here, the choice is not to do so. | ##Click '''Add More'''. | ||
##Select Add Note and add the text 'Launching Phase 2' (including the single quotes).<br><br>[[File:Zh.png]]<br><br> | |||
##:*Both variables and text can be added. (The variable selector is under the field. It works the same as the one you saw when creating an email template.) | |||
##:*Text strings must be in quotes. | |||
:*Both variables and text can be added. (The variable selector is under the field. It works the same as the one you saw when creating an email template.) | ##Click '''Add More''' once again, select '''Add Record''', and choose the '''Onboardings''' object. | ||
:*Text strings must be in quotes. | ##Initialize the Parent Case field: | ||
##:*Click in the Field box. | |||
##::A list of appears, showing the labels of fields in the record you are creating. | |||
:*Click in the Field box. | ##:*Choose Parent Case. | ||
::A list of appears, showing the labels of fields in the record you are creating. | ##:*Click in the Value box. Additional buttons appear. | ||
:*Choose Parent Case. | ##:*Click '''Choose Field'''. | ||
:*Click in the Value box. Additional buttons appear. | ##::A list appears showing labels of fields in the current record. | ||
:*Click | ##:*Choose Record ID. | ||
::A list appears showing labels of fields in the current record. | ##::The field name (id) is inserted into the action. | ||
:*Choose Record ID. | ##:When this rule executes, the value on the right is assigned to the field on the left. Here, the Lookup field in the new record gets the record ID from the current case. (That’s what Lookup fields contain as their values.) | ||
::The field name (id) is inserted into the action. | ## Click [Map Additional Fields] and repeat the process to set the values for these fields, using the screenshot below as a guide: | ||
:When this rule executes, the value on the right is assigned to the field on the left. Here, the Lookup field in the new record gets the record ID from the current case. (That’s what Lookup fields contain as their values.) | ##::'''Employee Name''' | ||
##::The field label is chosen (Employee Name) from the list. When inserted, the actual field name is included (subject). To that, add additional text that says ‘Phase 2’, and add the case number for ease of reference. Click the [Check Syntax] button here, to make sure that everything is correct: | |||
::'''Employee Name''' | ##:::''subject + ' - Phase II - ' + case_number'' | ||
::The field label is chosen (Employee Name) from the list. When inserted, the actual field name is included (subject). To that, add additional text that says ‘Phase 2’, and add the case number for ease of reference. Click the [Check Syntax] button here, to make sure that everything is correct: | ##::'''Recruiting Notes''' | ||
:::''subject + ' - Phase II - ' + case_number'' | ##::Add a note that refers the HR Rep to the original case record: | ||
::'''Recruiting Notes''' | ##:::''See the parent case for the notes.' | ||
::Add a note that refers the HR Rep to the original case record: | ##::'As with all text strings, this one is enclosed in single quotes. | ||
:::''See the parent case for the notes.' | ##::'''Onboarding Phase''' – The value from the picklist field: ‘Onboarding’ | ||
::'As with all text strings, this one is enclosed in single quotes. | ##::Click '''Map Additional fields''' to see what you have so far most clearly:<br><br>[[File:Zi.png]]<br><br> | ||
::'''Onboarding Phase''' – The value from the picklist field: ‘Onboarding’ | ##Add these fields to transfer critical data from fields in the old case to the new one:<br><br>[[File:Zg.png|700px]]<br><br> | ||
::Click | ##::As you scroll through the list, you see fields with an angle bracket at the end, like this: | ||
##:::''Hiring Manager >'' | |||
##::Those entries occur for lookup fields. When you click one, another list of fields opens up to the right, showing fields in the target record. The actual value of the lookup field is the one you copied: | |||
##:::''Hiring Manager_id'' | |||
::As you scroll through the list, you see fields with an angle bracket at the end, like this: | ##Click '''Save'''. | ||
:::''Hiring Manager >'' | ##:The rule is now complete, with the actions to take indicated, as well as the conditions.<br><br>[[File:Zj.png]]<br><br> | ||
::Those entries occur for lookup fields. When you click one, another list of fields opens up to the right, showing fields in the target record. The actual value of the lookup field is the one you copied: | |||
:::''Hiring Manager_id'' | |||
:The rule is now complete, with the actions to take indicated, as well as the conditions. | |||
==== Create the Phase I Event Rules ==== | |||
You must create event rules to keep track of which Phase 1 processes have completed. After each rule sets the appropriate flag, it will invoke the Rule Set that tests to see whether all flags have been set. | |||
:'''Create the Process Completed rules:''' | :'''Create the Process Completed rules:''' | ||
#Go to | #Go to '''Configuration''' > '''Case Automation''' > '''Business Rules''' | ||
#In the Events tab, choose On Record: Process Complete | #In the Events tab, choose On Record: Process Complete | ||
#Click | #Click '''New Rule''' | ||
:'''Name''' – Mark Background Check Done | #:'''Name''' – Mark Background Check Done | ||
:'''Process''' – Background Check | #:'''Process''' – Background Check | ||
:'''Execution Criteria''' – Unconditional | #:'''Execution Criteria''' – Unconditional | ||
:'''Actions to Perform''' – Update Record, | #:'''Actions to Perform''' – Update Record, | ||
::'''[Choose Field to Update]''' | #::'''[Choose Field to Update]''' | ||
::Click the button and select Due Diligence Checks. | #::Click the button and select '''Due Diligence Checks'''. Click '''Insert Field'''. | ||
::'''Value:''' ''IF( ISNULL(due_diligence_checks), 'Background Check', due_diligence_checks+',Background Check')'' | #::'''Value:''' ''IF( ISNULL(due_diligence_checks), 'Background Check', due_diligence_checks+',Background Check')'' | ||
:::For a single checkbox field, the value would simply be true, with no quotes around it. But for a multi checkbox group, we add the label text to the existing value, in case the references check finished first. (If the field is empty, the label is assigned to it. Otherwise, the checkbox label is appended to it.) | #:::For a single checkbox field, the value would simply be true, with no quotes around it. But for a multi checkbox group, we add the label text to the existing value, in case the references check finished first. (If the field is empty, the label is assigned to it. Otherwise, the checkbox label is appended to it.) | ||
#Under '''Actions to Perform''', click '''Add More'''. | |||
:'''Select Action''': Execute Rule Set | #:'''Select Action''': Execute Rule Set | ||
:'''Select Rule Set''': Begin Phase II when Phase I is complete | #:'''Select Rule Set''': Begin Phase II when Phase I is complete.<br><br>[[File:Zk.png]]<br><br> | ||
#Click '''Save'''. | |||
#:You see the Process Complete rule list, with the rule added. | |||
:You see the Process Complete rule list, with the rule added. | #Click '''New Rule''' | ||
#::'''Name''' – Mark References Check | |||
::'''Name''' – Mark References Check | #::'''Done Process''' – References Check | ||
::'''Done Process''' – References Check | #::'''Execution Criteria''' – Unconditional | ||
::'''Execution Criteria''' – Unconditional | #::'''Actions to Perform''' – Update Record | ||
::'''Actions to Perform''' – Update Record | #:::'''[Choose Field to Update]:''' Due Diligence Checks. | ||
:::'''[Choose Field to Update]:''' Due Diligence Checks. | #:::'''[Insert Field]''' | ||
:::'''[Insert Field]''' | #:::'''Value:''' ''IF( ISNULL(due_diligence_checks), 'References Check', due_diligence_checks+',References Check')'' | ||
:::'''Value:''' ''IF( ISNULL(due_diligence_checks), 'References Check', due_diligence_checks+',References Check')'' | #Under '''Actions to Perform''', click '''Add More'''. | ||
#::'''Select Action''': Execute Rule Set | |||
::'''Select Action''': Execute Rule Set | #::'''Select Rule Set''': Begin Phase II when Phase I is complete | ||
::'''Select Rule Set''': Begin Phase II when Phase I is complete | #Click '''Save'''. | ||
#::Both Rules now appear in the list. | |||
::Both Rules now appear in the list. | |||
:'''Create the Case Created rules:''' | :'''Create the Case Created rules:''' | ||
These rules launch the appropriate processes when a case record is created. | These rules launch the appropriate processes when a case record is created. | ||
#Go to '''Configuration''' > '''Case Automation''' > '''Business Rules'''. | |||
#In the '''Events''' tab, choose '''On Record Created'''. | |||
#Click '''New Rule'''. | |||
::'''Name''' – Launch Phase I Processes | #::'''Name''' – Launch Phase I Processes | ||
::'''Execution Criteria''' – When specified conditions are true | #::'''Execution Criteria''' – When specified conditions are true | ||
:::All of these conditions: | #:::All of these conditions: '''Add Condition''' | ||
:::Select Field: Onboarding Phase | #:::Select Field: Onboarding Phase | ||
:::Select Operator: is one of | #:::Select Operator: is one of | ||
:::Select Value: Pre-Boarding | #:::Select Value: Pre-Boarding | ||
::'''Actions to Perform -''' | #::'''Actions to Perform -''' | ||
:::'''Action''' - Change Process Status | #:::'''Action''' - Change Process Status | ||
:::'''Process''' – Onboarding Prep | #:::'''Process''' – Onboarding Prep | ||
:::'''Status''' – Disable | #:::'''Status''' – Disable | ||
:::(To ensure that the Phase 2 process isn’t started for this case record.) | #:::(To ensure that the Phase 2 process isn’t started for this case record.) | ||
:::'''[Add More]''' | #:::'''[Add More]''' | ||
:::'''Action''' - Start Process | #:::'''Action''' - Start Process | ||
:::'''Process''' – Background Check | #:::'''Process''' – Background Check | ||
:::'''[Add More]''' | #:::'''[Add More]''' | ||
:::'''Action''' - Start Process | #:::'''Action''' - Start Process | ||
:::'''Process''' – References Check | #:::'''Process''' – References Check | ||
# Click '''Save'''. The rule appears.<br><br>[[File:Zl.png]]<br><br> | |||
#Click '''New Rule''' | |||
#::'''Name''' – Launch Phase 2 Process | |||
::'''Name''' – Launch Phase 2 Process | #::'''Execution Criteria''' – When specified conditions are true | ||
::'''Execution Criteria''' – When specified conditions are true | #::'''All of these conditions:''' [Add Condition] | ||
::'''All of these conditions:''' [Add Condition] | #::'''Select Field''': Onboarding Phase | ||
::'''Select Field''': Onboarding Phase | #::'''Select Operator:''' is one of | ||
::'''Select Operator:''' is one of | #::'''Select Value:''' Onboarding | ||
::'''Select Value:''' Onboarding | #::'''Actions to Perform''' | ||
::'''Actions to Perform''' | #:::'''Action''' - Change Process Status | ||
:::'''Action''' - Change Process Status | #:::'''Process''' – Background Check | ||
:::'''Process''' – Background Check | #:::'''Status''' – Disable | ||
:::'''Status''' – Disable | #:::(To ensure that the Phase 1 process isn’t started for this case record.) | ||
:::(To ensure that the Phase 1 process isn’t started for this case record.) | #:::'''[Add More]''' | ||
:::'''[Add More]''' | #:::'''Action''' - Change Process Status | ||
:::'''Action''' - Change Process Status | #:::'''Process''' – References Check | ||
:::'''Process''' – References Check | #:::'''Status''' – Disable | ||
:::'''Status''' – Disable | #:::'''[Add More]''' | ||
:::'''[Add More]''' | #:::'''Action''' - Start Process | ||
:::'''Action''' - Start Process | #:::'''Process''' – Onboarding Prep | ||
:::'''Process''' – Onboarding Prep | #Click '''Save'''. | ||
#::The Phase 2 rule appears after the Phase 1 rule. | |||
::The Phase 2 rule appears after the Phase 1 rule. | #::(The order in which rules execute can be modified, but it makes no difference here.)<br><br>[[File:Zm.png]]<br><br> | ||
::(The order in which rules execute can be modified, but it makes no difference here.) | |||
== Test the Application == | |||
You are now ready to test the application: | You are now ready to test the application: | ||
#Create a new case. | |||
#Complete Phase I Processes. | |||
#:Note that the Phase II case record is created. | |||
#Complete the Phase II processes. Note that the case is closed. | |||
{{Note| When the final pre-boarding process is completed, and the second record is created, you are still viewing the original record! The onboarding process was started in the second record, so the record you’re on seems “incomplete”. (It has been marked as Resolved, but that may not be immediately obvious as you examine the screen.) What’s needed is a function extends a robotic arm out of the screen, grabs the mouse, and positions the agent at the new record. In the meantime, we just have to train them to go back to the case list after completing a process!}} | {{Note| When the final pre-boarding process is completed, and the second record is created, you are still viewing the original record! The onboarding process was started in the second record, so the record you’re on seems “incomplete”. (It has been marked as Resolved, but that may not be immediately obvious as you examine the screen.) What’s needed is a function extends a robotic arm out of the screen, grabs the mouse, and positions the agent at the new record. In the meantime, we just have to train them to go back to the case list after completing a process!}} | ||
:{| border="0" align="left" cellpadding="5" cellspacing="1" | |||
| | |||
[[Building a Dynamic Case Management Application in the AgileApps Cloud|Previous Article]] | |||
|} | |||
:{| border="0" align="right" cellpadding="5" cellspacing="1" | |||
| | |||
[[Customizing the ServiceDesk application in the AgileApps Cloud™|Next Article]] | |||
|} | |||
---------------------------------------------------------------------------------------------------------------------------------------------------------------------------------------------------------------- | |||
:{| border="0" align="Center" cellpadding="5" cellspacing="1" | |||
| | |||
[[Article Index|Back to Article Index]] | |||
|} | |||
Latest revision as of 12:07, 7 March 2023
Overview
This article describes an advanced implementation of an Employee Onboarding application that creates a second case record and launches the attendant processes when the processes attached to the first record have been completed. It represents a deeper dive into the platform that demonstrates some of the things you can do with advanced rules and processes.

Note: If you haven’t already read it, this article describes the basic application: Building a Dynamic Case Management Application in the AgileApps Cloud.
Links to the article and other useful pages can be found in the support wiki’s Article Index.
The Goal: Set Up a Two-Phase Onboarding Process
The goal of the implementation is to create a process suitable for onboarding new employees, in two phases.
Requirements and Strategy
- Manage the process in two phases, each with its own deadlines.
- In the first phase, the organization has a week to prepare for the new employee.
- In the second phase, the organization has a day to get the person into their new position.
- Notifications should be sent if either of the two phases reaches 90% of its time limit.
Meeting the Challenge of Two-Phase Onboarding
The need for a two-phase approach represents a major challenge for this case study. That is something the AgileApps case management platform was not originally designed to do. (It may do well so in the future, however, in response to needs like this one.) The strategy for meeting that challenge is to create two records for each case, and to use a combination of event-handing and rules to begin the second phase automatically when the first is done:

Here is how it works:
- When a new case is created, a Case Created event occurs.
- The Rules associated with that event check to see which kind of case it is: Phase I or Phase II.
- For a Phase I case, processes associated with Phase II are disabled, so they cannot be launched inadvertently, and Phase I processes are initiated. For a Phase 2 case, the reverse is true.
- Track process completion.
- When a Process Completed event occurs, run rules to determine which process it is, and set the appropriate flag in the case record to record the fact that it has been done.
- Determine when the next phase can begin.
- When all processes in Phase I have been completed, Phase II can begin.
- If all of the flags are set, mark the current case as Resolved.
- It could also be marked as Closed, which is almost the same thing, but when an HR representative sees the Resolved status in their list of cases, they immediately know that Phase II is in progress.
- Create the child case record for Phase II.
- The new record points back to the original one, so the two remain tied together.
- A flag is set to further indicate that this is a Phase II record.
- Launch Phase II Processes.
- Another flag in the record identifies it as a Phase II case, triggering the Case Created rule that disables processes for Phase I and enables those for Phase II.
- Close the case.
- When all onboarding preparations are complete, the case can be closed.
Mapping the Requirements to Platform Capabilities
The following table shows the functional capabilities used to implement the new system requirements.
Requirement
FunctionalityStart Phase II only when Phase I is complete Use Rules triggered by Case Events to create records and initiate the appropriate processes.
Customize the Application
Start by opening the Employee Onboarding application created in the companion article: Building a Dynamic Case Management Application in the AgileApps Cloud.
Add Additional Case Fields
You must add some additional fields that the Cases object needs. The need for them will become more apparent when the Business Processes are created. For now, as you go through the process just note the different kinds of fields, and take a moment to examine many other field types that are available. (Note that adding fields here gives you many more field type choices than you had in the Wizard.)
- Go to Configuration
 > Case Management > Case Fields.
 - Click New Field to create new fields. After you enter the details, click Save and New.
- (These values will be displayed as read-only. They are to be modified by the new processes. Refer to the following table to create new fields.)
- When done adding the last field, click Save.
Field Label
Display Type
NotesOnboarding Phase Picklist Values: Pre-Boarding, Onboarding. (Will equate to 1 and 2, respectively.) Default : 'Pre-Boarding' (include the single quotes)
Parent Case Lookup Object Name: Onboardings Lookup Field Configuration: Default (none). This field will be set by the system to connect the Phase 2 case record to the Phase 1 record.
Customize the Form
- Go to Configuration > Case Management > Case Forms.
- Click the Default Layout form.
- Change the properties of Onboarding Phase and Parent Case, to Read Only, as they will be modified programmatically:
- Click the Edit Field icon
- For Field Attributes, select Read Only.
- Click Save.
- Click and drag on the Move-arrows icons to change the position of the fields to create an arrangement like the one shown here:

Automating the Procedures
Here, you will set up two independent processes that will run as “parallel tracks” for a new employee. When both processes end, you will use events and rules to start the Phase II process. Later, you must add rules that use the case fields you added to track the process completions.
Define the First Phase I Process
Every active process in the system has a record associated with it. That record tracks the progress of the process for a given case. A Process is a template for those records. Underlying the template is a shared Process Model that defines the sequence of manual and automated tasks, potentially with conditional branching and other sophisticated features. This is a simple two-step process, so the goal here is mostly to see how a process is constructed. Create the Process:
- Go to > Case Automation > Processes
- Click New Process
- Drag in a Start Event.
- Drag in a User Task and enter the task information:
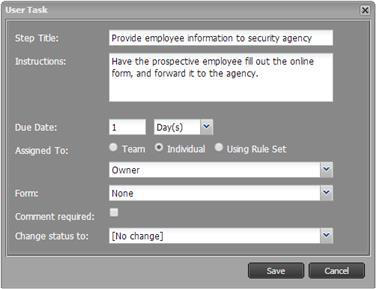
- Here, you are telling the owner of the current case (the HR representative) to get the background-information form filled out and to deliver it to the security agency for verification. When this part of the process is reached, a task appears for the case in the Agent’s sidebar. When it is done, the Agent marks it as Complete. (You will see how that works in a moment.)
- Click Save.
- Create another User Task to get the results from the security agency.
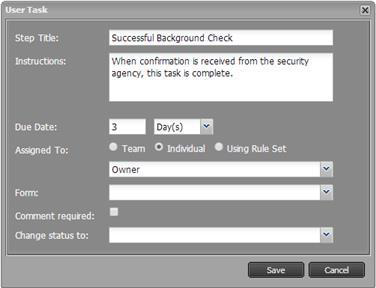
- Here, we have simply left the Form and Change Status fields empty, rather than choosing None. The effect is the same.
- (Were the background check to fail, we’ll assume the agent adds a note to the case and changes its status. But we’ll focus on the “happy path” here, and assume that everything succeeds.)
- Align the tasks, and draw the arrows between them. Then click the second task, and select the End Event icon:
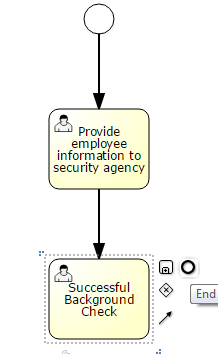
- The end-event is added to the diagram, and an arrow is drawn to it:
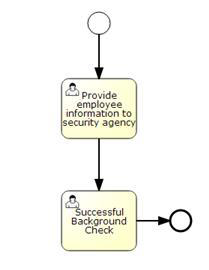
- The end-event is added to the diagram, and an arrow is drawn to it:
- Click the Check Syntax button to validate the model:

- Finally, press Ctrl+S or click the disk icon in the upper left to save the process model. The Save dialog appears.
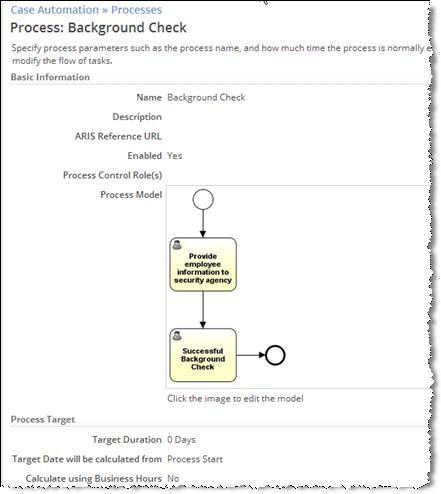
- In the Save dialog, specify the Process Name: Background Check.
- Click Save. The process page appears:


Create the Second Phase I Process
Here, you will create a process that asks the hiring manager to check references. This one includes an Approval Step to record the results. Create the Process:
- Go to > Case Automation > Processes
- Click New Process. The Process Model editor opens.
- Drag in a Start event, as before. Then drag in an Approval step. A dialog box opens for that step:
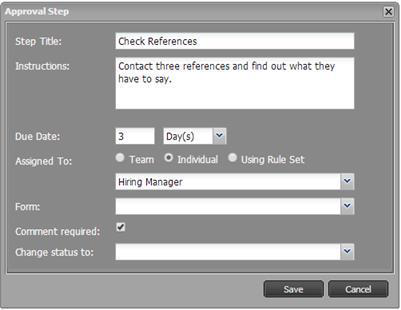
- When this step is reached in the process, a task appears for the Hiring Manager that has two buttons: Approve and Reject.
- A comment is required this time, to encourage the manager to summarize the conversations.
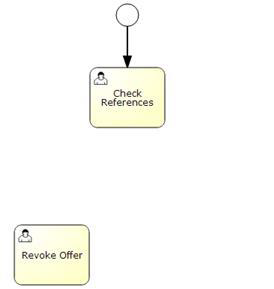
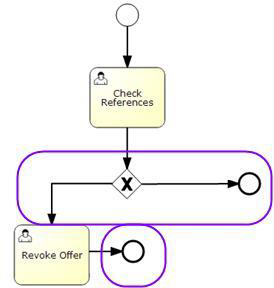
- If the reference check fails, we want to generate a task for the HR representative (case owner) to revoke the offer of employment. At that point, the HR rep will close the case. To do that, drag the User Task icon into the diagram, creating an arrangement something like this (for reasons that will be become clear in a moment):
- When the User Task dialog appears, provide the instructions for the HR representative:
- Step Title: Revoke Offer
- Instructions: Revoke the offer of employment.
- References were absent or not as good as claimed.
- Due Date: 8 hours Assigned To: Individual Owner
- To test which button the Hiring Manager clicked, drag a Decision Switch icon into position, draw one arrow to the Revoke Offer task, and add an End Event coming from the other side of the decision switch, and one from the Revoke Offer task.
- Double click the arrow going to the End Event. A dialog appears that lets you set conditions.
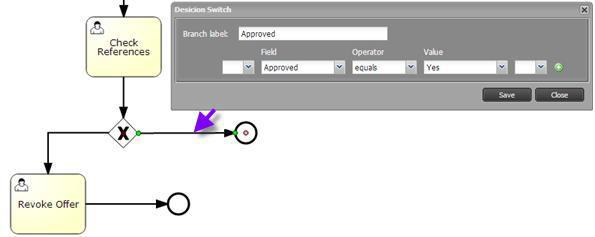
- In general, any field in the record can be used. But since the last step was an Approval step, the top field in the list is Approved, which has Yes and No values. Choose that field, with the value Yes. (So the process ends when the prospective employee’s references are good.)
- Note that you can use parentheses and you can add additional conditions by clicking the + icon. You can add AND/OR operators. Combined with the parentheses, those operators let you build up compound conditions of arbitrary complexity.
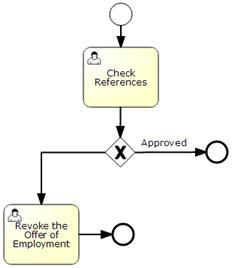
- Click Save.
- A label now appears on the arrow to indicate the conditions under which it is taken.
- Use the same procedure on the arrow going to the Revoke Offer task, but set the label to Rejected and select the value No. The process now looks like this:
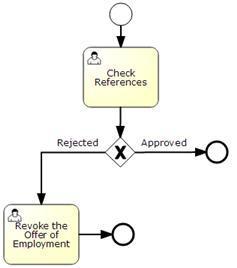
- A label now appears on the arrow to indicate the conditions under which it is taken.
- Click the Check Syntax button to validate the model:
- Press Ctrl+S or click the disk icon in the upper left to save the process model.
- Give the model a name: References Check
- Click Save


Use Rules and Events to Transition between Phases
All the pieces we need are now in place to do the rules and events processing we discussed earlier, when we talked about Meeting the Challenge of Two-Phase Onboarding.
-
Note: It is also possible to sequence processes, using Event Rules. A rule that is triggered when one process ends can start a new process, effectively sequencing the processes. Since each Rule can carry out multiple actions, the end of one process could trigger the start of many others. We’re not using that capability in this particular application, but it is worth noting that it exists.
For the purposes of this application, there are several events that need to be handled:
- When a case is created, start the appropriate processes
For Phase I, launch the 2 pre-boarding processes and disable the onboarding prep process. For Phase II, launch the Onboarding Prep process, and disable the pre-boarding processes.
- When a Phase I process ends, set the appropriate flag.
Keep track of which processes have already been completed.
- When both flags have been set, launch Phase II.
In addition to starting the Phase II process, this step initiates the Phase II Service Level Agreement, which sets up important deadlines for the onboarding preparation, with reminder messages and escalation procedures. That part of the system is discussed in the next section.
- In each situation, you must use Rules to test for the right set of conditions, and take the indicated actions.
-
Note: In addition to the rules you will be building, it is worth noting that several additional rules are pre-built into the ServiceDesk system. Those rules are used to send messages when a case has been reopened, or when a significant amount of time (36 hours) has elapsed after a case has been created or been put into the Pending state. (We won’t discuss them any further, at this point. You will find them under
> Case Automation > Business Rules, if you explore a little.)
Create a Rule Set to Launch Phase II
Each time a Phase I process completes, a rule will cause a flag to be set. When all of the flags are set, the application needs to launch Phase II (by creating a new case record). Each process-completed rule will set its own flag. But after that, all of the process-completed rules need to do the same thing: Test the flags and create the second case record if all of them are set.
Right now, there are only two processes. But there could easily be more. It doesn’t make sense to duplicate the flag-testing and record-creation in each rule, so we will use a Rule Set—a collection of one or more rules that can be triggered either by a process step or by another rule. (In this case, the rule set will be triggered by the process-completed rules.)
- Create the Rule Set
- Go to Configuration > Case Automation > Business Rules.
- Click the Rule Sets tab.
- Click New Rule Set.
- Name: Begin Phase II when Phase I is complete.
- Description: If all Phase I processes are finished, create the Phase II record and fill in the important fields.
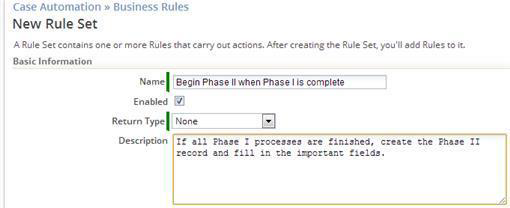
- Click Save.

The Rule Set summary is shown. You can now add one or more Rules to it.
- Add a Rule
- Click New Rule
- Under Basic Information, set Name: Begin Phase II when ready
- Under Execution Criteria, for Run this Rule choose: When specified conditions are true, buttons appear to let you add conditions.
- Next to All of these Conditions, click Add Condition. A field chooser dialog appears.
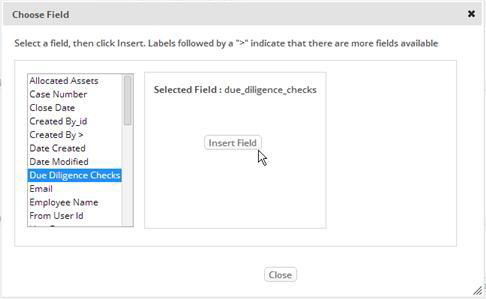
- Select the Due Diligence Checks field, and click Insert Field.
- Choose the Contains operator, and test for Background Check. The first condition is created.
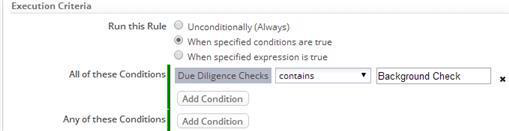
- The label you test for must be an exact match of the label specified when the field was defined.
- For a single checkbox field, the operator would be equals, and the choices would be Yes or No. This checkbox is in a multi-checkbox group, so we test for the label.
- We choose “contains”, because the field will eventually contain a comma-separated list of checkbox labels.
- Repeat the process for the References Check:
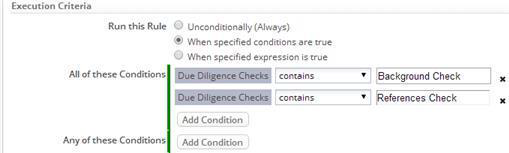
- The processes that cause these fields to be set run only for a Phase I case record, so there is no need to add a test to make sure we are in Phase I, as neither of these fields will ever be set in a Phase II record.
- Click Save. You can see the expression that is created for the Rule.
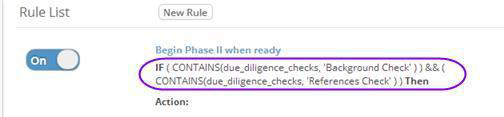
- You can write expressions like this one by choosing “When specified expression is true”, rather than “When specified condition is true”. The result is the same, but the procedure you just used is generally easier.


- Specify Actions
It is now time to specify the actions the Rule will take when the conditions are satisfied.
- To resume editing, click the name of the rule you just created (Begin Phase II when ready).
- Under Actions to Perform, follow the steps below to mark the existing (Phase I) case record as Resolved, and to create a new (phase II) case record that links to it:
- Select Set Status and mark the current case record Resolved.

- As with any action that modifies a field, you can choose whether or not to trigger the execution of any record-update rules that may have been defined on this object.
- Here, the choice is not to do so.
- Click Add More.
- Select Add Note and add the text 'Launching Phase 2' (including the single quotes).
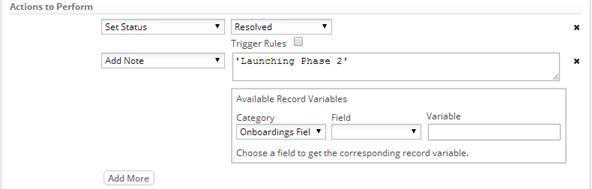
- Both variables and text can be added. (The variable selector is under the field. It works the same as the one you saw when creating an email template.)
- Text strings must be in quotes.
- Click Add More once again, select Add Record, and choose the Onboardings object.
- Initialize the Parent Case field:
- Click in the Field box.
- A list of appears, showing the labels of fields in the record you are creating.
- Choose Parent Case.
- Click in the Value box. Additional buttons appear.
- Click Choose Field.
- A list appears showing labels of fields in the current record.
- Choose Record ID.
- The field name (id) is inserted into the action.
- When this rule executes, the value on the right is assigned to the field on the left. Here, the Lookup field in the new record gets the record ID from the current case. (That’s what Lookup fields contain as their values.)
- Click [Map Additional Fields] and repeat the process to set the values for these fields, using the screenshot below as a guide:
- Employee Name
- The field label is chosen (Employee Name) from the list. When inserted, the actual field name is included (subject). To that, add additional text that says ‘Phase 2’, and add the case number for ease of reference. Click the [Check Syntax] button here, to make sure that everything is correct:
- subject + ' - Phase II - ' + case_number
- Recruiting Notes
- Add a note that refers the HR Rep to the original case record:
- See the parent case for the notes.'
- 'As with all text strings, this one is enclosed in single quotes.
- Onboarding Phase – The value from the picklist field: ‘Onboarding’
- Click Map Additional fields to see what you have so far most clearly:

- Add these fields to transfer critical data from fields in the old case to the new one:

- As you scroll through the list, you see fields with an angle bracket at the end, like this:
- Hiring Manager >
- Those entries occur for lookup fields. When you click one, another list of fields opens up to the right, showing fields in the target record. The actual value of the lookup field is the one you copied:
- Hiring Manager_id
- As you scroll through the list, you see fields with an angle bracket at the end, like this:
- Click Save.
- The rule is now complete, with the actions to take indicated, as well as the conditions.
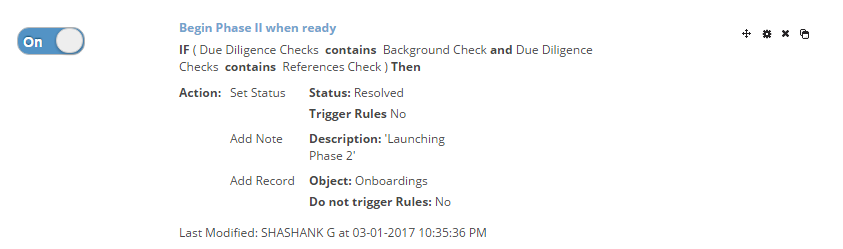
- The rule is now complete, with the actions to take indicated, as well as the conditions.
- Select Set Status and mark the current case record Resolved.


Create the Phase I Event Rules
You must create event rules to keep track of which Phase 1 processes have completed. After each rule sets the appropriate flag, it will invoke the Rule Set that tests to see whether all flags have been set.
- Create the Process Completed rules:
- Go to Configuration > Case Automation > Business Rules
- In the Events tab, choose On Record: Process Complete
- Click New Rule
- Name – Mark Background Check Done
- Process – Background Check
- Execution Criteria – Unconditional
- Actions to Perform – Update Record,
- [Choose Field to Update]
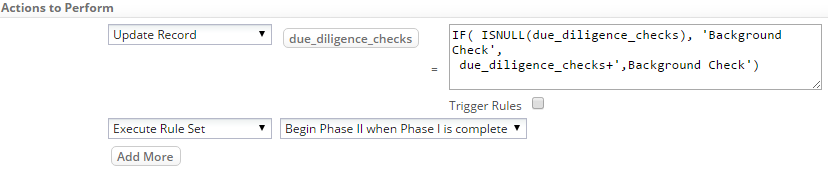
- Click the button and select Due Diligence Checks. Click Insert Field.
- Value: IF( ISNULL(due_diligence_checks), 'Background Check', due_diligence_checks+',Background Check')
- For a single checkbox field, the value would simply be true, with no quotes around it. But for a multi checkbox group, we add the label text to the existing value, in case the references check finished first. (If the field is empty, the label is assigned to it. Otherwise, the checkbox label is appended to it.)
- Under Actions to Perform, click Add More.
- Select Action: Execute Rule Set
- Select Rule Set: Begin Phase II when Phase I is complete.
- Click Save.
- You see the Process Complete rule list, with the rule added.
- Click New Rule
- Name – Mark References Check
- Done Process – References Check
- Execution Criteria – Unconditional
- Actions to Perform – Update Record
- [Choose Field to Update]: Due Diligence Checks.
- [Insert Field]
- Value: IF( ISNULL(due_diligence_checks), 'References Check', due_diligence_checks+',References Check')
- Under Actions to Perform, click Add More.
- Select Action: Execute Rule Set
- Select Rule Set: Begin Phase II when Phase I is complete
- Click Save.
- Both Rules now appear in the list.

- Create the Case Created rules:
These rules launch the appropriate processes when a case record is created.
- Go to Configuration > Case Automation > Business Rules.
- In the Events tab, choose On Record Created.
- Click New Rule.
- Name – Launch Phase I Processes
- Execution Criteria – When specified conditions are true
- All of these conditions: Add Condition
- Select Field: Onboarding Phase
- Select Operator: is one of
- Select Value: Pre-Boarding
- Actions to Perform -
- Action - Change Process Status
- Process – Onboarding Prep
- Status – Disable
- (To ensure that the Phase 2 process isn’t started for this case record.)
- [Add More]
- Action - Start Process
- Process – Background Check
- [Add More]
- Action - Start Process
- Process – References Check
- Click Save. The rule appears.

- Click New Rule
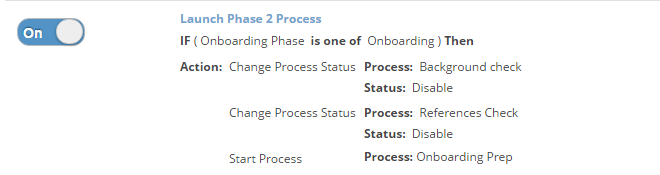
- Name – Launch Phase 2 Process
- Execution Criteria – When specified conditions are true
- All of these conditions: [Add Condition]
- Select Field: Onboarding Phase
- Select Operator: is one of
- Select Value: Onboarding
- Actions to Perform
- Action - Change Process Status
- Process – Background Check
- Status – Disable
- (To ensure that the Phase 1 process isn’t started for this case record.)
- [Add More]
- Action - Change Process Status
- Process – References Check
- Status – Disable
- [Add More]
- Action - Start Process
- Process – Onboarding Prep
- Click Save.
- The Phase 2 rule appears after the Phase 1 rule.
- (The order in which rules execute can be modified, but it makes no difference here.)


Test the Application
You are now ready to test the application:
- Create a new case.
- Complete Phase I Processes.
- Note that the Phase II case record is created.
- Complete the Phase II processes. Note that the case is closed.
-
Note: When the final pre-boarding process is completed, and the second record is created, you are still viewing the original record! The onboarding process was started in the second record, so the record you’re on seems “incomplete”. (It has been marked as Resolved, but that may not be immediately obvious as you examine the screen.) What’s needed is a function extends a robotic arm out of the screen, grabs the mouse, and positions the agent at the new record. In the meantime, we just have to train them to go back to the case list after completing a process!