Record Actions
This feature offers a way to apply changes to multiple records in one (batch) process. Applying bulk actions in this manner can save a significant amount of time, compared to editing records individually.
About More Actions
Typically, Actions include the following options:
- Update multiple records
- Delete multiple records
- Transfer record ownership
- Create View from Selections
- Clear Selections
- User-created Custom Form Actions, containing custom Components, Pages or JavaScript
Apply Actions
- To select the records you want to include in the Action, choose one of these methods:
- In a View, click Checkbox(es) to select individual records; Optionally, navigate to the next/previous page to select records in multiple pages
- Click the All link, to select all of the records on the page; Optionally, navigate to the next/previous page to select records in multiple pages
- Select one of the Action options
- The list of selected records will be displayed along with an action button. Click the action button to confirm, or click the [Cancel] button to stop the process.
Update
Delete Record
When data in a record is no longer needed, the record can be deleted. The record and any Related Records (records with a Lookup field that points to it) are moved to the Recycle Bin, where they are held for 30 days.
- Users with Delete permission enabled in Access to Records Owned by Others Within the Team can delete records
- Users with Delete permission enabled in Record Access Permissions can delete records
Delete a Single Record
- Click the tab containing the record you want to delete
- Select a record to open it.
- In the sidebar, click Actions.
- Click Delete.
The record and any Related Records are moved to the Recycle Bin, where they are held for 30 days.
Delete Multiple Records
To delete multiple records at one time, view Mass Delete Data.
Note: To delete the records permanently in the Recycle Bin, you can use the Delete Forever or Empty the Recycle Bin options.
Transfer
These actions let you assign or claim ownership of multiple records at one time.
They are available in the Cases object and the Tasks Object.
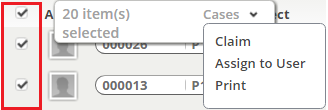
To change ownership of multiple records:
- In a View, click Checkbox(es) to select individual records
A pop-up appears showing the number of selected records and the object name. - Click the object name to display the list of additional actions, as shown here:
- Select one of the options.
- Claim - A confirmation dialog appears.
- Assign Owner - Choose the new owner.
- Click [Ok] to complete the action
Create Task
Create Task is an option in More Actions, which allows you to add the same task to multiple records.
