Difference between revisions of "SAML"
imported>Aeric m (Text replace - 'Settings > ' to 'File:GearIcon.png > Setup > ') |
imported>Aeric m (Text replace - 'Setup > Administration > Single Sign-On' to 'Administration > Company Setup > Single Sign-On') |
||
| Line 33: | Line 33: | ||
===Enabling SAML=== | ===Enabling SAML=== | ||
#Click '''[[File:GearIcon.png]] > Setup | #Click '''[[File:GearIcon.png]] > Administration > Company Setup > Single Sign-On''' | ||
#Click the '''[Edit]''' button | #Click the '''[Edit]''' button | ||
#For ''Single Sign-On Settings'', choose '''SAML''' | #For ''Single Sign-On Settings'', choose '''SAML''' | ||
Revision as of 00:16, 15 May 2013
Security Assertion Markup Language (SAML) is an XML-based standard for exchanging authentication and authorization data between security domains. The Service Provider must enroll with an Identity Provider and obtain an Issuer URL.
How it Works
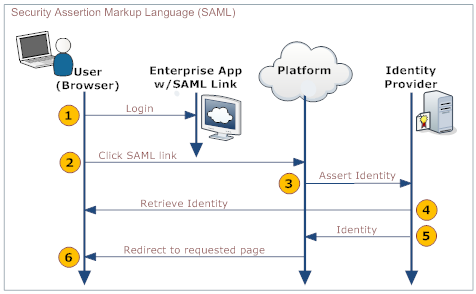
An enterprise app contains a link to the AgileApps Cloud platform. When users who are logged into the enterprise app click that link, they are automatically logged into the AgileApps Cloud platform, without requiring additional authentication. For example, an employee of ABC Company logs into the corporate website, which includes a link to the AgileApps Cloud platform on the landing page. The user clicks the link and is automatically logged in, without requiring a second login.
The process is shown in the following diagram:
Here is an explanation of the steps:
User Your Organization's Web App Platform Identity Provider 1. Logs in to a web app provided by your organization - Provides a link to the platform's SAML handler (generated by the platform when SAML is configured)
- Includes the desired platform target page as an argument in the link
2. Clicks the link that goes to the SAML handler 3. Sends an assertion to the identity provider 4. Retrieves and validates the user's identity 5. Sends the user's identity to the platform 6. Redirects the user to the appropriate page.
Enabling SAML
- Click
 > Administration > Company Setup > Single Sign-On
 - Click the [Edit] button
- For Single Sign-On Settings, choose SAML
- Fill in the SAML Settings (below)
- Click [Save]
The platform generates a link that goes to the SAML platform's SAML handler.
SAML Settings
- Version
- SAML Version
- Choose from Version 1.0 or Version 2.0
- Issuer
- The identity provider. (A name or identifier of some sort.)
- User Id Type
- Determines the type of identifier
- Choose from UserId or Federated Id, where:
- UserId is the Record Id of the user that is logged in
- Federated Identity acts as a user's authentication across multiple IT systems or organizations. Learn more: Federated Identity.
- User Id Location
- Specifies an attribute tag that defines the location of the User Id
- Choose from Subject or Attribute
- Third Pary authentication URL
- The URL used to authenticate a user or maintain a user's credentials.
- Syntax:The URL and Port Number must be specified using a FQDN or an IP address, for example:
- www.abc.com:9090
- 192.168.1.10
- abc.def.com
- Issuer Certificate
- Issuer certificate is used to sign and verify SAML messages. Requires a valid x509 issuer certificate.
- Choose one of the following options:
- Paste the Issuer Certificate in the text area
- Navigate to the Issuer Certificate section, then select and load a file containing the Issuer Certificate
Using SAML
To use single sign-on with SAML, you create links that go to the platform's SAML handler, passing the desired destination page as an argument.
To create a link to the platform in your enterprise app:
- Copy the SAML link that was generated when SAML was configured.
- Add a done= argument to the link that specifies the target page in the platform.
To create the done= argument:
- Go to the standard initial page using Service?t=1&targetpage=ViewPort.jsp
- Or:
- a. Click the Short URL icon CopyShortURL.png for the page you want to target
- b. Copy the URL from the dialog that appears.
- c. Edit the URL to remove https://{domain}/networking/"
What remains is the argument you'll pass. For example: pages/yourPage.jsp
- URL encode the link
- Learn more: URL Encoding
