HowTo:Use the Application Wizard to Build a Simple Order Processing System
|
For: Designers See more: |
It takes very little time to set up the skeleton for even a fairly sophisticated application. Here, you'll define the basic objects for an Order Processing system (Orders, OrderItems, and Customers), and establish the relationships between them.
Preparation
- Click [My Applications]
- Check to see if the Order Processing application already exists.
- If it doesn't exist, go on to the next section.
- If it does exist, you can remove it if you are its only user, or you can adjust the object names used in the remainder of this guide. For example, instead of creating "Orders", create "MyOrders".
Note: If the Order Processing application already exists, the process below will still work. The Object names will be given unique identifying numbers to distinguish them from the existing objects. (For example: "Orders_1".) Users will never notice the difference, because the object label will be displayed as "Orders". But it when you get to the point that you start programming, you'll need to use the actual object name ("Orders_1").
Use the Application Wizard
You'll start by creating the two most critical objects in the application: Orders and OrderItems, and establishing the relationship between them.
- Click [My Applications]
- Click [Create New Application]
- Click Create Using Wizard
- Enter the Application Name: Order Processing
- Enter the name of the first object: Orders
- Click [Define Fields]
- Add the first fields for the Orders object:
- Field Label: Order Number (note that the internal field name is created)
- Field Type: Autonumber (note the many choices)
- This field gets a new, unique number every time a record is added.
- Add one more field, to tell where the order came from:
- Field Label: Source
- Field Type: Picklist
- The Values field appears. Enter a comma-separated list of values of the dropdown that will appear for the user to pick from:
- Catalog,Internet,Store
- Click [Save]
- Under Key Field, select the field to use for indexing: Order Number
- Click [Add an Object]
- Enter the name of the second object: OrderItems
- Click [Define Fields]
- Add the initial OrderItems fields:
- Field Label: Item Description
- Field Type: Text Field
- Field Label: Item Quantity
- Field Type: Number
- Field Label: Item Price
- Field Type: Currency
- Those are all the data fields that need to be added, for the moment. The calculations on the data will be defined later.
- Click [Save]
Next, you'll establish the relationship between those two objects. In this case, there could be multiple OrderItems, each of which Looks up to a single Order, which defines a Lookup relationship.
- Click [Add a Relationship]
- Under Relationships fill in the blanks:
- Between Orders and OrderItems
- Specify the Relationship Type: One to Many
(One Order can have many Order Items
Now it's time to save your work and create the application:
- Click [Create this Application]
- Click [Open Application]
You're now ready to explore the application objects.
Explore the Objects
To see what the Wizard did, start by locating the Workspace and noting the items it contains:
Each item in that list opens a new tab. Time to start exploring!
Start with the OrderItems object
- Click OrderItems
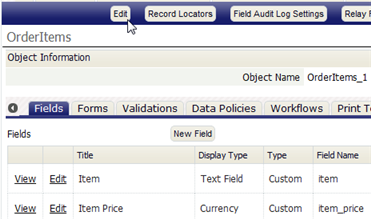
- At the right edge of heading bar, click the link Customize this Object.
Right now, we're interested in the fields that the wizard created:
- If you were off exploring, click the Fields tab to come back.
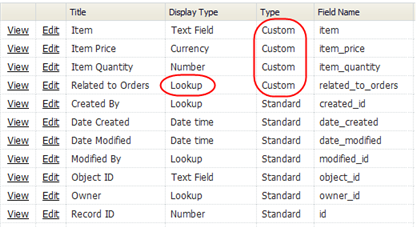
- You are now looking at all of the fields defined for the object:
- The Custom fields you specified in the Wizard
- Many Standard fields that are built into every record in the platform, including the record ID, the current record owner, the Date time fields that show when a record was created or modified, as well as the fields that show who did it.
- The last Custom field shows the Field Type Lookup. That's the field that looks up to the Orders object, connecting any given OrderItem to the Order it is part of.
Next, we'll look at Object Properties
- At the top of the screen, click the [Edit] button.
The object's properties are displayed. - Since the singular label says "OrderItems", change it to OrderItem.
- Click [Save]
Now, change the singular label for the Orders object:
- Click Orders
- Click the link Customize this Object.
- Click the [Edit] button.
- Since the singular label says "Orders", change it to Order.
- Click [Save]
Use the Object Wizard to Add an Object
Here, you'll add another object to the application: Customers. You could have done that at the outset, of course. But the idea here is to see how you can use the wizard to add objects and relationships to an existing application.
- Visit Designer > Objects
- Click [New Object]
- Click Create Using Wizard
- Enter the name of the object: Customers
- Click [Define Fields]
- Add the initial fields:
- Field Label: Customer Name
- Field Type: Text Field
- Field Label: Customer Address
- Field Type: Text Field
- Click [Save]
- Click [Add a Relationship]
- Under Relationships fill in the blanks:
- Between Customers and Orders
- Specify the Relationship Type: One to Many
(One Customer can have many Orders - Click [Create]
- Click [Open in Designer]
- Change the singular label for Customers, the same way you did for Orders and OrderItems
You can now explore the Customer object, the same way you explored Orders.
Add a Formula Field to Calculate a Total Amount for Each OrderItem
Now it's time to go back and fill in the calculations. Here, you'll add a Formula field to the OrderItem object, to calculate a total for each line item.
- Go to Workspace > OrderItems > Customize this Object
In the Fields tab, note the Item Price and Item Quantity fields. Those two quantities get multiplied to produce the line item total. - Click [New Field]
A new tab opens. - Enter the field Label - Item Total
Note that field name is created automatically. (That's the name that programmers use. The label is what GUI users see.) - Select the Display Type - Formula.
The window changes to present new options. - Set the Formula Return Type - Currency
Note that the number of decimal places defaults to zero. - Set the Decimal Places - 2
(The default for the Item Price field is already two decimal places.) - Click Recalculate Formula Field Value.
This selection causes values for existing records to be recalculated. In this case, it makes no difference, because there are no records. But it's good to know what this box does, because you frequently need to recalculate existing values, when you're changing the formula.
Now you're ready to enter the formula into the Formula field. In this case, the formula is pretty simple. You just need to multiply the price by the number of units purchased.
- Click Choose Field
- Select Item Quantity
- Click Insert Field
- Click after the field and add a space.
(Spaces increase readability, and ensure the cursor is in the correct location for the next insert.) - Click Insert an Operator
- Select * Multiply
- Click after the operator, and add a space.
- Click Choose Field
- Select Item Price
- Click Insert Field
The formula is now defined. - Below the Formula area, click [Check Syntax]
Another good habit to get into. Note that you could have typed in the entire formula by hand. In that case, it's an especially good idea to check the syntax of the formula before creating. - At the top of the window, click [Save]
The formula field you defined is now part of the object. Whenever a record is added or updated, the value of the field is automatically calculated for that record.
- Using Text in a Formula
- The note at the bottom of the formula box is trying to say that whenever you insert a text string into a formula, it needs to be enclosed in single-quotes (not double quotes). For example, a formula that returns a true/false Boolean value after comparing a name might look something like this:
- last_name = 'Smith'
Examine the New Order Form
In a moment, we're going to add a lot of information to the Order Form. Before we do, let's see what we have so far.
- Go to Workspace > Orders
- Click [New Record]
Note that there are entries for the fields Related to Customers and Source. - Click the icon next to Related to Customers.
A popup opens. There are no records as yet, but you can see columns for Customer Name and Customer Address. - Close the popup.
- Click the Source field. The choices for that Picklist appear in a dropdown.
That's interesting, of course. But it's not much of an Order! Not yet, anyway. But that's about to change.
Add a "Subform" to the Order Form to Total Up the OrderItems
The final step is to add up the OrderItems for an Order, and calculate a total.
The fundamental concept here is that OrderItems have a Lookup to Orders. The inverse relationship also exists: Orders have Related Records in the form of OrderItems. Those records are automatically shown under Related Information, when an Order is displayed. That's part of the "360-degree view" for a record. But we can take that concept quite a bit farther, to:
- Add OrderItems record when creating an Order record
- Automatically calculate totals for those records, and store the results in the Order.
To do that, you're going to create something called a Subform in the Orders object.
- Click Customize this Form.
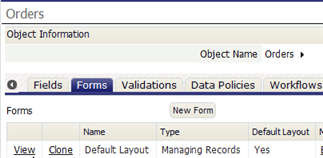
A new tab appears with the current Form (the Default form), opened. - You can also get here from the Customize Orders tab, by clicking the Forms subtab, and viewing the Default form (or any other form that has been created for this object).
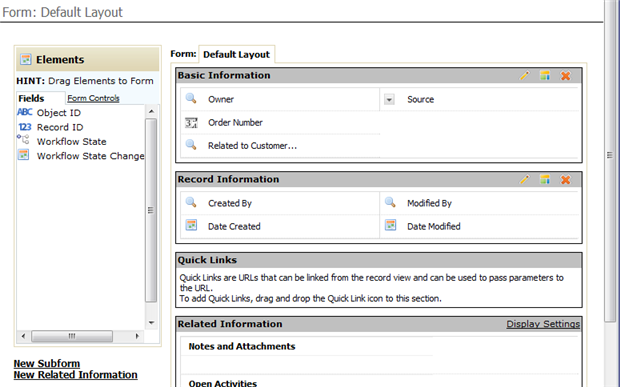
- However you got here, you are now looking at the Order form:
Note that Owner is the first field shown. The owner is the user who created the record (or the user who took it over later). In some cases, that's a good field to display. But for this application, it isn't of much use. So start by removing that field from the form, to simplify it:
- Hover the cursor over the area to the right of the Owner field.
The edit icon (pen point), reposition icon (arrows), and delete icon (X) appear. - Click the delete icon to remove the field.
It's now time to add the subform.
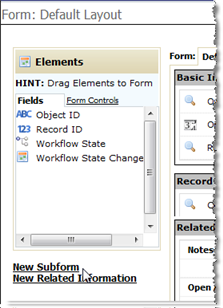
- At the lower left, click the New Subform link.
- Set these values:
- Title - Order Items
- Object Name - OrderItems
- The linking field is pre-selected for you. (You have the option of changing it, in case there are multiple fields in the Object that Lookup to Orders.)
- The available OrderItems fields are shown, as well.
- Select all of the Available Fields and move them to the list of Selected Fields.
- Arrange their order, so they look like this:
- Item Description
- Item Quantity
- Item Price
- Item Total
- At the top of the window, click [Next]
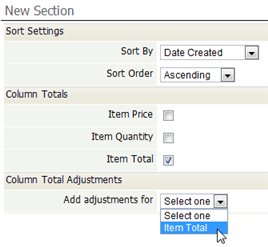
You can now choose how the records should be sorted when displayed, and which columns should get totals.
- For Column Totals select Item Total. Since that is a Currency field, it is also available for Column Total Adjustments, to calculate sales tax, for example, as shown here:
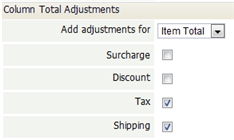
- Once selected, you can specify the adjustments you want. Choose Tax and Shipping.
- Click [Save]
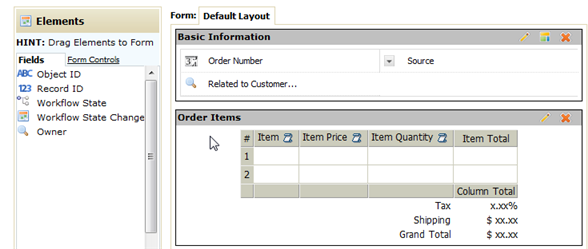
You're now back to the page that defines the layout for the Order form, with the new Subform added:
Try it Out
You're now ready to try out the application you created.
- Go to Workspace > Orders
- Click [New Record]
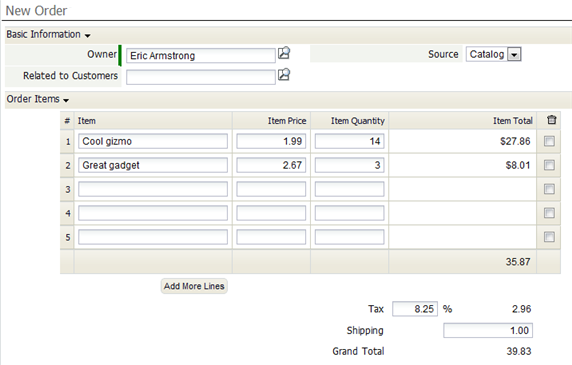
Note that the subform for OrderItems is now present. - Add some records, and watch what happens.
Modify the Orders View
Now that a full set of fields are present in the Orders object, it's a good time to arrange the List View (the one that looks like a spreadsheet table) to give you the information you'll typically be looking for.
- Go to the Orders tab, and look at the column headings to see which fields are displayed. It should look something like this, using the fields that were defined when you first created the object:
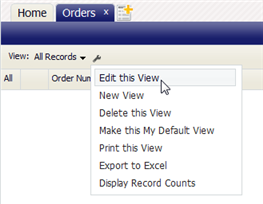
- Click the Wrench icon above the Order Number field, and then click Edit this View
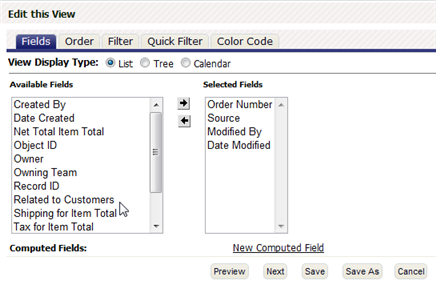
- The list of selected fields shows the set of defaults:
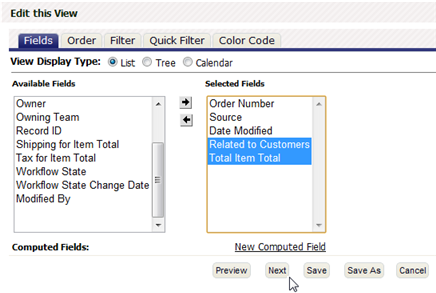
- To change that list, move Modified By to the left. Then move Related to Customers and Total Item Total to the right, producing the new list of fields.
- Click [Next]
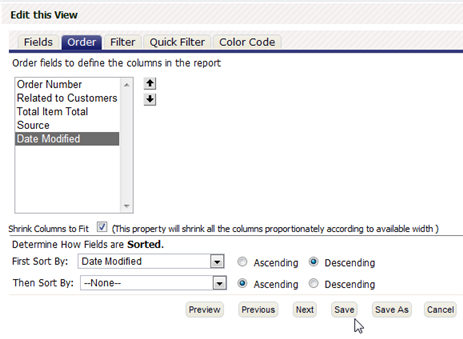
- Change the order of the fields to the one shown (or any order you prefer):
- Click [Save].
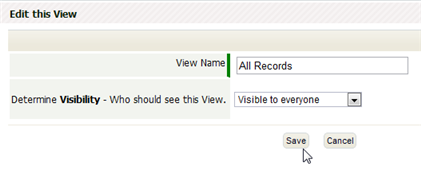
- Keep the defaults, so the view is visible to everyone: Click [Save].
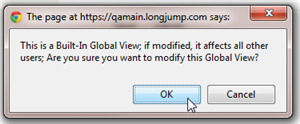
- Confirm that you want to modify the global view: Click [OK].
- The List View of Orders is displayed once again, with the fields you selected.
For extra credit, modify the labels that appear in the column headings:
- Click Customize this Object
- Edit the field definitions
- Change the labels associated with the fields
Wrap Up
Congratulations! At this point, you have created a small, but still very functional application, in a very short period of time. Along the way, you've explored:
- The Application Builder
- The Object Construction Wizard
- Object Relationships
- Common Field Types - Text, Number, and Currency
- Formula Fields
- Lookups
- Related Information
- Forms
- Subforms
- List Views
That's a tremendous amount of new information--and you have still only scratched the surface of what the platform can do! There is a lot more to come.


