Service Portal Usage
How Your Customers Use Your Service Portal
If customers are allowed to use the Service Portal without registering (an option you can configure) then they see service portal as a guest. Here's the interface that greets them when they arrive:

In this case, both the Knowledge Base and Community features have been enabled (you'll learn how to do that in a moment), so there are tabs for both of those options.
Registered portal users see an additional tab--the Cases tab, shown here:

This tab lets them add new Cases and view Cases they have previously filed.
How an Agent Gets to the Service Portal
External users go directly to the Service Portal when they browse to your ServiceDesk URL on the web. There, they'll see the features you have configured. If they're registered users, they'll also be able to browse their cases. Agents and other internal users, on the other hand, go to the Agent Portal when they log in.
To get to the Service Portal from the Agent Portal:
- Click the down arrow next to your login name, and then click Go to Service Portal
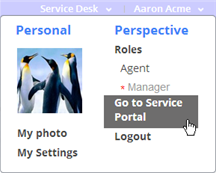
- (To get back, use the same process and choose Go to Agent Portal.)
- In the Support Portal, click the Knowledge Base or Community tab:
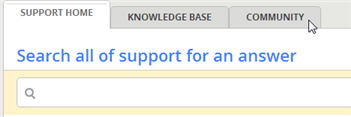
- (These tabs appear when they are enabled in the Service Portal configuration.)


Creating Categories
Categories help users to narrow their focus when searching or browsing for information. They can be featured in the Community page, the Knowledge Base, or both. When a user clicks on a category, they zoom into that subset of the community's messages and knowledge base articles. Initial categories for a community might include:
- Announcements
- General Questions
- Billing Questions
Initial categories for a knowledge base might include:
- Getting Started
- Tips and Tricks
- Troubleshooting
In both the Community pages and the Knowledge Base, categories are called topics. You can create a topic from either location.
To create a new category:
- In the Community or Knowledge Base tab, click the New Topic button:
- To create a new top-level category, leave the Parent Topic blank.
- To create a lower-level category, choose one of the existing topics as the parent.
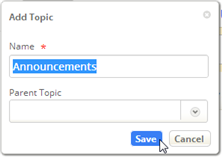
- Click Save.


Working with the Community
The community is a place where your customers can ask questions and get help from each other, as well as your support team.
Asking Questions
- In the Community tab, click Add Question
- Fill in the subject and body, and select a topic for the question:
- Click Save.


Answering Questions
When you view a question, click in the Post an Answer area to respond to it.

Previous answers are shown below the response area. Registered users can vote on an answer to move it up or down in the rankings. (Comments are ordered by their rank first, and by date second.)
Discussion Options
Registered users can subscribe or unsubscribe from a discussion, while Case agents can convert the original question to case, to make sure it gets the attention it needs.

Working with the Knowledge Base
With the knowledge base, your support team can publish articles where customers can find them. Customers can then search for articles and browse the article categories, and your support team can send links to articles that answer common questions.
Adding an Article
- In the Knowledge Base tab, click New Article:
- Adding an article is a lot like adding a community question except that:
- You can tag the article with multiple topics.
- You can make it a Featured Article, so it's listed on the first page.
- If you don't make it Publicly Visible, it can be seen only by internal users.
- You can add attachments.


Adding a Picture to an Article
Images from anywhere on the web can be inserted into an article using the HTML <img> tag. A basic version of that tag looks like this:
img alt="someImage.png" src="http://path/someImage.png"
Note:
The filename is typically put into the alt attribute to help with debugging, since that information appears only when the image can't be found.