Difference between revisions of "Transfer Ownership for a Group of Records"
From AgileApps Support Wiki
imported>Evelyn m (Text replace - 'checkboxicon.gif' to 'checkboxicon.gif|link=') |
Wikieditor (talk | contribs) |
||
| (5 intermediate revisions by one other user not shown) | |||
| Line 1: | Line 1: | ||
These actions let you assign or claim ownership of multiple records at one time.<br>They are available in the [[Cases object]] and the [[Tasks Object]]. | |||
#Click the | '''To change ownership of multiple records:''' | ||
# | #In a View, click Checkbox(es) to select individual records<br>A pop-up appears showing the number of selected records and the object name. | ||
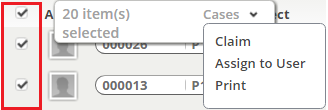
# | # Click the object name to display the list of additional actions, as shown here: | ||
#Click | #: [[File:MoreActions.png]] | ||
#Select one of the options. | |||
#* '''Claim - ''' A confirmation dialog appears. | |||
#* '''Assign Owner -''' Choose the new owner. | |||
#Click '''[Ok]''' to complete the action | |||
{{Note| If the '''Hide Assign Option from List View''' (Configuration > Account Management > Company Information) is '''enabled''', both '''Assign''' and '''Claim''' options will be hidden in the '''Case Object''' list.}} | |||
Latest revision as of 13:38, 13 June 2023
These actions let you assign or claim ownership of multiple records at one time.
They are available in the Cases object and the Tasks Object.
To change ownership of multiple records:
- In a View, click Checkbox(es) to select individual records
A pop-up appears showing the number of selected records and the object name. - Click the object name to display the list of additional actions, as shown here:
- Select one of the options.
- Claim - A confirmation dialog appears.
- Assign Owner - Choose the new owner.
- Click [Ok] to complete the action
