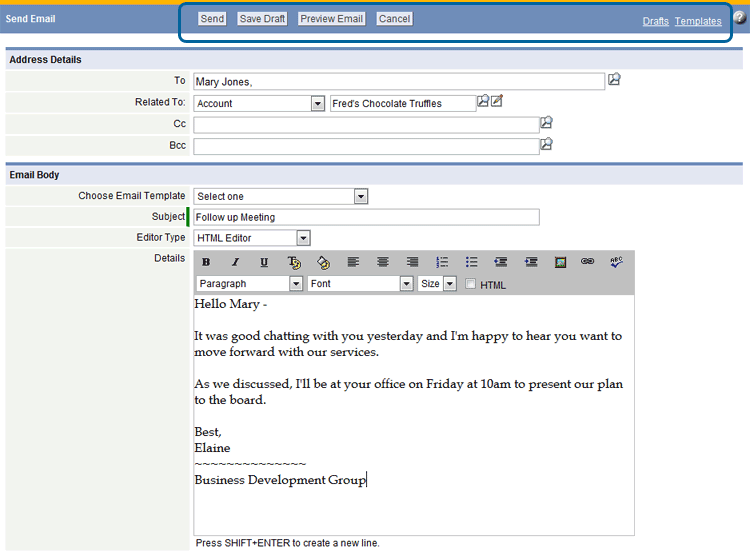
Send Email from a Record
Managing your contacts includes keeping an updated address/phone book. You can send email messages to your contacts from within the platform and track the communications automatically:
Email Messaging from a Record
You can send an email message from a record, attaching one or more files and identifying numerous recipients. This email becomes a task that is tracked as an activity associated with the record. You can define follow-up tasks, add appointments, and send additional notes related to this record.
When you send an email message from a Data Policy, you get extra TO/FROM options. See Send an Email Message from a Data Policy for details.
Users can also send email from the Documents and Reports tabs. See Email for more information.
Note: The [Send Email] button appears in the record only if the Track Activities option is enabled for the object.
To Send an Email Message from a Record:
- Open an object that contains the record of interest
- Click the record to open the details page
- In the Related Information section, click the [Send Email] button
- In the email page, specify information under the Address Details section:
- To
- Enter a name or click the Lookup
 button to select from a list of recipients
 - Related To
- The object and record automatically appear in the Related To fields
- Optionally, select another object and record to change the association
- Cc (Carbon copy)
- The name(s) of those you want to receive a copy of this email message; Enter multiple names separated by commas, or use the Lookup button to select from a list
- Bcc (Blind carbon copy)
- The name(s) of those you want to receive a copy of the this email message, but whose email names and addresses will not appear as recipients.
- Optionally, choose an Email Template
- Enter a Subject for the email message
- Editor Type
- The type of editor to use; For more information, see Editors
- Enter the message in the Details text area
- Optionally, include Documents as attachments; Use the Lookup window to display a list of available documents
- When ready, choose one of these options:
- Click the [Send] button to send the email message
- Click the [Save Draft] button to save a draft of the message without sending
- Click the [Preview Email] button to view the message before sending
- Click [Cancel] to stop the action
A message appears confirming that the email has been sent. Summary information about the email (the Date, Status, and Assigned To fields) appears under the Activity History in the record.
The email now becomes a completed task, and clicking on the email Subject opens the Tasks page, where you can perform all task-related activities.
You can also click the Send Note link under Activity History in the record to send additional information about this record to the task owner and other recipients.
Save Draft
To return to a saved email message:
- Open the object and click the desired record
- Click the [Send Email] button
- Click the Drafts link to view a list of saved messages
- Click the draft of interest and continue editing
- Optionally, save the draft again, or send the message
Email Messaging from a Data Policy
Email Messaging from a Data Policy
