Difference between revisions of "Timer Rules"
imported>Aeric |
imported>Aeric |
||
| Line 2: | Line 2: | ||
Timer rules let you set up a schedule of actions to be carried out at specific intervals before or after dates and times stored in a record. They help to prevent cases from falling through the cracks, by sending out emails, or even by reassigning a case. | Timer rules let you set up a schedule of actions to be carried out at specific intervals before or after dates and times stored in a record. They help to prevent cases from falling through the cracks, by sending out emails, or even by reassigning a case. | ||
====Working with Timer Rules==== | |||
{{Note|The structure of all Rules is pretty much the same--so if you have already seen how [[Event Rules]] work, you pretty much know all you need to know to work with Timer Rules.}} | {{Note|The structure of all Rules is pretty much the same--so if you have already seen how [[Event Rules]] work, you pretty much know all you need to know to work with Timer Rules.}} | ||
'''To create or modify a Timer Rule:''' | '''To create or modify a Timer Rule:''' | ||
Revision as of 01:41, 15 May 2013
![]() > Case Automation > Business Rules > Timer Rules
> Case Automation > Business Rules > Timer Rules
Timer rules let you set up a schedule of actions to be carried out at specific intervals before or after dates and times stored in a record. They help to prevent cases from falling through the cracks, by sending out emails, or even by reassigning a case.
Working with Timer Rules
Note: The structure of all Rules is pretty much the same--so if you have already seen how Event Rules work, you pretty much know all you need to know to work with Timer Rules.
To create or modify a Timer Rule:
- Select an existing event, or click [New Event]
- Fill in the Timer Rule Settings
- Click [Save]
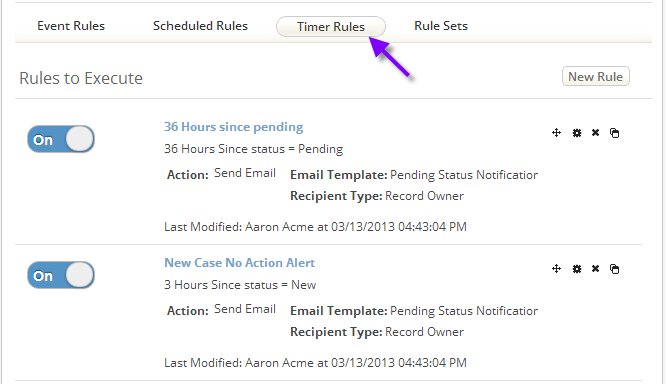
As an example, take a look at one of the Timer Rules that comes predefined with the system--in this case, the one that sends an email after a Case has been in the Pending state for 36 hours:
- Go to
 > Case Automation > Business Rules
 - Click [Timer Rules].
- The process for working with Timer Rules is pretty much the same as that for Event Rules, with the exception that the Basic Information section lets you choose a time interval:

- In addition to specifying a time interval after a status change, you can also specify an interval in advance of any date that is stored as part of the case. For example, the due date for a case which is under a Service Level Agreement.
- (Here, the Close Date field is shown as one of the possible selections, simply because it is a date field in the case. That isn't a date you would generally select, but the system doesn't know that.)
- As always, when you're done, click [Save].
Timer Rule Settings
Basic Information
- Name - Give the timer event a name.
- Enabled - Designate the event as enabled or disabled. (Disable it to keep it from firing, without deleting it.
- Type -
- Case Timer Event - The elapsed time is relative to a Cases Object record.
- Task Timer Event - The elapsed time is relative to a Tasks Object record (choose which).
- Calendar Event - The event occurs at a fixed (possibly repeating) date and time. (For example, every 3rd Friday of the month.)
- Execute - Execute the Rule Set(s) associated with the event:
- The specified number of Hours, Days, Business Days, Weeks, or Months
- Before or After
- The value of the specified date/time field associated with the Case or Activity:
- Case: Date Modified, Date Created, Completion Date, Target Date, or Deadline Date
- Activity: Date Started, Target Date, or Deadline Date
Rules
Specify one or more Rules to execute when the specified time has elapsed. Then rearrange their order of execution (top to bottom), add more, or remove entries from the list, as needed.
