Difference between revisions of "Pass Through Authentication"
imported>Aeric |
imported>Aeric |
||
| Line 79: | Line 79: | ||
;Message sent from the platform to the Authentication Server: | ;Message sent from the platform to the Authentication Server: | ||
:The Authentication Service reads | : The platform passes on the request the Authentication Service. | ||
: The Authentication Service reads the form parameters (content type <tt>application/x-www-form-urlencoded</tt>)<br>and authenticates the user. | |||
:;Method:POST | :;Method:POST | ||
:;URI:Configured in the [[Single Sign-On]] Settings | :;URI:Configured in the [[Single Sign-On]] Settings | ||
::<syntaxhighlight lang="xml" enclose="div"> | ::<syntaxhighlight lang="xml" enclose="div"> | ||
</syntaxhighlight> | </syntaxhighlight> | ||
;Authentication-Succeeded response: | ;Authentication-Succeeded response: | ||
Revision as of 23:24, 30 May 2013
Pass Through Authentication (PTA) lets a user go straight to the platform from an organization's web page or application, without having to log in again.
How it Works
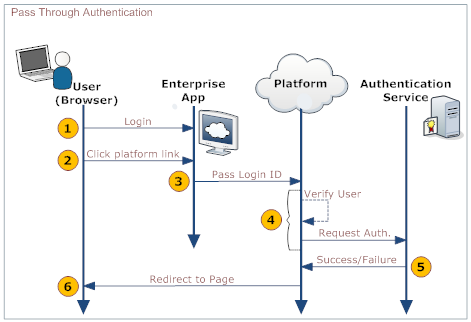
While using an enterprise application, a user would like to visit a page hosted on the platform, without having to log in to the platform to see it (after having already logged in to the enterprise app). To accomplish that goal, the application sends a small SOAP message to the platform, in an HTTP request. That message contains the information needed to log into the platform. Data in it is passed to an authentication server, which sends back a message saying that authentication has succeeded or failed, after which the user is directed to the appropriate page, as shown in the following diagram:
Here is an explanation of the steps:
User Your Organization's Web App Platform Authentication Server 1. Logs in to a web page or application provided by your organization 2. Clicks a link that goes to a platform page 3. Passes data to the platform's PTA service in the SOAP payload - Session ID (optional, but desirable)
- Login ID
4. - Receives data in the SOAP payload:
- Passes data to the Authentication server
5. - Authenticates the user
- Sends back a success- or failure-report
6. Redirects the user to the appropriate page.
Enabling Pass Through Authentication
The URL of the Authentication Server and the URLs of the pages to visit in the event of success or failure are configured in the platform's Single Sign-On Settings:
- Go to
 > Administration > Company Setup > Single Sign-On
 - Click the [Edit] button
- For Single Sign-On Settings, choose Pass Through Authentication
- Fill in the Pass Through Authentication Settings:
- Third party Authentication Service URL
- Location of the authentication service. The platform uses this URL to authenticate the USER, passing the appropriate pay load in the HTTP request.
- Success page URL
- The page the platform sends the user to when authentication succeeds:
- If not specified, the default destination is the platform's home page.
- Error page URL
- The page the platform sends the user to when authentication fails:
- If not specified, the default destination is the platform’s Login-error page.
- Can be overridden dynamically by the Authentication Server
- Click [Save]
Message Formats
Initial Message Sent to the Platform
This message format needs to be delivered to the platform by the Application or web page form like the one shown below.
- Method
- POST
- URI
- https://{yourDomain}/networking/passThroughAuth
- <syntaxhighlight lang="xml" enclose="div">
<form id='testForm'
 action='https://{domain}/networking/passThroughAuth'
 METHOD="POST" enctype="application/x-www-form-urlencoded"
>
   <input type="hidden" name="loginID" value="jondoe@test.com">
   <input type="hidden" name="sessionID" value="adasd3qw4q4weasdasd">
</form> </syntaxhighlight>
where:
- loginID
- The user's login name on the platform--typically in the form of an emails address.
- sessionID
- The session ID of the user on the organization's website. Optional. It is passed on to the authentication service, so the authentication service can make use of it.
Messages Sent Between the Platform and Authentication Server
These message formats need to be processed and/or delivered by the Authentication Server.
- Message sent from the platform to the Authentication Server
- The platform passes on the request the Authentication Service.
- The Authentication Service reads the form parameters (content type application/x-www-form-urlencoded)
and authenticates the user.- Method
- POST
- URI
- Configured in the Single Sign-On Settings
- <syntaxhighlight lang="xml" enclose="div">
</syntaxhighlight>
- Authentication-Succeeded response
- This response is sent when authentication succeeds.
- <syntaxhighlight lang="xml" enclose="div">
<?xml version="1.0" encoding="UTF-8" ?> <soapenv:Envelope xmlns:soapenv="http://schemas.xmlsoap.org/soap/envelope/"> <soapenv:Body> <LJAuthenticateResponse xmlns="urn:authentication.soap.ws.longjump.com"> <status>AUTHENTICATED</status> <loginID>userLogin@Login.com</loginID> </LJAuthenticateResponse> </soapenv:Body> </soapenv:Envelope> </syntaxhighlight>
- Authentication-Failed response
- This response is sent when authentication fails.
- <syntaxhighlight lang="xml" enclose="div">
<?xml version="1.0" encoding="UTF-8" ?> <soapenv:Envelope xmlns:soapenv="http://schemas.xmlsoap.org/soap/envelope/"> <soapenv:Body> <LJAuthenticateResponse xmlns="urn:authentication.soap.ws.longjump.com"> <status>NOT_AUTHETICATED</status> <loginID>userLogin@Login.com</loginID>
<redirectOnErrorURL>http://www.location.com/somePage</redirectOnErrorURL>
</LJAuthenticateResponse> </soapenv:Body> </soapenv:Envelope> </syntaxhighlight>
- where:
- redirectOnErrorURL
- URL of the next page the user sees. (Overrides the Single Sign-On settings.)
