Difference between revisions of "Creating a Custom User Interface (CUI) Implementation"
From AgileApps Support Wiki
imported>Aeric |
imported>Aeric |
||
| Line 19: | Line 19: | ||
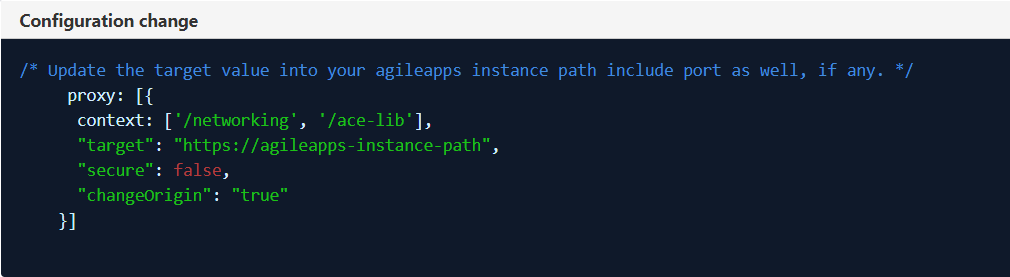
::a. Go to '''agileapps-cui''' directory and open the '''webpack.config.js''' file in Notepad or any other text editor. | ::a. Go to '''agileapps-cui''' directory and open the '''webpack.config.js''' file in Notepad or any other text editor. | ||
::b. Update the '''target''' value into your agileapps instance path. An example is as follows: | ::b. Update the '''target''' value into your agileapps instance path. An example is as follows: | ||
:[[File:cui_config_change.png]] | :[[File:cui_config_change.png|500px]] | ||
Revision as of 16:26, 2 November 2019
Overview
This use case provides information about customizing the user interface for the AgileApps platform UI. A custom user interface (CUI) implementation changes the overall look and feel of the layout of the runtime UI of the platform.
For information on creating a basic CUI, see Creating a Simple Custom User Interface (CUI). This section provides details on creating an advanced CUI.
Actors
UI designers use the CUI to create their own runtime experience with the help of HTML, CSS, and JavaScript. They can also include Smart UI components from the available library.
Before You Begin
- 1. Have the knowledge of HTML, CSS, and JavaScript.
- 2. Have an understanding of the file and directory structure for a CUI.
- 3. Have a basic understanding of the AgileApps platform UI.
- 4. Installed GitHub.
Creating a CUI
- 1. Create a directory and git clone the boiler template from GitHub as follows:

- 2. Configure the webpack development server as follows:
- a. Go to agileapps-cui directory and open the webpack.config.js file in Notepad or any other text editor.
- b. Update the target value into your agileapps instance path. An example is as follows: