Difference between revisions of "Building a Dynamic Case Management Application in the AgileApps Cloud"
imported>Aeric |
imported>Aeric |
||
| Line 173: | Line 173: | ||
When you are creating a DCM app using the wizard, you can also add additional objects, specifying the fields in those objects, and creating relationships among them. This section gives you practice with those options. | When you are creating a DCM app using the wizard, you can also add additional objects, specifying the fields in those objects, and creating relationships among them. This section gives you practice with those options. | ||
{{Note|This is the easiest way to create a Many to Many relationship, so it’s worth being aware that this mechanism exists. However, you can use it to create relationships only between objects defined in the wizard. To create a relationship to existing system objects (like the Users object), or to create a relationship within an object (where one record links to another in the same object), you need to define Lookup fields directly. Those are two things the relationship mechanism does not do, at this point. Since we need both in the current app, you’ll be adding those fields later.}} | {{Note|This is the easiest way to create a Many to Many relationship, so it’s worth being aware that this mechanism exists. However, you can use it to create relationships only between objects defined in the wizard. To create a relationship to existing system objects (like the Users object), or to create a relationship within an object (where one record links to another in the same object), you need to define Lookup fields directly. Those are two things the relationship mechanism does not do, at this point. Since we need both in the current app, you’ll be adding those fields later.}} | ||
'''To create additional objects and relationships:''' | |||
#Go to [[File:GearIcon.png]] > Administration > Applications | #Go to [[File:GearIcon.png]] > Administration > Applications | ||
#Click [Create New Application] | #Click [Create New Application] | ||
Revision as of 15:08, 10 April 2017
Overview
This paper shows you how to build an Employee Onboarding application--just one example of many kinds of Dynamic Case Management applications (or DCM Apps, for short) that can be built on the AgileApps platform.

Note: If you haven’t already read them, these articles provide important background information:
- Introduction to Dynamic Case Management and the AgileApps Cloud™
- Choosing a Development Approach in the AgileApps Cloud™
Links to those articles and other useful pages can be found in the support wiki’s Article Index
The Goal: Manage the Onboarding Process
The goal of the implementation is to create a process suitable for onboarding new employees, to make sure that everything that needs to happen is carried out, and that it happens in timely fashion.
Requirements Summary & Overall Strategy
This section summarizes the requirements that were given for the system. (You’ll see more of the details as you read through the article. Here, the idea is to give you an overview.)
-
Note: Similar requirements exist for a system that could be used to manage voluntary terminations of employment, termination for cause, and/or reductions in force. It’s pretty much the same set of processes, backwards.
The mandatory system requirements were these:
- Define the tasks that need to be performed, and capture the information needed to carry out the process at each stage.
- Kickoff the process and track its progress.
The optional, additional requirements were these:
- Capability to diverge from the set processes. For example, for a high level executive who is transitioning from the Board of Directors, the onboarding process might be handled differently.
- Extend the base template to cover specific onboarding needs. For example, when bringing on Sales personnel, enrollment in the financial system responsible for commission payouts would be an extra process step. Similarly, some positions might include a company credit card or car.
- Notifications should be sent if the onboarding procedure reaches 90% of its time limit.
Prospects for a successful implementation looked good right from the outset, because most of the requirements mapped directly into the capabilities of the AgileApps case management platform— including all of the optional requirements:
- Use business process models to manage the tasks that need to be performed.
- Each step in the model creates a task for the person or collection of people who can carry it out. The system then records which tasks are completed, by whom, and when. The model, meanwhile, allows task steps to occur in sequence, in parallel, or to take a conditional branch that depends on the nature of the case (defined by data stored in the Case record, or other records connected to it).
- Each case has a status that indicates whether it is new, open, closed, or in some intermediate state. The status of each process associated with a case is tracked, as well — making it easy to determine how many cases are open and where they are. Since times are tracked, it is also possible to construct reports to provide insights into case closure rates over time and by person.
- Use the capacity to define Service Level Objectives and Escalation policies (for example to send an email or reassign a case) to make sure that things happen in a timely manner.
- Use Email Templates and Document Templates to created messages and printed documents, each filled in with the appropriate case-specific data.
- For exceptional conditions (like when a board member becomes an executive), the platform allows both single-step and multi-step tasks to be created on the fly by the person handling the case. (A single step task is simply a request for something that needs to be done, assigned to the person or collection of people who can do it. A multi -step task is in reality a mini process, complete with approval-step branching that can be defined and then executed dynamically.)
- The capacity for Case Types, meanwhile, allows for variations on a theme. The default functionality of the main Cases object, along with any customization or extensions to it are shared by each subtype, using an object-oriented construct known as inheritance.
For the basic requirements, then, success was assured. The only thing left is the implementation!
Using Processes and Events
The following diagram shows how processes and events are used to track the tasks that need to be performed to bring someone on board:
Here’s how it works:
1. When a new case is created, a Case Created event occurs.
- The Rules associated with that event launch the associated processes.
- Each process carries out one or more automated tasks, and assigns one or more manual tasks to users, all in the sequence(s) defined by the processes.
2. Track process completion.
- When the last task in a process is completed, a process completed event occurs. Additional rules carry out the appropriate actions.
3. Close the case.
- In this case, all on-boarding preparations are complete, so the case is closed.

Making the System Comprehensible to its Users
It’s all well and good to know that the onboarding process is really an instance of Case Management, but forcing people to use the terminology of Case Management doesn’t help them to understand that a new, automated system is simply a better way of doing what they already do.
For example, HR doesn’t think in terms of managing “cases”. Rather, HR personnel think in terms of assisting people. Two simple customizations help to make the system more readily comprehensible to its users:
- Change the label of the Cases object
- Depending on the nature of the system, it might be called Incidents, Investigations, Requests, or Onboarding Cases. Here, we’ll keep it short and call it Onboardings.
- Change the label of the Subject field
- In Case Management, each case has a subject line. That field summarizes the information in the case description, and identifies the cases in a list. Simply changing the label of the field from “Subject” to “Employee Name” makes things easier for the folks in HR.
- Change the name of the Application
- Like the label displayed for the main Cases object, the name of the application can be changed whenever it makes sense—something that holds true for applications you install, as well as applications you build.
Summary: Mapping the Requirements to Platform Capabilities
The following table summarizes the system requirements and shows the functional capabilities used to implement them.
Requirement
Functional CapabilityUse terminology that is familiar to the application’s users. Change label of Cases object to Onboardings Change label of subject field to Employee Name Record the source of the new hire. Change label of description field to Recruitment Notes Track process completion, and record the information needed for each step. Add additional fields to the Cases object Identify the people responsible for individual tasks Add Teams and Roles to the application Make sure that every task which needs to be done is carried out. Set up Process Models for each phase of the onboarding process. In those processes, create tasks and approval steps, assigned to the people (users, roles, teams) who need to carry them out. Make sure that onboarding tasks are carried out in time to get the new employee oriented and productive as rapidly as possible. Set up Service Level Objectives that specify the time in which the onboarding tasks must occur. Accommodate compressed onboarding timelines of a few days, and extended timelines of several weeks, as well as a standard one-week timeline. Use Case priority levels to specify the amount of time available. Default to the standard, one-week onboarding timeframe. Send reminder messages when things are nearing their due dates, and reassign cases when time is becoming critical. Use SLA Escalation procedures to automate those activities. Prepare a welcome letter for new employees, customized with their personal information. Create a Print Template that inserts the new employee’s phone number, email address, and login information. Send a reminder message to the HR Rep, telling them when to expect the new employee. Create an Email Template for the message. At the end of the onboarding preparation process, invoke a Rule that sends the message to the case owner. Have differing processes for engineers and sales personnel, for example. Define Case Types with additional process models, inheriting all of the standard process models from the parent Cases object. Capability to diverge from the set processes Ad Hoc Processes (multi-step tasks)
Designing the Application
While comprehensive design advice is outside the scope of this article, a few important principles dictate the best design sequence:
1.Design the data model first.
- While it may be tempting to think in terms of the processes your organization follows, the best way to design the application is to focus on the data model at the outset.
- The reason is that processes are attached to the objects that make up the data model. (An object is a data table that provides additional behaviors--such as processes, rules, and email--
- which can be applied to any record in the table. So any given process is a built-in part of a specific object.)
- If you start by building processes, on the other hand, you can easily design one that needs information from different objects. When you discover that problem later on, you’re forced to either :revise the model or create a linkage between those objects that would otherwise be unnecessary.
- The simplest form of data model is an Entity Relationship (E/R) diagram like this one:

- An E/R diagram can get much more complex, of course, but you don’t need much more than the one above to get started.
- That diagram says that one customer can have multiple claims, and one claim can have multiple claim items. Those are 1 to Many relationships (1:Many, or 1:*). The diagram also says that a claim can :be related to multiple products, and that a product can have multiple claims. That’s a Many to Many relationship.
- Later on, you’ll explore the power of such relationships. For now, just know that a relationship is established using a Lookup field—a field that points to one or more records in another object.
- (You’ll see how to add them yourself, and you’ll see how the Application Construction Wizard creates them automatically when you specify the desired relationship.)
2.Identify the most basic fields
- These are the basic fields that need to be input into the record. You don’t need to worry about calculated fields or report summaries, and you don’t need to worry about thing like flags that control :your processes. Those can be added as you go.
- You also don’t need to worry about that fields that establish the relationships. Those are created automatically when you define those relationships using the Application Construction Wizard. So :once you settle on an initial collection of input fields, you’re ready to begin building.
-
Note: It has been suggested that it is beneficial to step through the standard UML design sequence: Object Models (or data structures, in reality), Sequence Diagrams, and the State Model. That is the waterfall (design first) methodology. But can also begin building the application with just the E/R diagram and the basic fields. With that information in hand, you can construct an initial version of the application in a matter of hours, and have a basic version in operation in a matter of days. That is the agile (design as you build) methodology.
- In this scenario, we are building a Dynamic Case Management application. Most everything needed is already built into the application, so there is only a few basic fields that need to be added to the Cases object:

- (For convenience, you’ll be adding some other fields that are needed for process context as you build the application. But were you building the app from the outset, these fields are all you really need to get started.)
3.Build the App
- At this point you have enough information to begin building the application.
- You can also begin designing your processes, if you like. But if you build them in the application, the processes you design will never be divorced from the data model. In addition, you’ll be able :to make immediate use of the application, minus the automation that the processes will add— that gives you a chance to interact with it as you build, testing as you go.
4.Build the Processes
- Building processes directly into the application as you design them ensures that your process design matches the data model—so the information needed at each stage of processing is on hand.
Adding Your Custom Brand
Before doing anything else, you should know that you can customize the application pages by uploading a custom logo and changing the banner background color. You make those changes in the ServiceDesk application—which just happens to be the initial application you see in your cloud platform. So we’ll do that now, before creating a new application.
- In ServiceDesk, go to
 > Channels > Service Portal
 - Under Basic Information, set Title: AllAboard Acme [This value sets the name displayed in bookmarks and the browser tab.]
- In the Branding section, specify:
- Header Logo [Upload your organization's logo image. Standard size is 98 pixels wide by 24 pixels high. A realistic maximum size is up to 600 pixels wide by 32 pixels high.]
- For example, here’s one that is 220 wide by 32 high:
![]()
- At 32 pixels high, only very simple images and stylized text are readable.
- Web Site Url
- Enter the URL the users go to when they click on your logo. (Typically, that will be your organization's web site.)
- Favicon
- Upload a small favicon image that displays in the browser's address bar, in bookmarks, and in browser tabs. For example, here’s a scaled up version of an icon file created using the IcoFx editor:

- Mobile Logo
- Upload an image that appears when the application is accessed from a mobile device.

Important: All AgileApps applications are mobile enabled from the moment they are created.
Building the Initial Application
This article steps you through the entire development process, with many a screenshot to guide the way. The whole process takes little more than a couple of hours to complete. (Yes. A reasonably - sized application can be developed in that little time. And as you’ll see, a usable application can be created literally in minutes.)
Prerequisites
Before you begin, there are a couple of things you will need:
- You should be familiar with the AgileApps interface, as described in Using the Agent Portal in the support wiki. You see, you need a separate tool to build an application. The tools you need are built in, so you see the application as you build it. (There is, however, a plugin for the Eclipse development environment that can be used to make sophisticated coding easier. That capability is discussed at the end of this article, along with other development tools.)
- If you are the initial admin in a new platform instance, you will automatically have all the privileges you need. If you are a new Designer in an existing platform instance, you will typically need Application Control privileges. If a programmer, you will need Development Control privileges. (Other privileges may be needed, as well, depending on what you do.) Learn more: Access Profiles.
Use the Application Construction Wizard to Create the Onboarding App
- Click > Administration > Applications
- Click [Create New Application]
- Click the Create Using Wizard tab.
- Fill in the following fields:
- Application Name: Acme Onboarding
- Cases Object Title: Onboardings
- Name of the main object is Cases in documentation and developers the same terminology. But the label that users see can be anything.
- 5.Click [Define Object].
- A new dialog opens that lets you modify labels and add additional fields with basic field types.
- Change the Display Label (Singular) field from the default (Onboardings) to Onboarding. The interface will now look right everywhere a singular label is needed.
- Change the Subject label from Subject to Employee Name.
- Change the Description label from Description to Recruiting Notes.
-
Note: Once a field is created, its internal name is fixed—but its label can be changed at any time.
- 6.Click [Add Additional Object] to add another object.
- 7.Click [Add a Relationship] to define the relationship between the created objects.
- 8.Select the objects from the Relationships drop-down and select either One to Many or Many to Many from Relationship Type.
- 9.Click [Create this Application].
- 10.Click [Ok] in the dialog that appears telling you that application is created.
- 11.Click [Leave] in the dialog box that appears asking whether you want to leave the page.
- The Dynamic Case Management application can be customized.

Running the Application
To see the labels you created, go to the upper right part of the screen and click New. From there, you can click Onboarding to create a new case.

The form appears for a new case. The labels of the two main fields (subject and description) have been changed to the labels you specified:

You can also add a new case using the button in the tab that displays a list of Cases, as shown here:

Use the Application Construction Wizard to Create Relationships
When you are creating a DCM app using the wizard, you can also add additional objects, specifying the fields in those objects, and creating relationships among them. This section gives you practice with those options.
-
Note: This is the easiest way to create a Many to Many relationship, so it’s worth being aware that this mechanism exists. However, you can use it to create relationships only between objects defined in the wizard. To create a relationship to existing system objects (like the Users object), or to create a relationship within an object (where one record links to another in the same object), you need to define Lookup fields directly. Those are two things the relationship mechanism does not do, at this point. Since we need both in the current app, you’ll be adding those fields later.
To create additional objects and relationships:
- Go to > Administration > Applications
- Click [Create New Application]
- Click the Create Using Wizard tab.
- This time, click [Add additional Object]. Some new options appear, as shown here:
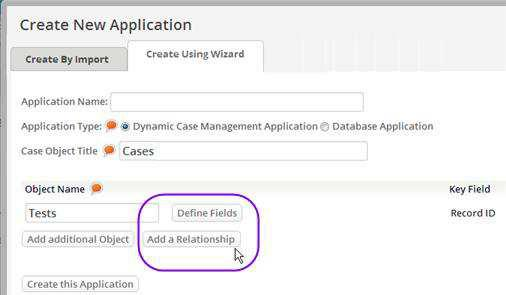
- These options work the same way they do when creating a Database Application. You can define fields for each new object you create, and you can specify the relationship between among them.
- 5.Create a few different objects, and experiment with the relationship options.
- 6.When you’re done, click the X icon in the corner to close the dialog without creating the application.

Customizing the Application
With the initial application constructed, it’s time to take the next steps.