Single Sign-On
Settings > Administration > Single Sign-On
- The Single Sign-On option is managed by a Service Provider admin
- This feature is disabled, by default
- Learn more: Tenant Configuration Options
Single Sign-On provides the ability for users to gain access to multiple enterprise systems with a single login. A single login saves time for users, and simplifies their work, because they no longer have to stop to login again at every gateway to an application/portal/enterprise system.
Simplified SOAP Protocol for Single Sign-On
The platform's implementation of Single Sign-On uses simple SOAP messages sent over an HTTP connection. The resulting protocols are simple enough to be implemented in a minimum amount of time, making it easy for enterprises to integrate platform services into their existing operations.
- Best Practices
Consider the following best practices when implementing Single Sign-on for your organization:
- Your organization’s implementation of the Web service must be accessible by the platform servers. This means you must deploy the Web service on a server typically in your DMZ.
- Namespaces, element names, and capitalization must be exact in SOAP requests. Wherever possible, generate your server stub from the WSDL to ensure accuracy.
- For security reasons, you should make your Web service available by SSL only. You must use an SSL certificate from a trusted provider, such as Verisign or Thawte.
- The platform sends you the originatingIp in the web service call it makes to your servers. You can use this information to restrict access based on the user’s location.
- You must map your organization’s internal usernames and the platform's usernames. If your organization does not follow a standard mapping, you may be able to extend your user database schema (for example, Active Directory) to include the platform username as an attribute of a user account. Your authentication service can then use this attribute to map back to a user account.
- We recommend that you do not enable single sign-on for the system administrator’s profile. If your system administrators are single sign-on users and your single sign-on server has an outage, they have no way to log in to the platform. System administrators should always be able to log in to the platform so they can disable single sign-on in the event of a problem.
Enabling SSO in the Platform
Users with the System Administrator role can enable Single Sign On
Single Sign On must be enabled for each user, individually--typically when the user account is created in the platform.
- Learn more: Add a User
To configure Single Sign-On:
- Click Settings > Administration > Single Sign-On
- Click the [Edit] button
- In the Single Sign-On Settings section, choose one of the available options:
- Fill in the settings for the choice you made (described in the sections that follow)
Guidelines
- The System Administrator can decide to enable some users for SSO and disable SSO for other users. In this case, users with SSO enabled will be validated against their corporate environment and users with SSO disabled will be validated against the platform.
- SSO cannot be turned off if there exists at least one user who has SSO enabled from the user profile. If the System Administrator tries to disable SSO under this condition, a warning is displayed.
- If SSO is disabled, and the System Administrator tries to enable SSO for a user, the System Administrator is asked to enable SSO, and provide a valid SSO URL
- When disabling SSO for a User, the administrator is asked to use Reset Password for the user. This is to ensure that this user receives a valid password for login.
Restrictions
- Username in the platform should be same as the username in your organization's environment
- These password-related options are not allowed:
- Reset Password
- Change Password
- Forgot Password - a Message will be shown prompting the user to contact their organization's system administrator
- When adding a new user, the Welcome email message will not contain a password.
- SSO can be turned on/off at the user level, if the System Administrator has granted the user rights to change this setting
Delegated Authentication
With delegated authentication, you use your own server to validate platform Users against a corporate database or an LDAP Directory. Users can then use a single username and password to access all of their applications--as long as they support delegated authentication.
Scope
Delegated Authentication is limited to user authentication and does NOT include authorization. Users must be active in the platform. Teams, Roles and other permissions must also be maintained.
It is the responsibility of the corporate System Administrator/IT Staff to develop and implement a Web service that can accept and respond to the web service calls made by the platform servers.
How Delegated Authentication Works
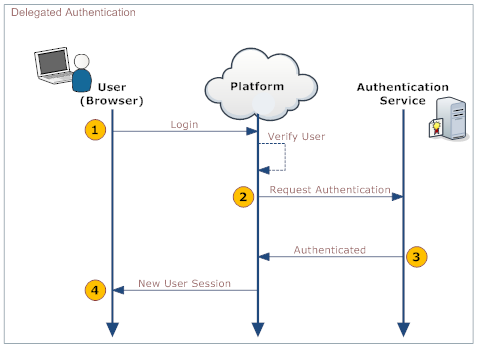
When a User logs in, their identity is authenticated in both the platform and in your organization's systems. The following diagram shows the process:
This table describes the actions taken by the User, the platform, and your organization's Web Service.
User Platform Your Organization's Web Service 1. Log into the platform Validate that: - User is Active
- SSO is Enabled
2. Make a Web Services call to the organization's Web service, requesting authorization. Include these parameters in the call:
username
password
originatingIp
Note: originatingIp is the IP address that originated the login request. This could be useful to restrict access based on the user’s location. The Web Service must be implemented in a way that the platform is able to access it.
3. Validate the passed information and return either "Authenticated" or "Failure". 4. On Authenticated response, generate a new User Session. On Failure, notify the user.
Enabling Delegated Authentication
- Click Settings > Administration > Single Sign-On
- Click the [Edit] button
- For Single Sign-On Settings, choose Delegated Authentication
- Fill in the Delegated Authentication Settings:
- Specify the URL of the authentication server running in your environment (abc5.abc.com:8080)
- Note that the URL and Port number must be specified using a Fully Qualified Domain Name or an IP address. Secure HTTPS (Hypertext Transfer Protocol over Secure Socket Layer) protocol is used to access this URL.
- If you do not have this information available, contact your IT department or System Administrator.
- Choose whether or not to Enable Single Sign-On for individual Users.
- Click [Save]
Setting up Communications with the Authentication Server
For a successful handshake with the platform, the authentication server needs a certificate. If you are using a self-signed certificate, it needs to be loaded into the cacert keystore file in the platform's {installed_JDK}/jre/lib/security folder. Otherwise, you get an SSL error.
To load the certificate into the keystore:
- Make sure that the JAVA_HOME environment variable points to the JRE in an installed JDK.
Check the configuration in these three locations:- installation.properties
- configure.pl installation script
- scripts/longjump
- Learn more: Platform Installation Files
- Load the certificate using the keytool -import command/
- The default password is "changeit".
- Learn more: Java Tutorial: Importing a Certificate
Making a Web Service Call
Use the URL and port number provided under the Single Sign-On Settings Section to make a SOAP request to authenticate the users. SSO Request and SSO Response are predefined by the platform. These request and response are conducted via SOAP messaging.
Web Services Message Format
- Request
- SSO SOAP Request sent from the platform is as follows:
<?xml version="1.0" encoding="UTF-8" ?>
	<soapenv:Envelope xmlns:soapenv="http://schemas.xmlsoap.org/soap/envelope/">
		<soapenv:Body>
			<LJAuthenticate xmlns="urn:authentication.soap.ws.longjump.com">
				<username>jim@abc.com</username>
				<password>sales</password>
				<originatingIp>1.2.3.4</originatingIp>
			</LJAuthenticate>
		</soapenv:Body>
	</soapenv:Envelope>
- Response
- SSO SOAP Response expected by the Platform is as follows:
<?xml version="1.0" encoding="UTF-8" ?>
	<soapenv:Envelope   xmlns:soapenv="http://schemas.xmlsoap.org/soap/envelope/">
		<soapenv:Body>
			<LJAuthenticateResponse xmlns="urn:authentication.soap.ws.longjump.com">
				<Status>Authenticated</Status>
			</LJAuthenticateResponse>
		</soapenv:Body>
	</soapenv:Envelope>
SAML
Security Assertion Markup Language (SAML) is an XML-based standard for exchanging authentication and authorization data between security domains. The Service Provider must enroll with an Identity Provider and obtain an Issuer URL.
How it Works
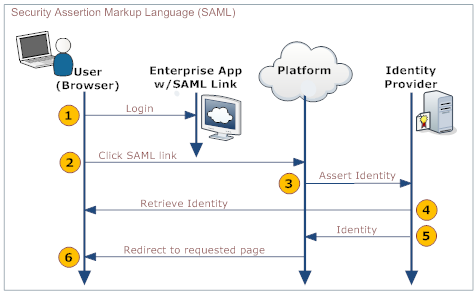
An enterprise app contains a link to the LongJump Platform. When users who are logged into the enterprise app click that link, they are automatically logged into the LongJump Platform, without requiring additional authentication. For example, an employee of ABC Company logs into the corporate website, which includes a link to the LongJump Platform on the landing page. The user clicks the link and is automatically logged in, without requiring a second login.
The process is shown in the following diagram:
Here is an explanation of the steps:
User Your Organization's Web App Platform Identity Provider 1. Logs in to a web app provided by your organization - Provides a link to the platform's SAML handler (generated by the platform when SAML is configured)
- Includes the desired platform target page as an argument in the link
2. Clicks the link that goes to the SAML handler 3. Sends an assertion to the identity provider 4. Retrieves and validates the user's identity 5. Sends the user's identity to the platform 6. Redirects the user to the appropriate page.
Enabling SAML
- Click Settings > Administration > Single Sign-On
- Click the [Edit] button
- For Single Sign-On Settings, choose SAML
- Fill in the SAML Settings (below)
- Click [Save]
The platform generates a link that goes to the SAML platform's SAML handler.
SAML Settings
- Version
- SAML Version
- Choose from Version 1.0 or Version 2.0
- Issuer
- The identity provider. (A name or identifier of some sort.)
- User Id Type
- Determines the type of identifier
- Choose from UserId or Federated Id, where:
- UserId is the Record Id of the user that is logged in
- Federated Identity acts as a user's authentication across multiple IT systems or organizations. Learn more: Federated Identity.
- User Id Location
- Specifies an attribute tag that defines the location of the User Id
- Choose from Subject or Attribute
- Third Pary authentication URL
- The URL used to authenticate a user or maintain a user's credentials.
- Syntax:The URL and Port Number must be specified using a FQDN or an IP address, for example:
- www.abc.com:9090
- 192.168.1.10
- abc.def.com
- Issuer Certificate
- Issuer certificate is used to sign and verify SAML messages. Requires a valid x509 issuer certificate.
- Choose one of the following options:
- Paste the Issuer Certificate in the text area
- Navigate to the Issuer Certificate section, then select and load a file containing the Issuer Certificate
Using SAML
To use single sign-on with SAML, you create links that go to the platform's SAML handler, passing the desired destination page as an argument.
To create a link to the platform in your enterprise app:
- Copy the SAML link that was generated when SAML was configured.
- Add a done= argument to the link that specifies the target page in the platform.
To create the done= argument:
- Go to the standard initial page using Service?t=1&targetpage=ViewPort.jsp
- Or:
- a. Click the Short URL icon
 for the page you want to target
 - b. Copy the URL from the dialog that appears.
- c. Edit the URL to remove https://{domain}/networking/"
What remains is the argument you'll pass. For example: pages/yourPage.jsp
- a. Click the Short URL icon
- URL encode the link
- Learn more: URL Encoding
Pass Through Authentication
Pass Through Authentication (PTA) lets a user go straight to the platform from an organization's web page or application, without having to log in again.
How it Works
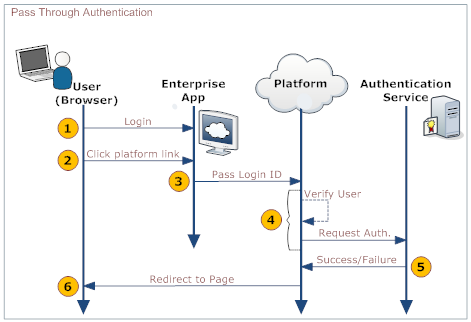
While using an enterprise application, a user would like to visit a page hosted on the platform, without having to log in to the platform to see it (after having already logged in to the enterprise app). To accomplish that goal, the application sends a small SOAP message to the platform, in an HTTP request. That message contains the information needed to log into the platform. Data in it is passed to an authentication server, which sends back a message saying that authentication has succeeded or failed, after which the user is directed to the appropriate page, as shown in the following diagram:
Here is an explanation of the steps:
User Your Organization's Web App Platform Authentication Server 1. Logs in to a web page or application provided by your organization 2. Clicks a link that goes to a platform page 3. Passes data to the platform's PTA service in the SOAP payload - Session ID (optional, but desirable)
- Login ID
4. - Receives data in the SOAP payload:
- Passes data to the Authentication server
5. - Authenticates the user
- Sends back a success- or failure-report
6. Redirects the user to the appropriate page.
Enabling Pass Through Authentication
The URL of the Authentication Server and the URLs of the pages to visit in the event of success or failure are configured in the platform's Single Sign-On Settings:
- Go to Settings > Administration > Single Sign-On
- Click the [Edit] button
- For Single Sign-On Settings, choose Pass Through Authentication
- Fill in the Pass Through Authentication Settings:
- Third party Authentication Service URL
- Location of the authentication service. The platform uses this URL to authenticate the USER, passing the appropriate pay load in the HTTP request.
- Success page URL
- The page the platform sends the user to when authentication succeeds:
- If not specified, the default destination is the platform's home page.
- Error page URL
- The page the platform sends the user to when authentication fails:
- If not specified, the default destination is the platform’s Login-error page.
- Can be overridden dynamically by the Authentication Server
- Click [Save]
Message Formats
Posting a Form to the Platform
The application or web page can use a form like the one shown below to do an HTTP POST to the platform. The user is then seamlessly redirected to the success or failure page, depending on the results of the authentication.
<form id='testForm'
   action='https://{domain}/networking/passThroughAuth'
   METHOD="POST" enctype="application/x-www-form-urlencoded"
>
   <input type="hidden" name="loginID" value="jondoe@test.com">
   <input type="hidden" name="sessionID" value="adasd3qw4q4weasdasd">
</form>
where:
- loginID
- The user's login name on the platform--typically in the form of an email address.
- sessionID
- The session ID of the user on the organization's website. Optional. It is passed on to the authentication service, so the authentication service can make use of it.
When the platform receives POSTed form data, it passes the data to the Authentication Service using content type application/x-www-form-urlencoded, in a request like the one shown below:
- Method
- POST
- URI
- Configured in the Single Sign-On Settings
- Content-Type
- application/x-www-form-urlencoded
- Payload
- A URL Encoded version of a data string that looks like this:
loginID=jondoe@test.com&sessionID=adasd3qw4q4weasdasd
- The Authentication Service reads the identification parameters from the request--as in this Java code, for example:
String loginId   = (String)request.getParameter("loginID");
String sessionId = (String)request.getParameter("sessionID");
- where:
- request is the object containing the HTTP request (for example, in an HttpServlet instance).
Sending a SOAP Request to the Platform
This message format can be delivered to the platform by an application or web page.
- Method
- POST
- URI
- https://na.longjump.com/networking/passThroughAuth
<?xml version="1.0" encoding="UTF-8" ?>
<soapenv:Envelope xmlns:soapenv="http://schemas.xmlsoap.org/soap/envelope/">
    <soapenv:Body>
        <LJAuthenticate xmlns="urn:authentication.soap.ws.longjump.com">
            <sessionID>...</sessionID>
            <loginID>...</loginID>
        </LJAuthenticate>
    </soapenv:Body>
</soapenv:Envelope>
where:
- sessionID
- The session ID of the user on the organization's website. Optional. It is passed on to the authentication service, so the authentication service can make use of it.
- loginID
- The user's login name on the platform--typically in the form of an email address.
When the platform receives a SOAP request, it sends a message in the following format to the Authentication Server:
- Method
- POST
- URI
- Configured in the Single Sign-On Settings
<?xml version="1.0" encoding="UTF-8" ?>
<soapenv:Envelope xmlns:soapenv="http://schemas.xmlsoap.org/soap/envelope/">
    <soapenv:Body>
        <LJAuthenticate xmlns="urn:authentication.soap.ws.longjump.com">
            <sessionID>...</sessionID>
            <originatingDomain>...</originatingDomain>
            <originatingIp>...</originatingIp>
            <loginID>...</loginID>
        </LJAuthenticate>
    </soapenv:Body>
</soapenv:Envelope>
- where:
- originatingDomain
- Name of the Domain the request originally came from (e.g. wwww.paaspartout.com)
- originatingIp
- IP Address of the domain the request originally came from (e.g. 10.20.30.40)
- sessionID
- Passed on from the original request
- loginID
- Passed on from the original request
Messages Returned by the Authentication Server
After authenticating the user, the server sends back a success or failure response.
- Authentication-Succeeded response
- This response is sent when authentication succeeds.
<?xml version="1.0" encoding="UTF-8" ?>
<soapenv:Envelope xmlns:soapenv="http://schemas.xmlsoap.org/soap/envelope/">
    <soapenv:Body>
        <LJAuthenticateResponse xmlns="urn:authentication.soap.ws.longjump.com">
            <status>AUTHENTICATED</status>
            <loginID>userLogin@Login.com</loginID>
        </LJAuthenticateResponse>
    </soapenv:Body>
</soapenv:Envelope>
- Authentication-Failed response
- This response is sent when authentication fails.
<?xml version="1.0" encoding="UTF-8" ?>
<soapenv:Envelope xmlns:soapenv="http://schemas.xmlsoap.org/soap/envelope/">
    <soapenv:Body>
        <LJAuthenticateResponse xmlns="urn:authentication.soap.ws.longjump.com">
            <status>NOT_AUTHETICATED</status>
            <loginID>userLogin@Login.com</loginID>
            <redirectOnErrorURL>http://www.location.com/somePage</redirectOnErrorURL>
        </LJAuthenticateResponse>
    </soapenv:Body>
</soapenv:Envelope>
- where:
- redirectOnErrorURL
- URL of the next page the user sees. (Overrides the Single Sign-On settings.)


