Manage Contacts
Sales Force Automation application > Workspace > Contacts
Contacts are individuals associated with your accounts. Most accounts have someone who is considered to be the primary contact or the key person with whom you should communicate. There may also be additional contacts associated with an account.
The Contacts tab allows you to manage your contacts by creating contact lists, merging contacts, and editing existing contacts. You can add and view related information including opportunities, notes, attachments, appointments, and tasks. You can send email and log calls from the contacts detail page, add contacts to your Outlook address book, and request updated information from your contacts.
Add Contact
You can enter basic contact, address, and descriptive information in each contact record. When you save the new contact, the details page for that contact opens, which enables you perform numerous actions relating to that record (and related objects).
To Add a Contact:
- Click the Contacts tab
- Click the [New Record] button
- Complete the information in the contact fields
- Click [Save]
Developers, learn more: Add a Contact using a Page and Class
Email Messaging
Use the [Email] button in Accounts, Contacts, Prospects, and User records to send an email message. You can attach one or more files and specify multiple recipients. This email becomes a task that is tracked as an activity associated with the record. You can define follow-up tasks, add appointments, and send additional notes related to this record.
Note: The [Email] button appears in the record only if the Track Activities option is enabled for the object.
When you send an email message from a Data Policy, you get extra TO/FROM options. See Send an Email Message from a Data Policy for details.
Users can also send email from the Documents and Reports tabs. See Email for more information.
Send a Message from a Record
To Send an Email Message from a Record:
- Open an object that contains the record of interest
- Click the record to open the details page
- In the Related Information section, click the [Send Email] button
- In the email page, specify information under the Address Details section:
- To
- Enter a name or click the Lookup
 button to select from a list of recipients
 - Related To
- The object and record automatically appear in the Related To fields
- Optionally, select another object and record to change the association
- Cc (Carbon copy)
- The name(s) of those you want to receive a copy of this email message; Enter multiple names separated by commas, or use the Lookup button to select from a list
- Bcc (Blind carbon copy)
- The name(s) of those you want to receive a copy of the this email message, but whose email names and addresses will not appear as recipients.
- Optionally, choose an Email Template
- Enter a Subject for the email message
- Editor Type
- The type of editor to use; For more information, see Editors
- Enter the message in the Details text area
- Optionally, include Documents as attachments; Use the Lookup window to display a list of available documents
- When ready, choose one of these options:
- Click the [Save Draft] button to save a draft of the message without sending
- Click the [Preview Email] button to view the message before sending
- Click the [Send] button to send the email message
A message appears confirming that the email has been sent. Summary information about the email (the Date, Status, and Assigned To fields) appears under the Activity History in the record.
The email now becomes a completed task, and clicking on the email Subject opens the Tasks page, where you can perform all task-related activities.
You can also click the Send Note link under Activity History in the record to send additional information about this record to the task owner and other recipients.
Work with a Saved Draft
To return to a saved email message:
- Open the object and click the desired record
- Click the [Send Email] button
- Click the Drafts link to view a list of saved messages
- Click the draft of interest and continue editing
- Optionally, save the draft again, or send the message
Add a Contact to Outlook
You can add a contact to your Microsoft Outlook address book:
- Open the contact record
- Click the Add to Outlook button
- Complete the Contact information window in Outlook
Request Update
With this feature, you can send an email request, asking that the recipient update their contact information.
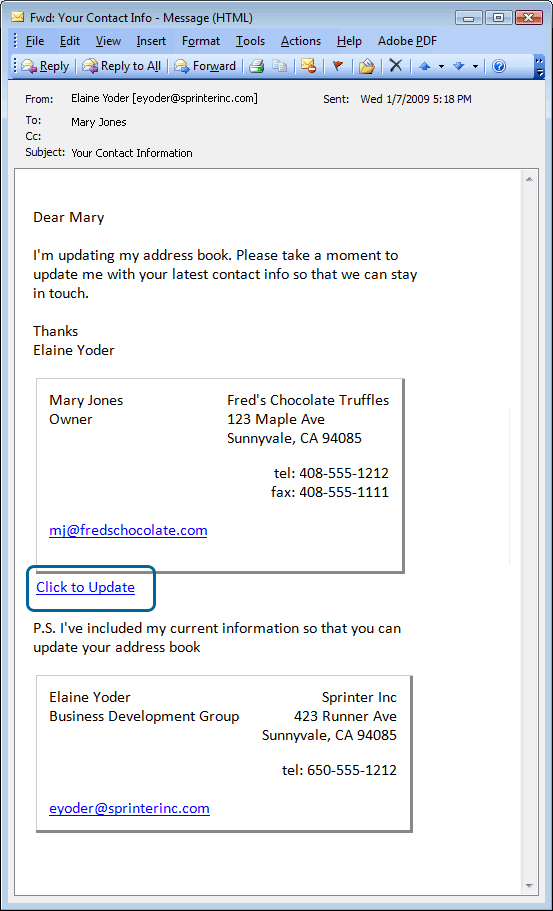
When you send the update request, an email message containing a link to a form is sent. The recipient completes the form with any new information (Name, Title, Company, Address, Phone numbers) and clicks OK. The Contacts record is automatically updated when the form is submitted.
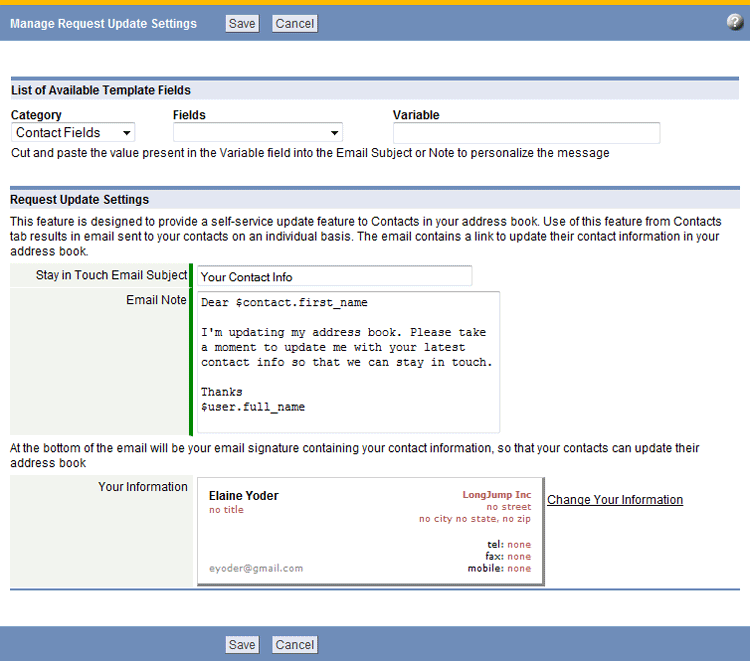
You can use Template Variables to customize the email message.
To send an email message, requesting updated contact information:
- Open the contact record
- Click the [Request Update] button
- Customize the Subject or message body as desired
- Optionally, click the [Spell Check] button to check the spelling of the message
- Click the [Send] button to send the email message
To change your contact information see Request Update Settings or click the Change Request Update Settings link.
Recipient's Message Example
This is a sample of an email message sent via the Request Update process:
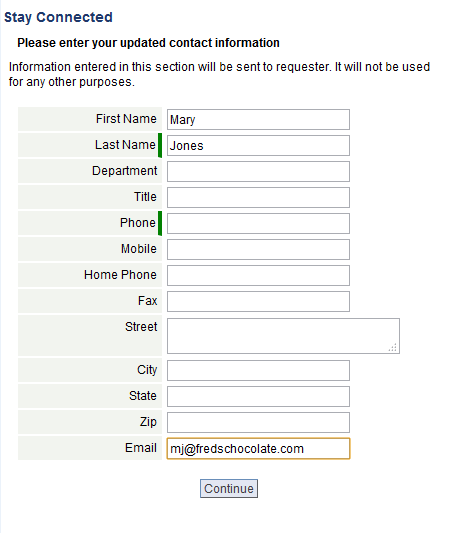
When the recipient clicks the Update link, this form appears:
The recipient can complete the form and click [Continue] to submit the new information. The form data will automatically update the contact record in the platform.
Delete a Contact
To delete a contact:
- Click the Contacts tab; a list of contacts opens
- Find the contact of interest, and click contact name link
- Click the [Delete] button; a dialog box opens, asking you to confirm the action
- Click [OK] to delete the contact, or click [Cancel] to cancel the action
Primary Contact
A person associated with an Account or Prospect, who is the key point of communications for the organization. You can associate many people (Contacts) with an Account or Prospect, but the Primary Contact is the one person in that organization who can direct you to the key personnel within the organization, and help you build relationships with them.


