Digital Signatures
Designer > Objects > {object} > Digital Signatures
Digital Signatures provide the ability to approve (by electronic signature), the values of a group of fields in a record.
- The Digital Signatures option is managed by a Service Provider admin
- This feature is disabled, by default
- Learn more: Tenant Configuration Options
Enable Digital Signatures
To Enable Digital Signatures for an Object:
- Click Designer > Data > Objects > {object}
- Click the [Digital Signatures] button
- If Digital Signatures are not already enabled for the object, click the [Edit] button and click the checkbox
 icon to enable them.
 - The following read-only fields are created automatically:
- Signed By - User name (lookup field)
- Signed Date - date/time stamp
- Sign Hash - a security feature
- Purpose - a global picklist
Block Level Signature Groups
An entire record can be signed as a whole, or a group of fields can be specified as a Block-Level Signature Group.
Block-Level Signature Groups are used when multiple approvals are needed, since each block of fields can be approved by people with different roles, in different departments.
For example, a sale of a network system to a major account might required director-level approval on the discount structure, quality-assurance manager approval on component testing, and engineering approval of the configuration.
For each Block-Level Signature Group you create, a [Signature Button] is created with a label you specify. For example: [Discounts Approved], [Components Checked], and [Configuration Approved].
Creating a Block-Level Signature Group
Users that have the Customize Objects permission can modify Digital Signatures and create, update or delete Digital Signature Groups
To create Block-Level Signature Groups
- Click the [New Signature Group] button and specify the following information:
- Signature name
- Button label
- Roles to which this signature group is accessible
- List of fields to be included as part of the signature group
- Optionally, add additional Block-Level Signature Groups
- Optionally, reorder the Block-Level Signature Groups (which sets the order of execution)
- Considerations
- In an Object, the Digital Signature option must be enabled first, which automatically creates a Record-Level Digital Signature. This Record-Level Digital Signature is of a higher order than the Block-Level Signature Groups.
- The Block-Level Signature Group:
- Requires the Record-Level Digital Signature to be enabled
- Includes these Signature Group elements: signature name, button label, roles to which this signature group is accessible, list of fields to be included as part of the signature group
- Block-Level Signature Group can be re-ordered
- A field can be part of only one Block-Level Signature Group
- The Block-Level Signature Group order is automatically set by the system
- To delete a Record-level signature field, the object must be deleted
- Deleting any one of the four signature-specific fields will throw an exception, warning the user that the field is used in a Record-Level Digital Signature
- Signature-specific fields are available in any Form Layout as a read-only field
- To delete signature-specific fields, delete the Block-Level Signature Group
- The order of Record-Level Digital Signature should be greater than the order of all the available Block-Level Signature Group
Digitally Sign a Record
- Users in Roles with permission rights to View an Object can digitally sign a record in that object, provided that the Block-Level Signature Group is accessible to that particular role
- Learn more:
To digitally sign a record:
- Open the record to be signed.
- Click the [Digital Signature] button.
- If a Block-Level Signature Group is defined, click the appropriate [Signature Button].
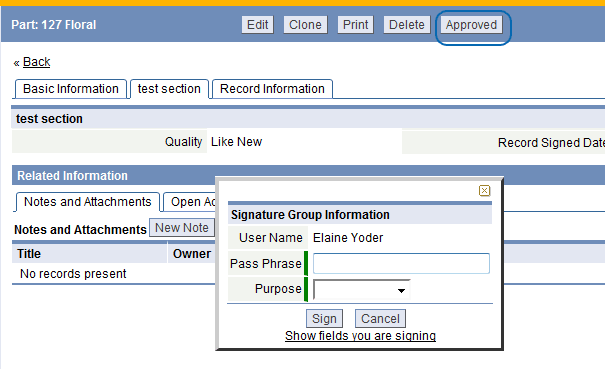
- A new section opens, which includes these fields:
- User name - displayed for reference
- Pass Phrase - enter the login password
- Purpose - choose an item from the list
- Optionally, click the Show Fields you are signing link to display the fields in this Block-Level Signature Group
- Click the [Sign] button to create a digital signature and approve the corresponding data
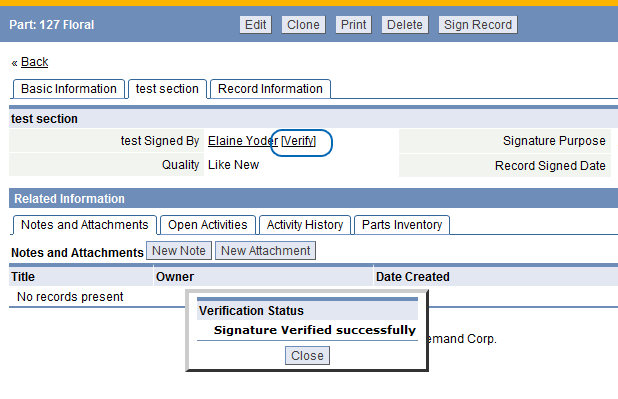
- A Signed by field is created, and displayed as an available field in the Form Layout, along with a Verify link;
To confirm a signature:
- Click the Verify link on a record to confirm signature(s) are valid.
About Record Validation
- After a record has been digitally signed, any change in the values for the fields associated in the Block-Level Signature Group will result in a verification failure, followed by Record-Level Digital Signature invalidation
- If a Block-Level Signature Group is invalidated, all the signatures whose group order is greater will also be invalidated
- If an attempt is made to change a record that has been digitally signed, a warning message is displayed, stating that if the action is confirmed, it will invalidate the Record-Level Digital Signature. The warning/confirmation message is also displayed on these record actions:
- Ownership change
- Mass update
- Group actions
- Imports (On Merge with a record that has already been digitally signed)
- Changes to the configuration of a signature group do not affect the records that are already signed. They remain valid until the next time a user clicks the Verify link, at which time the record is re-verified.
- Changes to any of the following will result in signature verification failure:
- signature algorithm.key pair for the user
- list of fields part of the signature group
- value of the fields included in the particular signature group
Encryption Key Infrastructure
The platform automatically creates default Encryption Keys for Digital Signatures. Optionally, an Encryption Key / Sign Hash can be created to align with the policies of an organization.
Users that have the Company Information permission can setup and enable the Private Key Infrastructure
Users that have the Access Control/User Management permission can setup the Encryption Key / Sign Hash
To set up the Encryption Key / Sign Hash:
- Click Settings > Administration > Company Information
- Click the [Edit] button
- In the Digital Signature Settings section, specify the algorithm to generate public and private encryption keys. Choose from:
- (DSA) Digital Signature Algorithm (Default)
- RSA encryption algorithm
- Click [Save]
Manage Digital Signature Keys
To manage Digital Signature Keys for individual users:
- Click Settings > Administration > Users
- Click the [Digital Signature Keys] button
- Provide either:
- Private Key
- Public Key or Certificate
- Click [Save]
- Considerations
- The key is validated using the algorithm specified in the Company Information
- The platform ensures that the public/private key pair is valid, as well.
- If a user doesn't have any private key and public key, the default hard-coded private key and public key is used
- The private key is used to sign the data and the signed hash bytes are converted to base 64 bytes and converted to a string to store it in the Sign Hash field
- To verify the signature, the base 64 encoded hash string is decoded and verified using the public key

