Lab B.2: Simple Interaction
- Goals
-
- Understand what a Controller does
- Create a Controller class
- Create a JSP button
- Prerequisites
-
- Lab B.1: Hello World, to establish a development environment and set up the destination page.
Exercise
In this exercise, you'll create a page (Hello.jsp) where the user can press a button to get the "Hello World" response you created in Lab 1. To do that, you'll create a controller class that handles the button press and directs the user's browser to the target page.
Create a Controller class
When creating a JSP page that has a controller behind it, you'll create a Java class whose name is based on the page name. Since the page will be Hello.jsp, you'll create HelloController.java.
- Click
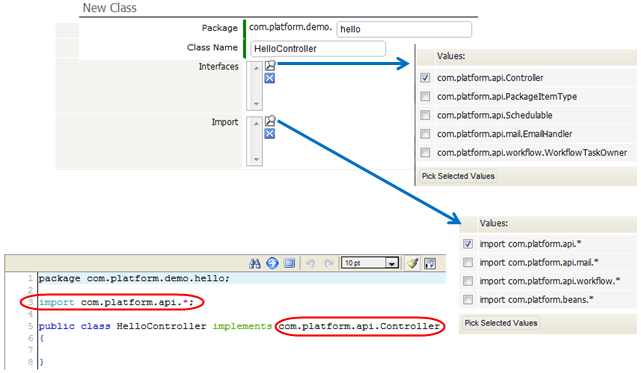
 > Customization > Developer Resources > Classes > New Class
- Enter the package name: hello
- Every class lives in a package hierarchy. The first two levels of the hierarchy (com.platform) are predefined. The next is your organization's namespace. (Here, we use demo.) The last name in the hierarchy specifies the application. We're calling this simple application "hello".
- Enter the class name: HelloController
- Note:
Unlike JSP pages, it is necessary to leave off the extension (.java) when specifying the class name.
- Note:
- Click the magnifier next to the box labeled Interfaces.
- A Multi Value Lookup page appears to let you select the interface(s) you need.
- Pick com.platform.api.Controller
- Click the magnifier next to the box labeled Imports.
- Pick import com.platform.api.*.
- (None of the com.platform.api classes are used in this example, but it's a good idea to get in the habit of supplying it, because almost every class will.)
- Click [Next]
- A class is created with the imports and interface declarations you selected:
Next:
- Add an import for HashMap. (It will hold arguments passed to the controller.)
- <syntaxhighlight lang="java" enclose="div">
import java.util.HashMap; </syntaxhighlight>
- Add the code for the method:
- <syntaxhighlight lang="java" enclose="div">
   public ControllerResponse execute(HashMap params) throws Exception
   {
       ControllerResponse cr = new ControllerResponse();
       cr.setTargetPage("HelloWorld.jsp");
       return cr;
   }
</syntaxhighlight>
- This code implements the execute() method specified by the Controller interface. The params HashMap would contain arguments, if any. The execute() method creates a ControllerResponse argument that is used to pass back data. (Any Java object can be passed, because JSP code will be handling the response at the other end.)
- The important bit here is that setTargetPage specifies the next page for the browser to display. That page will get any data you send. When the data arrives, it will be processed by the Java code in the JSP target page.
- The final code should look like this:
- <syntaxhighlight lang="java" enclose="div">
package com.platform.demo.hello;
import com.platform.api.*; import java.util.HashMap;
public class HelloController implements Controller {
   public ControllerResponse execute(HashMap params) throws Exception
   {
       ControllerResponse cr = new ControllerResponse();
       cr.setTargetPage("HelloWorld.jsp");
       return cr;
   }
} </syntaxhighlight>
- Click Save.
- Visit the controller page to be sure that it works as expected: https://{yourDomain}/networking/controller/com/platform/demo/hello/HelloController
- You visit the same "Hello World" page you created in Lab B.1, but this time, you accessed it by way of the controller.
- (Note that the fully qualified package name (package path and class name) is specified to access the class.)
Create a JSP page with a Button
Here, you'll create a new JSP page called Hello.jsp that contains a button for the user to press.
- Click
 > Customization > Developer Resources > Pages > New Page
 - Enter the page name: Hello.jsp
- Add content for the page:
<syntaxhighlight lang="java">
Press the button to see something cool.
 <form name="mainForm" action="/networking/controller/com/platform/demo/hello/HelloController"
    method="POST" class="form1">
    <input type="submit" name="go" value="Go!" />
 </form>
</syntaxhighlight>
The JavaScript code creates a simple web form with the button you press to access the controller. Note that the "action" you specify is the path to the controller class.
Also, note that the form above will let the user specify data to send, when we get to that point. This command, on the other hand, could be used to process the button click directly: <syntaxhighlight lang="java"><input type="button" name="back" value="Cancel" onclick="location.href='/networking/controller/com/platform/demo/hello/HelloController?action=go'"/> </syntaxhighlight> With that code, you can supply data in URL's the query string, as with the action parameter shown here.
- Click Save.
- Visit the page you created: https://platform_url/networking/pages/Hello.jsp
- Click the button to see the results.
What You Just Did
In outline, you performed the 3-step dance that lies at the core of web programming:
- Present a page for the user to interact with (Hello.jsp)
- Define a controller class (HelloController) to process the data and select a destination page to go to next.
(In some cases, you'll specify the same page as the destination. More typically, you'll go to one page when processing succeeds, and go to another in the event of a failure.) - Display a destination page the user will see when processing completes.
Note:
The "ControllerResponse" object goes to the container that's doing the processing (in this case, the platform). The container then pulls up the next page to display (as specified in the object), and sends along any other data stored in the object. But the term "Response" only makes sense when you are thinking of things from the point of view of the container--because it is the container that invokes the execute() method and gets back the response.From the standpoint of the application you are coding, the object is not so much a "Response" as it is a "target" specifier--where to go to next, and what data to send there. So when you see "ControllerResponse", think "Destination", or "Target".
