Mailbox
When you put your application into production, you'll want customers to communicate with you using an email address you have established for the purpose--something like support@YourCompany.com. This article shows you how to set up an Email Channel mailbox to handle those communications.
How an Email Channel Mailbox Works
An Email Channel mailbox can be hosted by any standard email provider. Here's how messages sent to that mailbox are processed:
- When an new message is sent to that mailbox, a Case is automatically constructed (if you have configured it to allow that behavior). The subject line of the message becomes the subject of the case.
- When a message is sent in reply to a Case-related email, it is added to the Case history.
- All messages read from the Mailbox are deleted after they are processed.
- When a mailbox is configured, all existing messages are processed and then deleted.
- (So don't configure an email address that is used for any other purpose.)
- Messages that were automatically generated by a remote server are ignored, including:
- Messages that were bounced back to the platform (for example, because the original email address is no longer valid)
- Automatic-response messages
- Vacation-response messages
Adding an Email-to-Case Mailbox
Prerequisites:
- To set up an Email mailbox, you need an existing email address that will be dedicated to case-related communications.
- That address can be established with any Email provider.
To set up the Email-to-Case mailbox:
- Go to
 > Channels > Email
 - Click [New Mailbox]
- Fill in the Basic Information and other settings to configure the Email Channel
- Fill in the Mailbox Configuration Settings discussed below
- Click [Save]
If messages exist in the mailbox, you are immediately notified that, should you continue, the messages will be processed and deleted. (It's an extra check to keep you from targeting something like your personal mailbox, by mistake.)
When you continue from that point, the existing messages are processed. New cases are created with status Closed. Acknowledgement messages are not sent out for those cases. (The assumption is that the majority of messages represent a historical record, rather than the current case load. Change status to Open for any cases that are ongoing.)
Mailbox Configuration Settings

Important:
- Messages in the Mailbox are deleted as they are processed. Make sure to use a Mailbox that is dedicated to Case messages.
- Google and Microsoft have deprecated the basic authentication and will no longer support this feature from October 1st 2022. It is encouraged to use OAuth as the authentication type in your mailbox configuration settings.
The platform uses these configuration settings to access the Mailbox.
Basic Authentication Configuration
- Email Address
The Email address of the external Mailbox. For example, abc@zyz.com.
Must be unique (not be used for any other mailbox).
- Email Address
- Username
The login name for the external Mailbox account.
(Defaults to the email address, but can be edited.)
- Username
- Password
The password used to access the Mailbox.
- Password
- Protocol
The access protocol provided by the email host: POP3, POP3S, IMAP, or IMAPS.
- Use of IMAP or IMAPS is recommended.
- Protocol

Note:
- POP3 - Post Office Protocol, version3. (The original email protocol. Messages are always downloaded when read.)
- POP3S - A version with additional security.
- IMAP - Internet Message Access Protocol. (An advanced protocol allows messages to remain on the server, for access from multiple locations.)
- IMAPS - A version with additional security.
- Host
The IP address of the email host, or the domain name. For example, imap.gmail.com
- Host
- Port
The port number used to access the Mailbox.
- Port
OAuth Configuration
Using Gmail as your Mail Server
Before you configure your mailbox settings on AgileApps Client, perform the following steps to register your application in the Google Mail Server.
Registering your Application in the Google Mail Server
You must register your application in the Google Mail Server as an OAuth Client. You must create a project prior to performing the application registration process.
- Go to the Google Developer Console, select the email address you have registered for the external Mailbox, and enter the password.
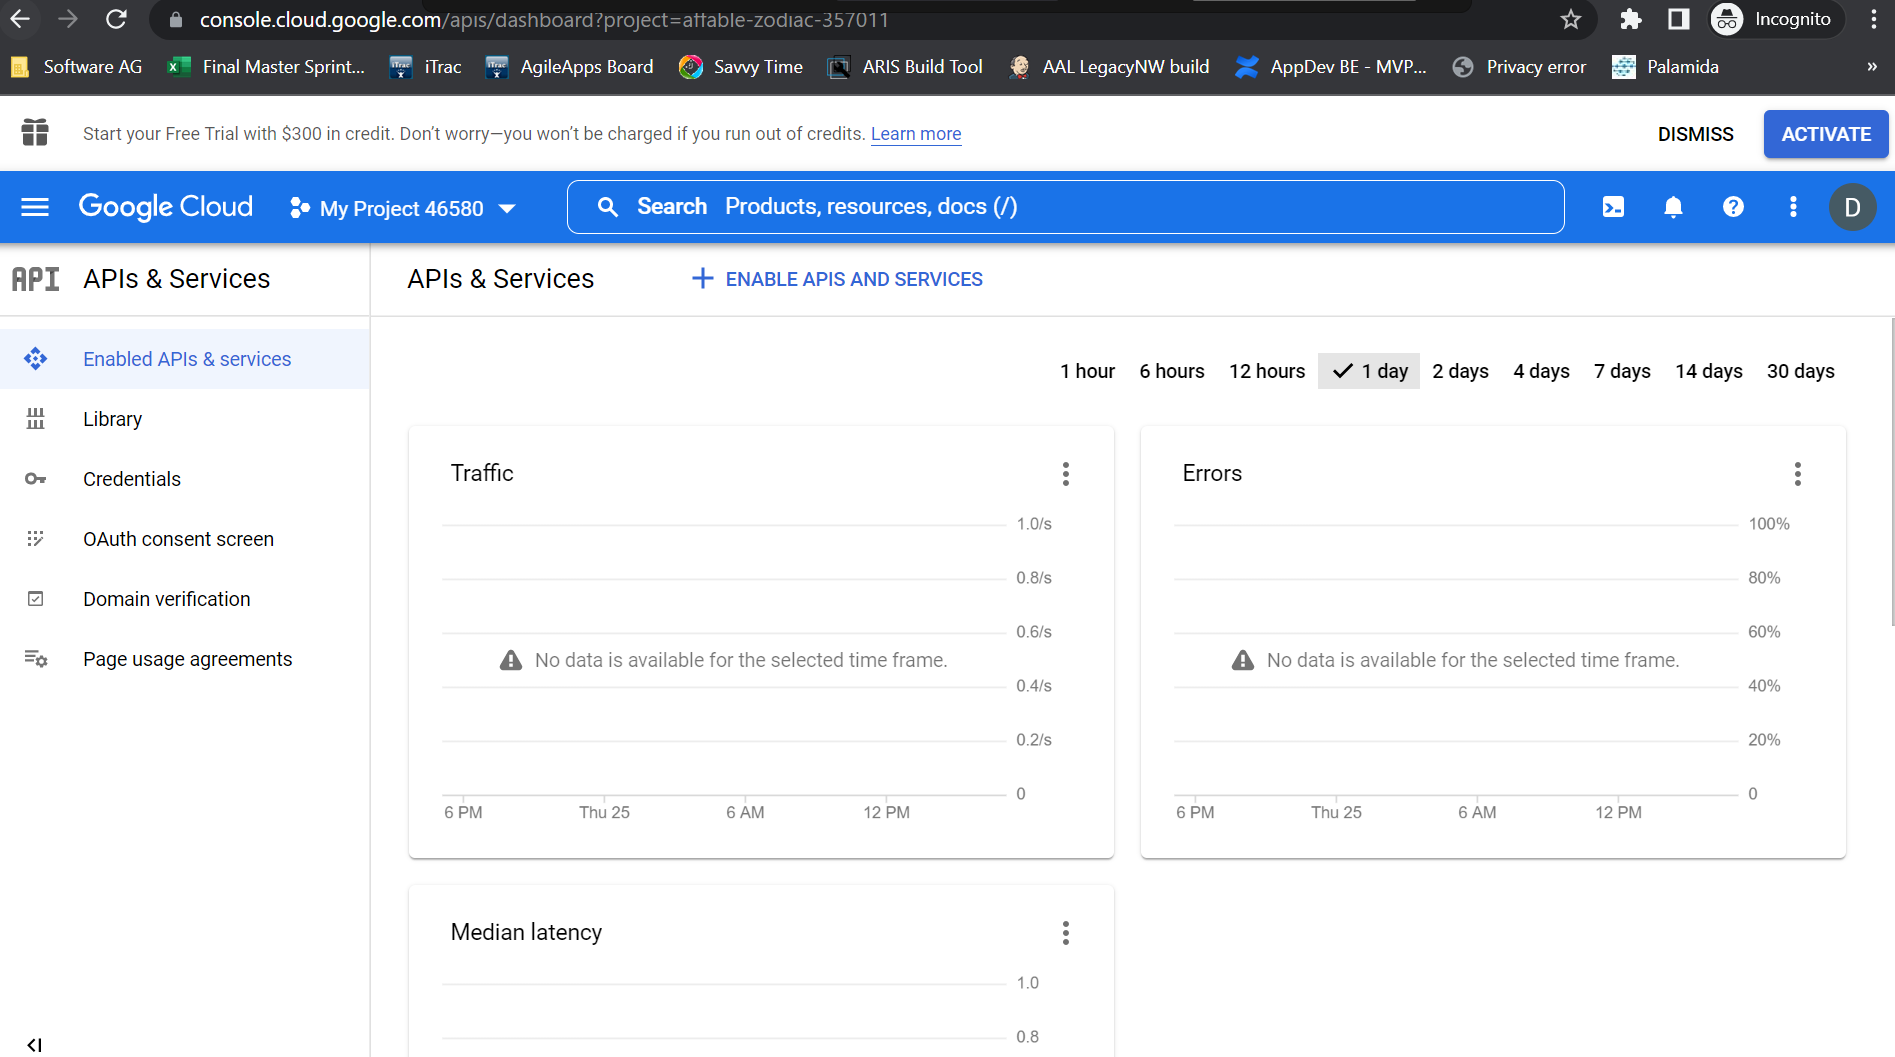
- Under the Project drop-down, click New Project.
- On the New Project window, enter the project name in the Project name textbox.
- Click CREATE.
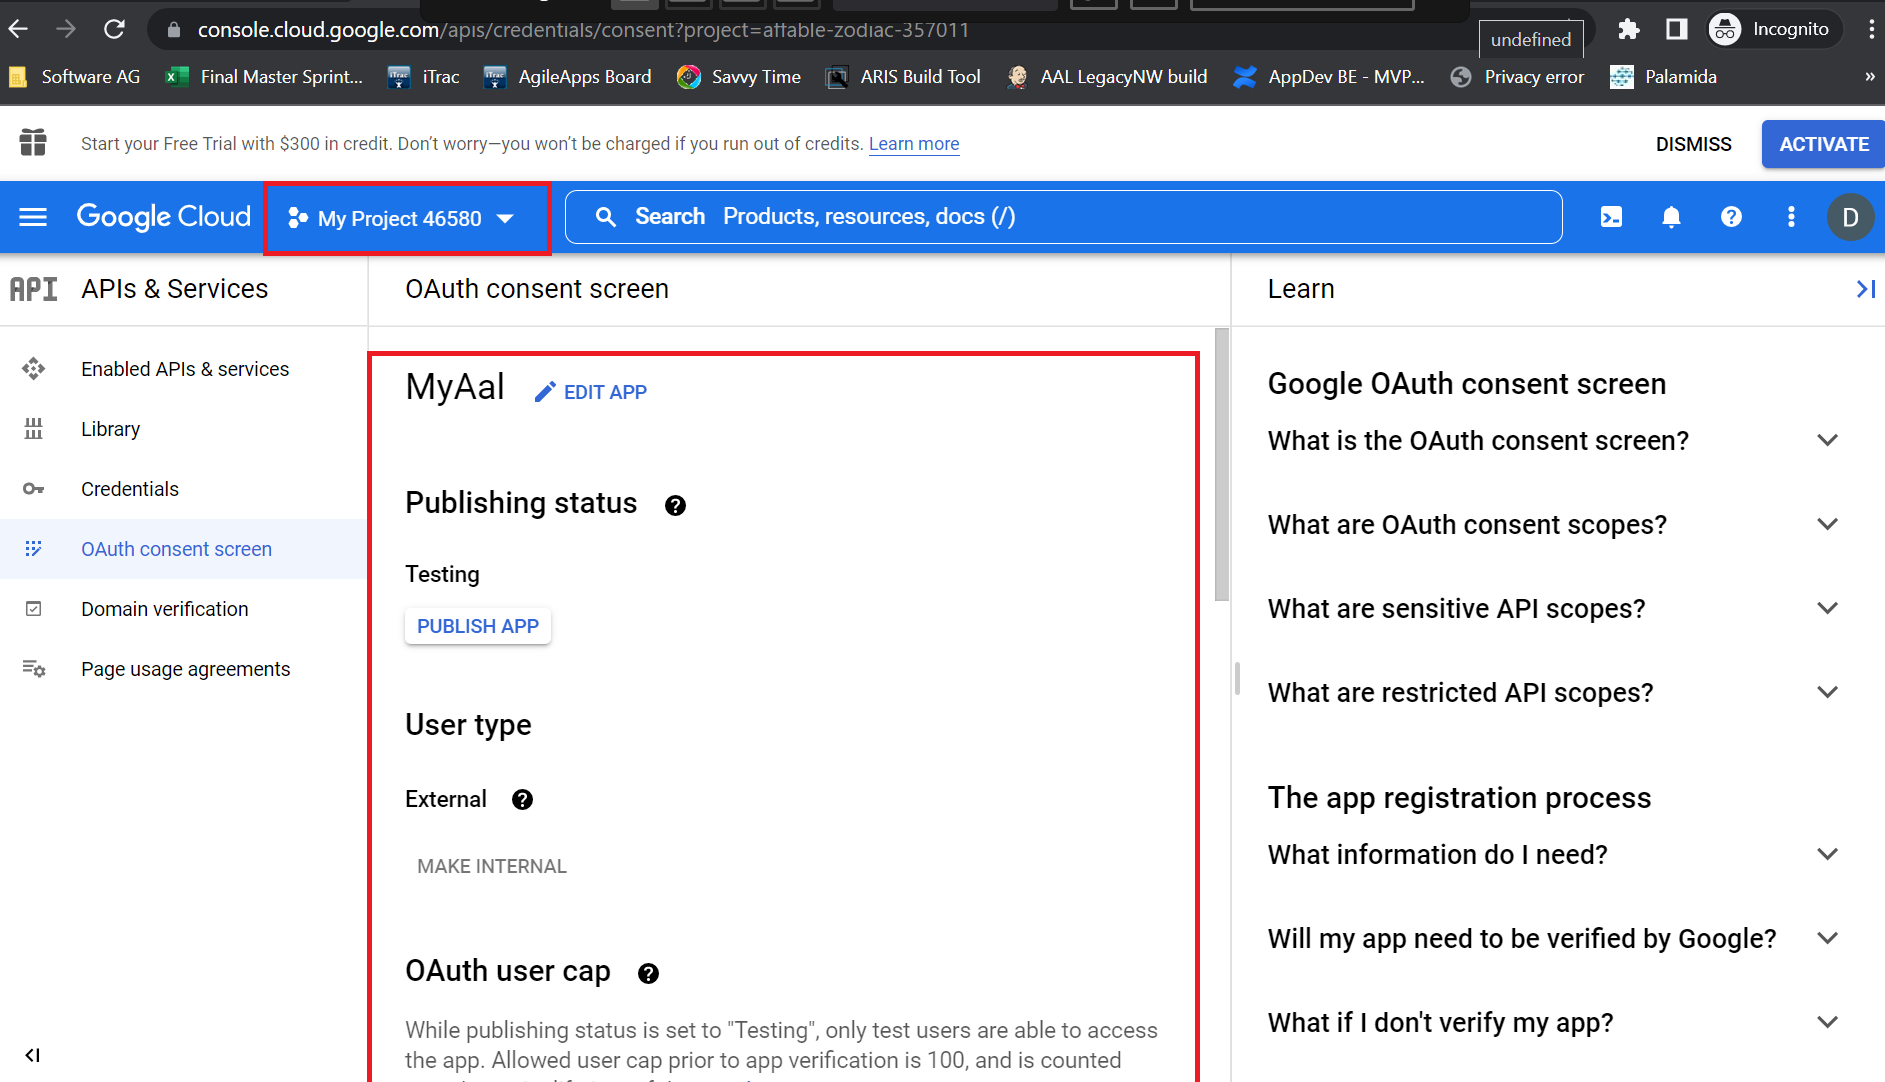
- Under the APIs and services page, go to the OAuth consent screen and select the External option and click OK.
- On the Edit app registration page, enter the following details and click Save.
- App Information
- App name: Enter the application name you want to register.
- User support email: Enter the email address you have registered as the external mailbox.
- App logo: Upload an image, not larger than 1 MB on the consent screen that will help users recognize your application. Allowed image formats are JPG, PNG, and BMP. Logos should be square and 120px by 120px for the best results.

- Developer contact information
- Email addresses: Enter the same email address as provided in the App Information section. Click SAVE AND CONTINUE.
- Gmail scopes: Click ADD OR REMOVE SCOPES on the top of the page to add scopes. Enter https://mail.google.com/ in the Manually add scopes textbox and click ADD TO TABLE. Select the checkbox for the scope that you added recently. Click UPDATE. Click SAVE AND CONTINUE.
- Test users: Click + ADD USERS to add the test user. You can enter the same email ID you provided earlier as a test user. Click SAVE AND CONTINUE.
- App Information
- Under the APIs and services page, go to the Credentials page and click + CREATE CREDENTIALS. Select OAuth client ID to create an OAuth client ID. Enter the following details and click SAVE.
- App name: Enter the application name.
- Authorized redirect URIs: Click + ADD URI to add the redirect URI. For example, https://localhost:8284/networking/rest/token.

- Once you complete step 7; you will see the Client ID and Client Secret being generated and displayed on the right side of the Client ID for Web application page.
- Note: You must copy the Client ID and Client Secret and paste them into respective fields on the AgileApps Client Mailbox > OAuth Configuration page settings.


AgileApps Client Mailbox OAuth Configuration Settings
To update the AgileApps Client Mailbox settings, go to the New Mailbox window and provide the following information in the respective fields:
- Email Address
The Email address of the external Mailbox. For example, abc@zyz.com.
Must be unique (not be used for any other mailbox).
- Email Address
- Username
The login name for the external Mailbox account.
(Defaults to the email address, but can be edited.)
- Username
- Password
The password used to access the Mailbox.
- Password
- Protocol
The access protocol provided by the email host: POP3S or IMAPS.
- Protocol
-
Note:
- POP3 - Post Office Protocol, version3. (The original email protocol. Messages are always downloaded when read.)
- POP3S - A version with additional security.
- IMAP - Internet Message Access Protocol. (An advanced protocol that allows messages to remain on the server, for access from multiple locations.)
- IMAPS - A version with additional security.
- Host
The IP address of the email host, or the domain name.
For example,- If you are using IMAPS as the protocol, you can provide imap.gmail.com.
- If you are using POP3 as the protocol, you can provide pop.gmail.com.
- Host
- Port
The port number used to access the Mailbox.
- Port
- Client ID
Enter the Client ID in the textbox.
- Client ID
- Client Secret
Enter the Client Secret in the textbox.
- Client Secret
- Scope
Enter the URL that you added in the Gmail scopes section while registering your project in the Google Cloud console. For example, https://mail.google.com/.
- Scope
- Grant Type
The option Authorization Code is pre-selected in the dropdown.
- Grant Type
- Auth URL
Enter the Auth URL in the textbox. For example, https://accounts.google.com/o/oauth2/v2/auth.
- Auth URL
- Access Token URL
Enter the Access Token URL in the textbox. For example, https://oauth2.googleapis.com/token.
- Access Token URL
-
Note:
Once the email channel configuration is saved successfully, before the access token expires, a refresh token is used internally to obtain the new access token.
- Redirect URI
Enter the redirect URI in the textbox. For example, https://localhost:8284/networking/rest/token.
The redirect URI will have the authorization code generated when it gets triggered. You must look for the code parameter value to see the authorization code in the address bar.
- Redirect URI
- Authorization Code
To get the authorization code, perform the following steps:
- Authorization Code
- On the Channels > Email > New Mailbox > 'OAuth Configuration page, click the Get Authorization Code link. Once you click on the link, the Auth URL is triggered based on the inputs provided above.
- If you are logging in for the first time, an OAuth consent screen is displayed where you need to provide the password and click Allow for the Client to access this application.
- You must select the email address of the external Mailbox you have registered. It redirects you to the redirect URI where the authorization code is generated.
- Copy the complete URL from the address bar and paste it into a Notepad. Copy only the code parameter value from the Notepad and paste it into the Authorization Code textbox of the AgileApps Client Mailbox settings page.

-
Note:
- The authorization code is like an OTP for you to use it only once and save the changes. If you find any errors while establishing the connection to the mail server, provide the correct inputs and regenerate a new authorization code as the previous one will no longer be valid.
- Similarly, when you make any changes in the mail server (for example, changing the password of your external mailbox, that is Gmail), the corresponding email channel also needs to be updated with the new authorization code so that you receive a new access token.
Click Save on the right corner of the New Mailbox page to save the Mailbox settings.
Once you click Save, the Mailbox Setup window appears showing the number of messages present in your mailbox. Click Continue to save this configuration.
Using Microsoft Outlook as your Mail Server
Before you configure your mailbox settings on AgileApps Client, perform the following steps to register your application in the Microsoft Mail Server.
Registering your Application in the Microsoft Mail Server
Prerequistes:
- Ensure that the user has the required license to access the external Mailbox, that is Microsoft Outlook. For example:

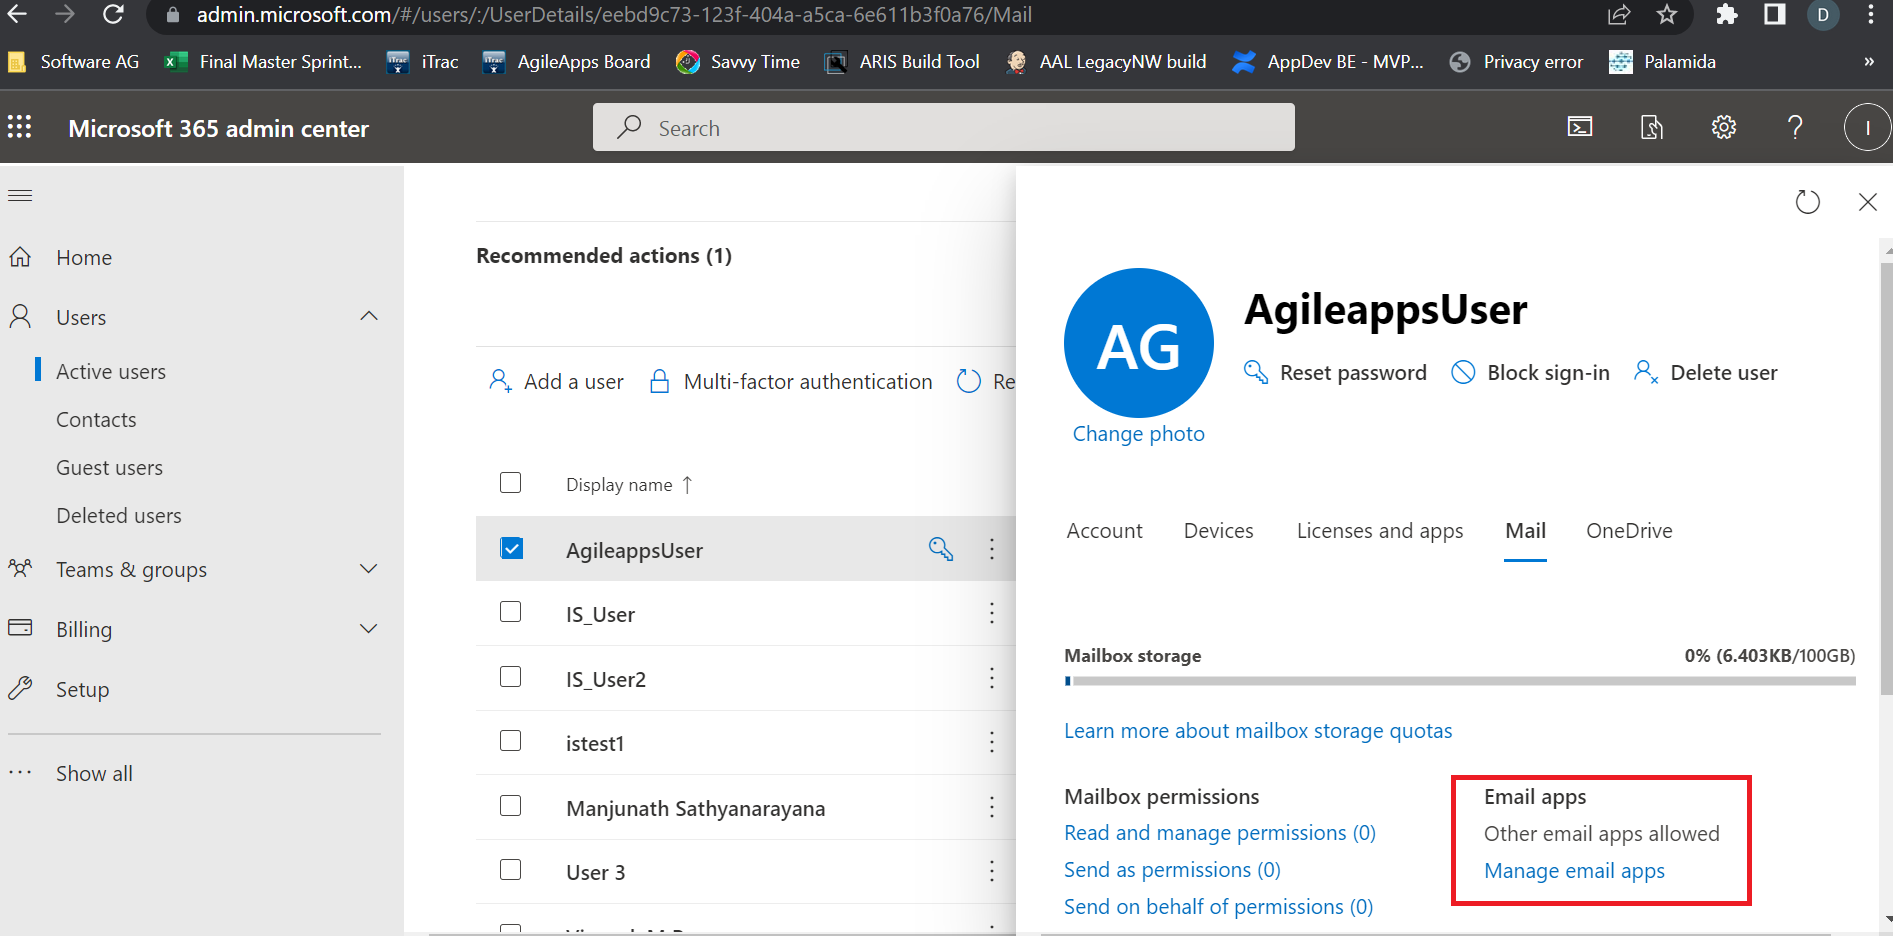
- Go to https://admin.microsoft.com > Users > Active users page. Search for the user in the list and select the checkbox to see information about the user.
- Provide the license information in the Licenses and apps tab. Ensure that the IMAP and POP protocols are not in the blocked state and you must have only the Other email apps allowed text displayed in the Mail > Email apps section. The user for whom you have updated the license information is allowed to access the mailbox.
- Ensure that the user has the required license to access the external Mailbox, that is Microsoft Outlook. For example:


-
Note:
After you perform the steps mentioned in the Prerequisites section, you must wait for a minimum of 30 minutes for the changes to get synchronized and reflected.
You must register your application in the Microsoft Mail Server as an OAuth Client. You must create a project prior to performing the application registration process.
- Go to the Microsoft Azure portal and sign in with your credentials.
- Under Azure Active Directory, go to the App registrations page and click + New registration tab. Enter the following details and click Register.
- Name: Enter your application name.
- Supported account types: Select Accounts in any organizational directory (Any Azure AD directory – Multitenant) and personal Microsoft accounts (e.g. Skype, Xbox) option.
- Redirect URI: Enter the redirect URI.
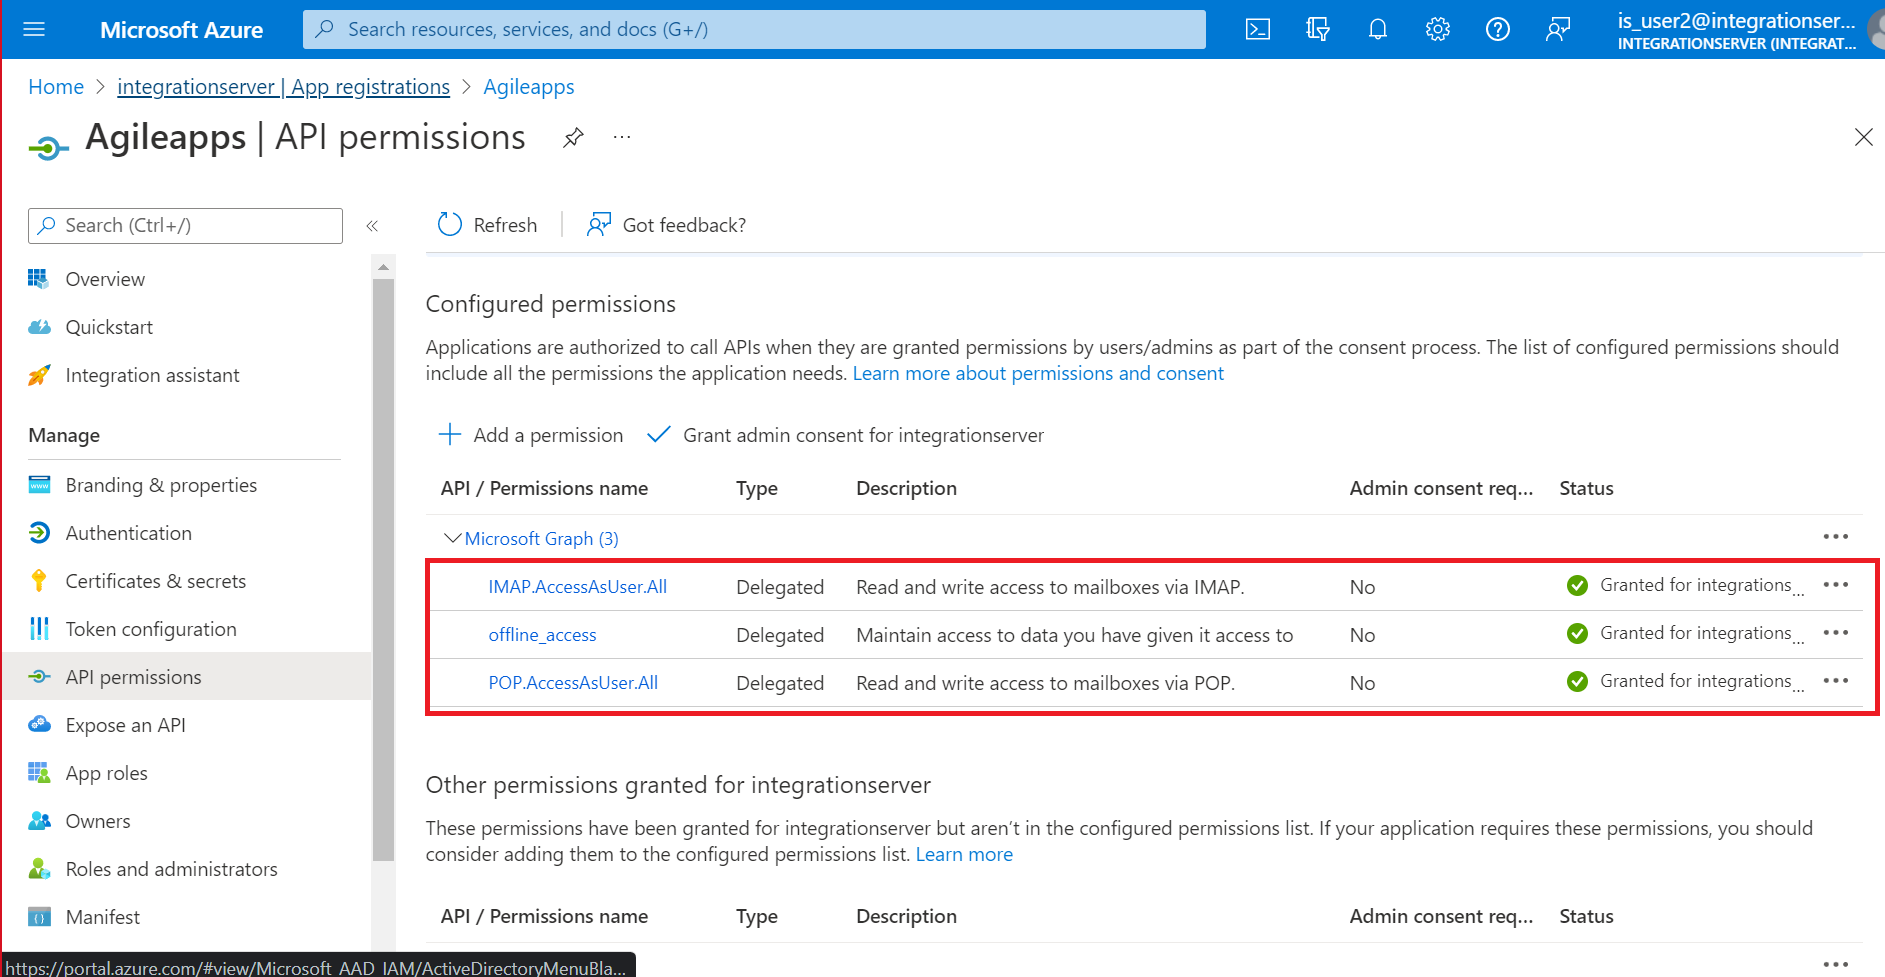
- Under App registrations, go to the API permissions page and click + Add a permission. Select the following permissions:
- IMAP.AccessAsUser.All
- Offline_access
- POP.AccessAsUser.All
- Note:
- To get the refresh token that can be used to renew the access token, you must include Offline_access scope.
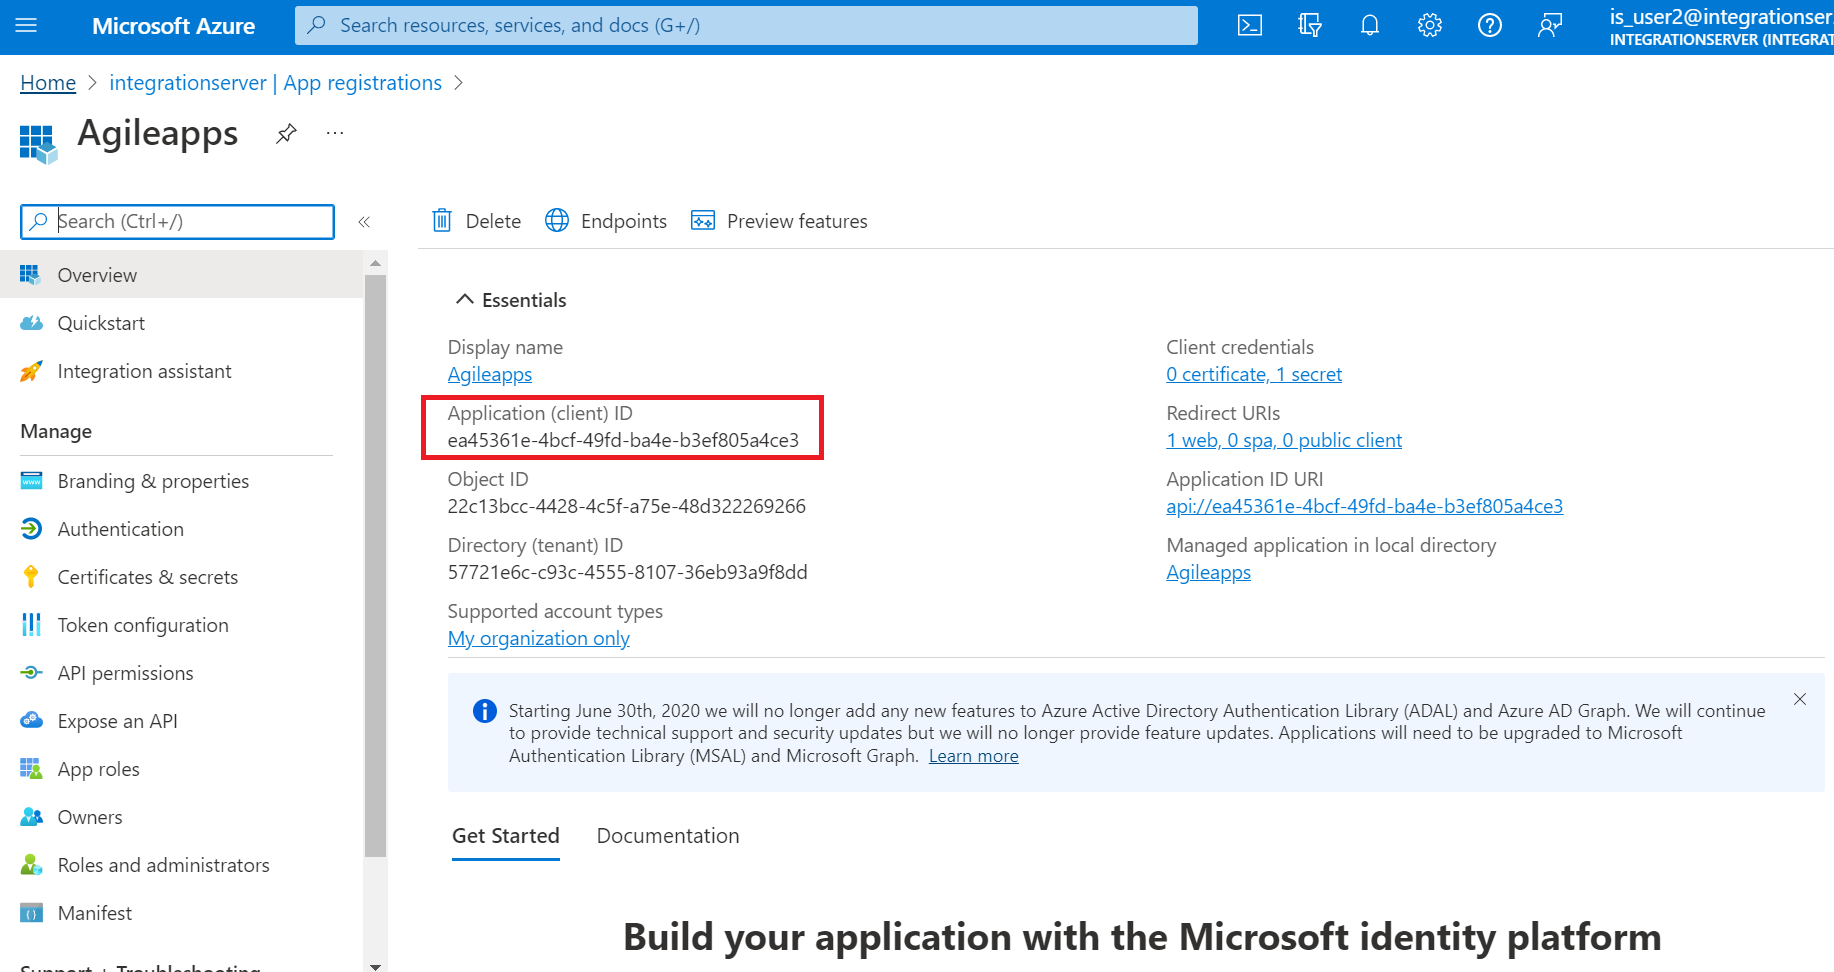
- To locate the Client ID, perform the following steps:
- Under Azure Active Directory > integrationserver > App registrations > Overview window, you will see all the information about the application you have registered.
- You must copy the Application (client) ID and paste it into the Client ID textbox of the AgileApps Client Mailbox settings.
- Under App registrations, go to the Certificates & secrets > Client secrets tab and click + New client secret. Enter the description and expiry date and click Save. You must copy the Value that is generated and paste it into the Client Secret textbox on the AgileApps Client mailbox settings page.

- Note:
- Do not copy the Secret ID. It is the Value you must copy and paste into the Client Secret textbox.
- The value appears once when you register the application. Copy it immediately, after which it gets hidden.
- Note:
- To see the Auth URL and Access Token URL, perform the following steps:
- Under the Azure Active Directory > integrationserver > App registrations > Overview window, click the Endpoints tab.
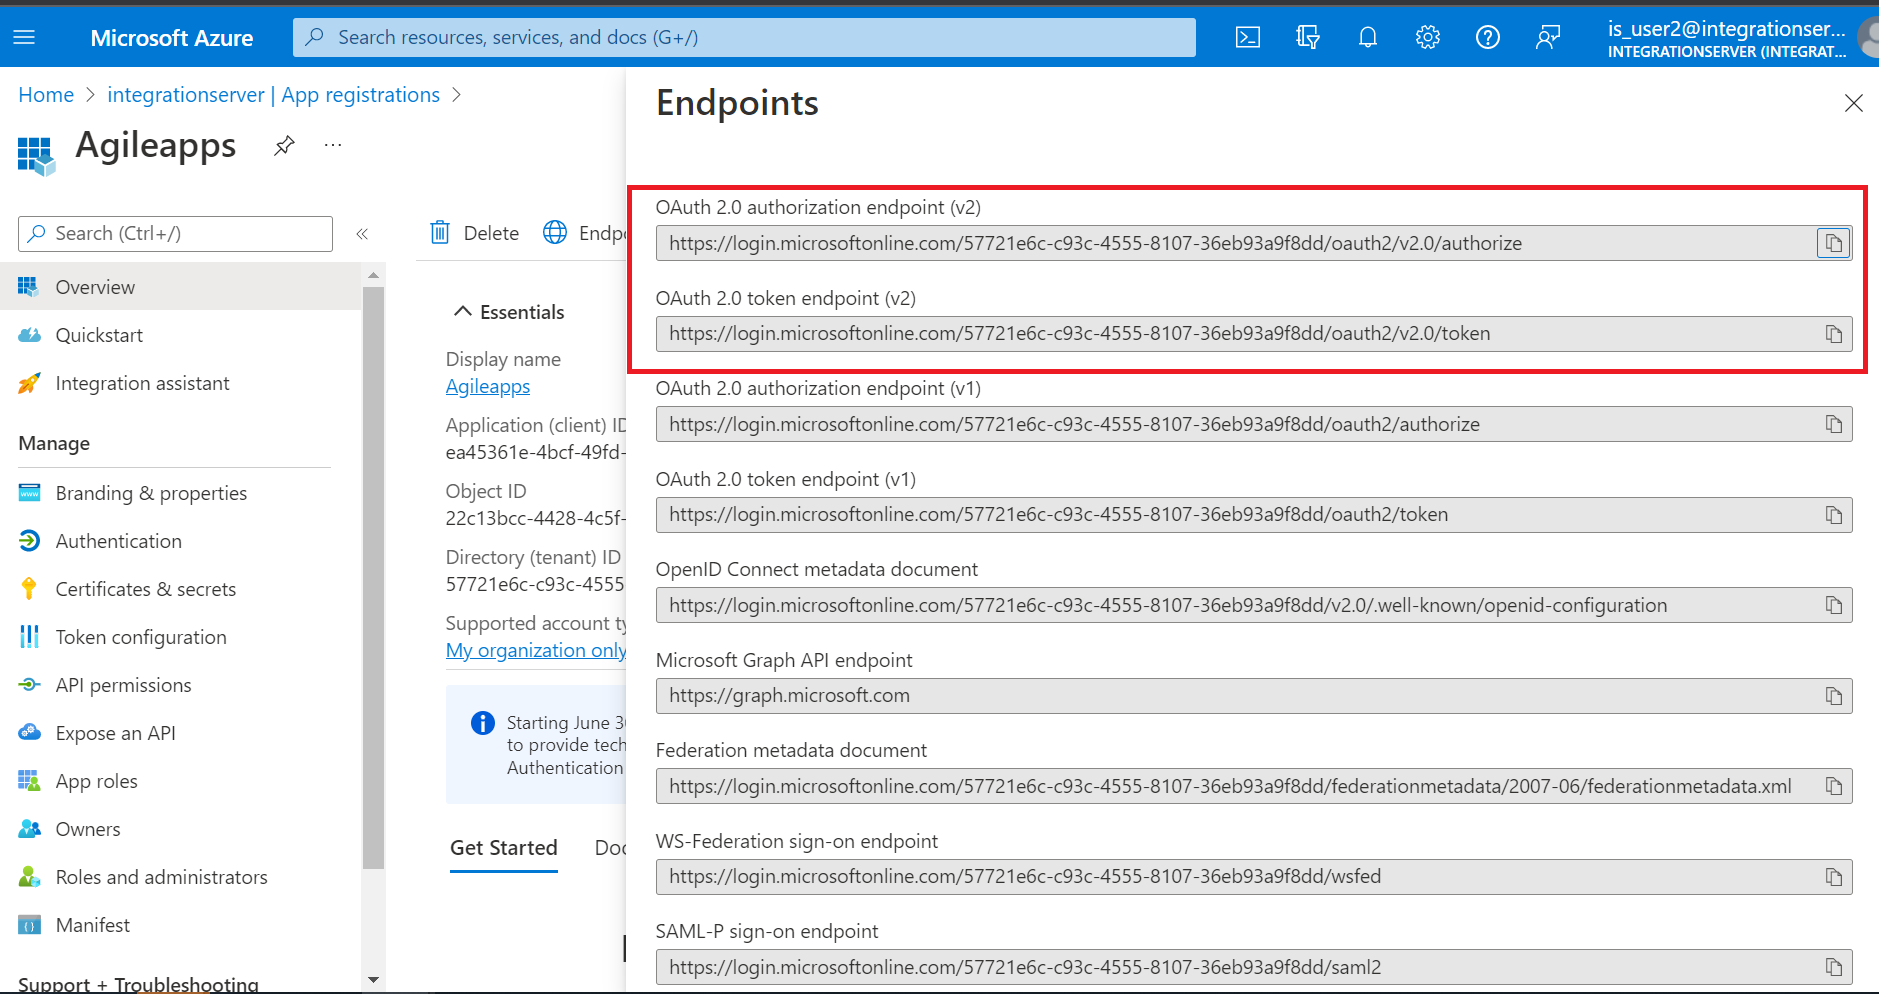
- Copy the OAuth 2.0 authorization endpoint (v2) and paste it into the Auth URL textbox of the AgileApps Client – New Mailbox page.
- Copy the OAuth 2.0 token endpoint (v2) and paste it into the Access Token URL textbox of the AgileApps Client – New Mailbox page.
- Under the Azure Active Directory > integrationserver > App registrations > Overview window, click the Endpoints tab.


AgileApps Client Mailbox OAuth Configuration Settings
To update the AgileApps Client Mailbox settings, go to the New Mailbox window and provide the following information in the respective fields:
- Email Address
The Email address of the external Mailbox. For example, abcd@outlook.com.
Must be unique (not be used for any other mailbox).
- Email Address
- Username
The login name for the external Mailbox account.
(Defaults to the email address, but can be edited.)
- Username
- Password
The password used to access the Mailbox.
- Password
- Protocol
The access protocol provided by the email host: POP3S or IMAPS.
- Protocol
-
Note:
- POP3 - Post Office Protocol, version3. (The original email protocol. Messages are always downloaded when read.)
- POP3S - A version with additional security.
- IMAP - Internet Message Access Protocol. (An advanced protocol that allows messages to remain on the server, for access from multiple locations.)
- IMAPS - A version with additional security.
- Host
The IP address of the email host, or the domain name.
For example, outlook.office365.com.
- Host
- Port
The port number used to access the Mailbox.
- Port
- Client ID
Enter the Client ID in the textbox.
- Client ID
- Client Secret
Enter the Client Secret in the textbox.
- Client Secret
- Scope
Enter the permission names that you added in the API permissions section of the Microsoft Azure portal.
For example,- If you are using IMAPS as the protocol, you can provide https://outlook.office365.com/IMAP.AccessAsUser.All offline_access.
- If you are using POP3 as the protocol, you can provide https://outlook.office365.com/POP.AccessAsUser.All offline_access.
- Scope
-
Note:
You must provide a space between the scope names.
- Grant Type
The option Authorization Code is pre-selected in the dropdown.
- Grant Type
- Auth URL
Enter the Auth URL in the textbox.
- Auth URL
- Access Token URL
Enter the Access Token URL in the textbox.
- Access Token URL
-
Note:
Once the email channel configuration is saved successfully, before the access token expires, a refresh token is used internally to obtain the new access token.
- Redirect URI
Enter the redirect URI in the textbox.
- Redirect URI
- Authorization Code
To get the authorization code, perform the following steps:
- Authorization Code
- On the Channels > Email > New Mailbox > OAuth Configuration page, click the Get Authorization Code link. Once you click on the link, the Auth URL is triggered based on the inputs provided above.
- If you are logging in for the first time, perform the following steps:
- You must provide your login credentials and click Next.
- Click Next on the More information required window.
- Click cancel for Authentication Phone and Email setup.
- You must select the email address of the external Mailbox that you have registered. It redirects you to the redirect URI where the authorization code is generated in the address bar.
- Copy the complete URL from the address bar and paste it into a Notepad. Copy only the code parameter value from the Notepad and paste it into the Authorization Code textbox of the AgileApps Client Mailbox settings page.
-
Note:
- The authorization code is like an OTP for you to use it only once and save the changes. If you find any errors while establishing the connection to the mail server, provide the correct inputs and regenerate a new authorization code as the previous one will no longer be valid.
- Similarly, when you make any changes in the mail server (for example, changing the password of your external mailbox, that is Microsoft Outlook), the corresponding email channel also needs to be updated with the new authorization code so that you receive a new access token.
Click Save on the right corner of the New Mailbox page to save the Mailbox settings.
Once you click Save, the Mailbox Setup window appears showing the number of messages present in your mailbox. Click Continue to save this configuration.
Next Steps
Configure the email handling and filtering options.
- Learn more: Configuring an Email Channel