HowTo:Create a JSP Page and Java Controller
From AgileApps Support Wiki
Revision as of 19:17, 25 April 2014 by imported>Aeric (Text replace - '{domain}' to '{{domain}}')
|
For: Developers See more: |
Overview
In this guide, you create a JSP Page and a Controller Class that interact to:
- Add records to a Mailing List object
- Do a SQL search for (one or more) records
- Update records
Sample Scenario
A sample interaction scenario might look like this:
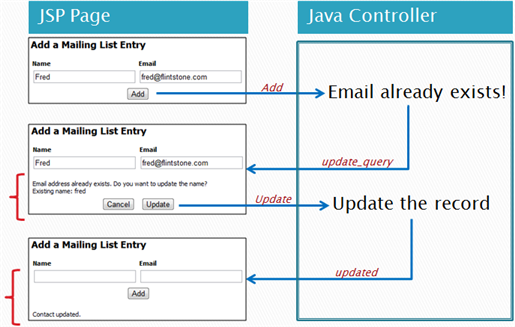
- The arrows going to the controller show the value of the action variable that is passed from the JSP Page.
- The arrows going to the JSP Page show the value of the control variable that is passed from the controller.
- (The names of the variables are determined by convention. They could be anything.)

Communication Mechanisms
This diagram shows how the interactions between the JSP Page and the controller Class take place:
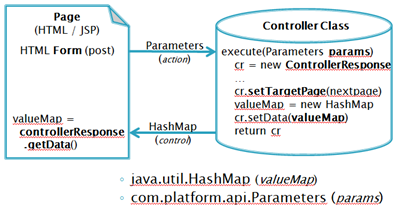
- An HTML Form designates the location to go to when a button is pressed.
- In this case, the Form targets a Class.
The platform instantiates an object when the class page is visited. - All contents of the form are passed to the controller as name/value pairs, in the params argument, including:
- - Fields with data the user supplies: <input type="input" ...
- - Hidden data fields: <input type="hidden" value="<%=SomeVariable%>"...
- - The button that was pressed: <input type="submit" name="..." value="..." ...
- (The value is displayed as the button label, and passed as the value associated with the name.)
- The controller's execute method returns a ControllerResponse object
- The ControllerResponse object designates the page to go to next
- You use its setData method to load a HashMap with values to send to the page

Prerequisites
- A "Mailing List" object must be created, with two fields: contact_name and contact_email
Developing the Application
Create the Java class
- Follow the instructions at Add a Class to create AddUpdateController_YOURNAME
- Copy and paste the contents of AddUpdateController.java into the Class
- Modify the class, supplying your package namespace and name:
- Save the class

Create the JSP Page
- Follow the instructions at Add a Page to create AddUpdateYOURNAME.jsp
- Copy and paste the contents of AddUpdate.jsp
- Customize the JSP Page with your package namespace and name:
- Save the JSP page

Try it Out
To test the project you created, visit the URL for your page, substituting your platform address for "{yourDomain}":
- https://{yourDomain}/pages/AddUpdateYOURNAME.jsp
(A valid username and password is required to log in to the platform.)