Difference between revisions of "Understanding Object Relationships"
imported>Aeric m (moved Object Relationships to Understanding Object Relationships) |
imported>Aeric |
||
| Line 1: | Line 1: | ||
[[Objects]] and their relationships are fundamental concepts of the platform. They are the difference between a flat, two-dimensional spreadsheet and a deep, multi-dimensional process model--one that integrates data management policies and user access rights, in addition to its many other benefits. | [[Objects]] and their relationships are fundamental concepts of the platform. They are the difference between a flat, two-dimensional spreadsheet and a deep, multi-dimensional process model--one that integrates data management policies and user access rights, in addition to its many other benefits. | ||
Revision as of 18:59, 17 October 2013
Objects and their relationships are fundamental concepts of the platform. They are the difference between a flat, two-dimensional spreadsheet and a deep, multi-dimensional process model--one that integrates data management policies and user access rights, in addition to its many other benefits.
About Object Relationships
A relationship is established by adding a Lookup field to an object.
Relationships are displayed in the Related Objects section of Object Relationships. For each related object, the type of relationship is shown.
For example, in the Cases object:
- Contacts is a line in the relationship table.
- The relationship is Many to one.
- The way to read that line is Many (Cases) to One (Contact).
- Considerations
-
- Lookup fields in the User Object are not editable.
- A Self Reference Lookup in an object will have two entries in the relationship grid
(a Many to One relationship and a One to Many relationship). - An existing relationship can be changed to Many to Many by creating a junction object.
Learn more: Create a Junction Object Manually
Users that have the Customize Objects permission can manage Relationship Information.
Relating Objects Using Lookups
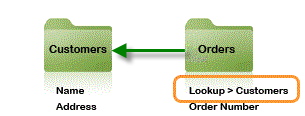
An object relationship is established when one object has a Lookup to another object:
In this example, the Orders object has a Lookup field that references Customers. To create it, it was only necessary to:
- Add a field of type "Lookup"
- Specify the target object (Customers)
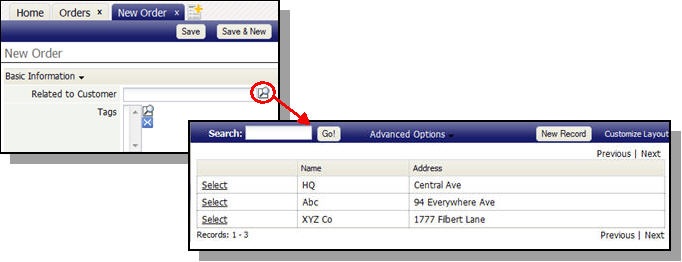
With that relationship established, the platform knows what to do when you create or modify an Order. When creating a new order, for example, clicking the Lookup icon (![]() ) gives you a list of Customers you can use to make a selection:
) gives you a list of Customers you can use to make a selection:
Note:
- Alternatively, a user can start typing into the field to take advantage of the Auto-Completion capability for Lookup fields.
- You can also add a new customer on the spot using the [New Record] button in that window. That button, too, is generated for you, as a result of adding the Lookup field.
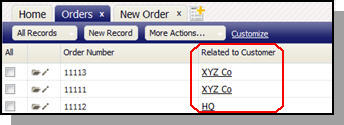
When Orders are displayed, information that identifies the Customer is included:
In each case, you can customize the layout to choose which fields from the Customer record to display, and how they are arranged.
Types of Relationships (Relationship Cardinality)
The cardinality of relationship is determined by the number of possible objects at each end of the relationship.
The possible relationships are:
- Many to One
- One to Many
- One to One
- Many to Many (using an intermediate Junction Object)
Many to One (N:1)
A Lookup field present in an object defines a Many to One relationship. For example, the Orders object has a Lookup to Customers:
So there can be multiple source records (Orders) that point to the same target record (a Customer). So the Lookup defines a Many Orders to One Customer relationship.
- Other Examples of Many to One Relationships
-
- Many employees work for a single company
- Many birds belong to a single flock
One to Many (1:N)
By definition, the "Many Orders to One Customer" relationship also has an inverse relationship: One Customer to Many Orders. The platform handles that relationship in the Related Information of a record. When viewing a Customer record, that section shows all related Orders.
In addition to open Orders, that section shows the history of all Orders for that customer - a time line of your organization's interactions with this Customer, all in one place. Plus, the Related Information Section includes the ability to add Notes and Attachments, Send Email, Add Appointments and Tasks, or Log Activities.
- Other Examples of One to Many Relationships
-
- A person can own many cars
- A car is assembled from many parts
One to One (1:1)
A One to One relationship is considered a special case of a One to Many relationship (1:N). You create a 1:N relationship, and then use the application's business logic to put a lid on the number of source objects, whether that lid is set at one, ten, or a thousand.
Most often, a One to One relationship is best modeled by adding fields directly to the record. But it sometimes happens that there are many fields that are used only rarely. In that case, you can put the seldom-used field in a secondary object, and create a Lookup to it. That makes the information easy to access when you need it, but it doesn't take up time or space (for example, when transmitting record data over the internet).
Many to Many (N:M)
In the Sample Order Processing System an Order can have multiple Tags, and any given Tag can apply to multiple Orders. In that system:
- The tag "Rush" could apply to Order #1 and Order #15. (Many Orders to One Tag)
- Order #1 could tagged as a "Linux" system, while also being a "Rush" order. (Many Tags to One Order)
That arrangement is a Many Tags to Many Orders relationship.
- Examples of Many to Many Relationships
-
- Musicians collaborate to produce songs (and songs can be produced by multiple artists)
- Employees request reimbursement for expenses (and expenses are allocated to employees in a budget)
- Customers place orders for products (and products are purchased by customers)
- Carpools contain different riders (and riders can belong to multiple carpool groups)
Working with Relationships
Creating a Many to Many Relationship
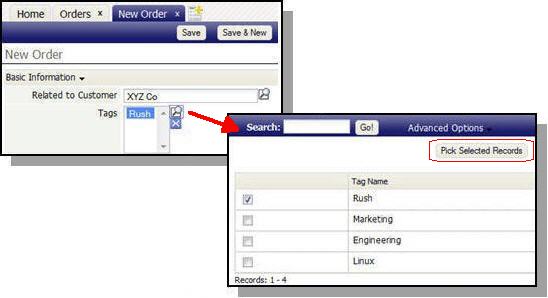
Once a Many to Many relationship has been established, each object contains a Multi Value Lookup field that lets you make multiple selections from the related object. Here, an Order contains a multi value lookup for Tags:
Using the Wizard to Create a Many to Many Relationship
The Wizard is used here to establish a relationship between Tags and Orders:
- Open the Wizard:
- Create the objects you need.
(At least one object needs to exist, to begin defining a relationship to it in the Wizard.)- Add fields
- Establish Relationships
- Click [Add a Relationship]
- Between: Orders and: Tags
- Relationship Type: Many to Many
An Orders_Tags object is created behind the scenes, and a many-to-many relationship is established.
Note: Programmers who work with APIs will need to know about the Junction Objects that underlie Many to Many relationships. Everyone else just needs to know that when they see a strange "Orders_Tags" object in their list of objects, that's just the Junction Object that establishes the Many to Many relationship, behind the scenes. (That object won't appear in the Users workspace, but will appear in the object lists in the Designer categories.
Creating a Many to Many Relationship Manually
When the objects already exist, a Many to Many Relationship must be created manually.
To create a Many to Many relationship manually:
- Identify the objects that at the ends of the relationship. (ex: Orders and Tags)
- Create the Junction Object that lies between them. (ex: Orders_Tags)
- Establish the Lookup relationships from the Junction Object to the endpoint objects. (The fields that are automatically generated by the Wizard have names like related_to_Orders and related_to_Tags. That's a good naming strategy to use.)
- Declare the relationship to be Many to Many:
- Customize one of the objects (ex:
 > Customization > Objects > Orders)
 - Go to the Relationships tab
- Choose the Junction Object (Orders_Tags)
- Change the relationship from One to Many to Junction (Many to Many)
- Specify the object at the other end of the relationship (ex: Tags)
- Specify the Lookup field that targets the other object (There typically is only one such field in a junction object, but if there were more than one, you could choose which one to use.)
- Customize one of the objects (ex:
Managing Relationships
- Go to
 > Customization > Objects > {object} > Object Relationships
 - Work with either:
- Child Objects - objects in a hierarchical inheritance relationship
- Related Objects - objects connected by a Lookup field
Relationships and Composite Objects
Relationship definitions allow for Composite Object operations, where records in related objects can be modified at the same time as the original object, along with objects related to them, and so on--all in a single transaction-safe operation.
- Learn more: Working with Composite Objects


