Difference between revisions of "Add a Document Template"
From AgileApps Support Wiki
imported>Aeric |
imported>Aeric |
||
| Line 10: | Line 10: | ||
#: | #: | ||
# If it does not already exist, create the template: | # If it does not already exist, create the template: | ||
#* [[Create a JSP Page | #* [[Create a JSP Page Print Template]] | ||
#* [[Create an HTML Print Template]] | #* [[Create an HTML Print Template]] | ||
#* [[Create an MS Word Print Template]] | #* [[Create an MS Word Print Template]] | ||
Revision as of 18:51, 17 February 2012
A Print Template can be added to any object, except for the built-in Documents and Users objects. It can use a Page stored in the platform, or it can be creating using an external HTML, Word, or PowerPoint file. This section outlines the process.
To add a Print Template to an Object:
- Click Designer > Data > Objects > {object} > Print Templates
- Click the [New Template] button.
The New Template page appears. - Use the Template Variable Tool to get the names of variables you can use in the template:
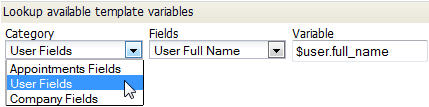
- Note:
Template variables can be used in HTML, Word, and PowerPoint files. (In Pages stored in the platform, you use standard JSP programming techniques to access platform information, rather than template variables.)
- If it does not already exist, create the template:
- Create a JSP Page Print Template
- Create an HTML Print Template
- Create an MS Word Print Template
- Create a PowerPoint Print Template
- Provide the information in the Template Information section:
- Template Title
- The template name
- Description
- Describe the purpose of the template or other information about it.
- Ready to Use
- The default setting for the template is Yes.
- Type
- HTML - To upload an HTML, Word, or PowerPoint file stored on your local system.
- The [Browse] button appears.
- Click it to locate the file to upload.
- Page - To use a JSP/HTML Page stored in the platform.
- A list of platform Pages is displayed.
- (The list does not include pages that have the Include Headers option.)
- Choose one of the listed pages.
- Click [Save]
