Difference between revisions of "Invite Contacts to the Service Portal"
imported>Aeric |
imported>Aeric |
||
| Line 11: | Line 11: | ||
#* This choice appears only when the contact is not already registered as a [[Service Desk]] user | #* This choice appears only when the contact is not already registered as a [[Service Desk]] user | ||
#* When clicked, an email that contains the invitation is sent to the user. | #* When clicked, an email that contains the invitation is sent to the user. | ||
#* The | #* The [[Portal User Welcome Email]] is used to formulate the email | ||
{{TBD| THIS PROCEDURE NEEDS TO BE TESTED AND REFINED<br>}} | {{TBD| THIS PROCEDURE NEEDS TO BE TESTED AND REFINED<br>}} | ||
Revision as of 00:49, 1 November 2012
Contacts > {contact} > Actions > Invite Contact
In some cases, it makes sense to allow Service Desk users to [[Template:HelpDesk:Customizing the Service Desk#self-register|self register]]. For example, if a product is sold through retail channels, customers will come to the service desk through the organization's website, and register for support. In such circumstances, there is rarely a need to invite contacts to the Service Desk (although it can be done).
In other cases, access to the Service Desk is much more restricted. In a B2B setting, for example, only employees of the client company will be eligible to register as service desk users. In those cases, you'll invite contacts.
To invite a single contact to use the Service Desk:
- Go to the Contacts tab
- Click on the contact you intend to invite
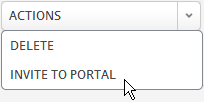
- Click Actions > Invite to Portal

- This choice appears only when the contact is not already registered as a Service Desk user
- When clicked, an email that contains the invitation is sent to the user.
- The Portal User Welcome Email is used to formulate the email
__TBD: THIS PROCEDURE NEEDS TO BE TESTED AND REFINED
__
To invite multiple contacts to use the Service Desk:
- Use Import to upload their names and email addresses into Contacts
- A new Contact entry is created for each person
- Each Contact entry has a unique ID
- Select the contacts and use Export to generate a list of names, addresses, and unique IDs
- Copy the Portal User Welcome Email template
- Use Excel mail merge functionality to generate emails