Difference between revisions of "Application Access"
From AgileApps Support Wiki
imported>Aeric |
imported>Aeric |
||
| Line 9: | Line 9: | ||
===Working with Application Access=== | ===Working with Application Access=== | ||
{{:Application Access Settings}} | |||
Revision as of 00:23, 14 March 2013
![]() > Setup > Administration > Application Access
> Setup > Administration > Application Access
About Application Access
Using Application Access, you determine who has access to an application, and what Roles they can adopt when using it.
Access can be granted to individual users or to teams. For each user or team you select, you specify the role(s) they are allowed to adopt.
Each combination of a user/team and an associated role becomes a record in an access table that records the configuration settings.
Working with Application Access
- The Application Access page lists the applications that are running on your system.
- Click on an application.
The Access to Application page appears for that application, listing all of the users and groups that have been assigned access, and the roles they can play. (This is the access table.) - Click [New] to create a new entry in the table, or click the Edit link adjacent to an existing entry.
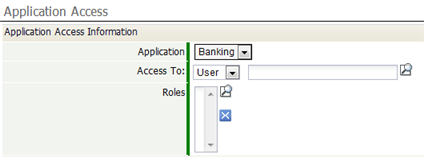
The Access Assignment window appears. - Select User or Group from the dropdown
- Click the magnifier icon to do look up the user or group, or type in the name. (After three characters have been typed, the system will attempt to automatically complete the name.)
- In the list of Roles, choose the roles the designated user or group can adopt:
- a. Click the magnifier icon to do a Lookup, then select the roles that apply
- b. Type in a comma-separated list of roles
- Click [Save]


