Document Templates
Designer > Presentation > Print Templates
Print templates let you generate PDF documents for selected records.
About Print Templates
Print templates are powerful tools, allowing you to set up documents that pull information from a specific object and merge into an HTML or JSP page. Print templates are loaded into the platform and can be used to set up standard proposals, queries, contracts, invoices, etc., and generate PDF documents unique to specific records - any document that you can dream up.
Examples
- Create an Expense Report to be used in expense management application
- Print an Employee Benefit Form

Note: The files used for HTML, Word, and PowerPoint based Print templates are first created outside of the platform. The initial version of a JSP Page-based template is created inside the platform. Once created, print templates can be downloaded, edited, and uploaded again.
- Learn more: Sample Print Templates you can customize and use.
How Print Templates Work
The Print Templates feature lets you generate graphical mail-merge-style PDF documents using variables and rich formatting. You can use these templates to create prefilled forms, invoices, contracts, and other types of documents using data stored in your application. The platform uses the Apache Velocity templating engine to create powerful dynamic documents.
In outline, the process looks like this:
- You create a document (on your local file system) or an HTML/JSP Page in the platform that includes all of the fixed text and images you want to include in your template.
Learn more: HTML Resources - While creating the document, you make note of the platform data you want to add:
- Record fields
- Record images
- Charts created from Reports
- User fields
- Company fields
- Fields from Related Records
- You use the Template Variable Tool to get the field names you need to customize the HTML file with fields and images taken from data records.
- You use the Reports tool to get the identifiers for charts you want to add.
- You use the Velocity scripting language to build logic into the template, changing the content based on data parameters.
- Considerations
-
- CSS styles can be embedded into HTML files. External CSS files can also be referenced in the template, if they are first uploaded as Static Resources.
- Fixed images can be inserted into Word and PowerPoint files directly.
- Fixed images in an HTML file need to be stored on the platform either as Static Resources, or as Public Documents.
-
Note: A Static Resource is available only to a logged-in user. A Public Document is visible to anyone who has the link. From the standpoint of a Print Template, the difference is immaterial, since a user has to be logged in to print a record.
Working with Print Templates
Add a Print Template
Edit a Print Template based on a Platform JSP/HTML Page
- Click Designer > Logic > Pages > {page}
- Edit the page.
- Learn more: Pages
- If you need the names of additional variables:
- a. Click Designer > Data > Objects > {object} > Print Templates
- b. View the template to access the Template Variable Tool:

Edit a File-Based Print Template
- Click Designer > Data > Objects > {object} > Print Templates
- Click the Download link on the template you want to copy to your local system.
- Make changes to the template.
- If you need the names of additional variables, click the [New Template] button to access the Template Variable Tool:
- If the New Template window is open, click [Cancel] to close it and go back to the Templates (record list) view.
- Click the Replace link on the template to upload the modified template.

Warning: Be sure to click the right link. The existing template page will be replaced by the new one.
Use a Template to Print a Record
- Open an object record.
- Click the [Print] button.
- Select Template based to create an HTML page using the Print Template.
- Select the Template
- Optionally, Select PDF format to get the results in PDF format. (Default is HTML.)
- Click [Print].
A new window opens to display the results. - Copy content from the resulting HTML page, print it, or save the page to your local system.
Use a Template to Print a List of Records
- Visit Workspace > {object}
- Select a view
- Do a search or add criteria to modify the view
- Select the records to print.
(Click All to select all displayed records.) - Select More Actions > Print
- Use the current view, choose a new one, or select records manually.
- For Print Layout, choose Use a Print Template
- Select the template to use
- Set the page orientation
- Click [Print]
Insert Images, Charts, and Template Variables
See the instructions for the kind of template you are creating:
Accessing Related Records
In a Custom Object, fields from related records can be added to a Print Template. (That is, records from an Object that has a Lookup to the current object.)
For example, OrderItems has a lookup to Orders, so in a Print Template for Orders, related OrderItems records can be accessed. (In an object Form, related records are typically displayed in a Subform, although they need not be.)
When formatting a record in the current object for printing, those related records and the fields they contain can be processed in a loop.
Finding and Using Related Record Variables
Finding Related-Record Variables
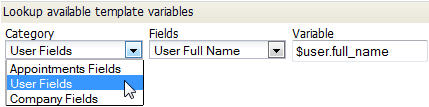
Related Object variables can be found using the Template Variable Tool. Here, the related OrderItems objects are being chosen from the category list:

Here, the Tag Name field is being selected from the Many to Many relationship with the Tags object:
The object that is directly connected to Orders is Orders_Tags -- a Junction Object that has Lookups to both Orders and Tags. In that object, the Lookup to Tags is called Related to Tags. Within that group, the Tag Name field is listed, along with other fields in the Tags object.
Once selected, the variable name appears in the Variable area:
- $Orders_Tags_record.related_to_Tags.tag_name
where:
- $Orders_Tags_record is the expected loop variable for the $Orders_Tags Junction Object records
- related_to__Tags is the name of the Lookup field in the Junction Object that references a Tags record
- tag_name is the field we want to display
- The "dot" separator (.) joins each of the segments in the variable name
Processing Related Records a Loop
Typically, you'll create a table for the related records, define its headings, and then create a row for a single record, putting the related-record variables into the cells of the row. You then enclose that row in a loop, using the #foreach instruction defined by the Velocity templating engine.
Related records are returned in an array, so the loop creates a new table row for each record in the array.
For example (with formatting attributes removed for simplicity):
<table>
<tbody>
<tr>
    <th>Quantity</th>
    <th>Product </th>
    <th>Unit Price</th>
    <th>Amount</th>
</tr>
</tbody>

#foreach( $OrderItems_record in $OrderItems )
<tr>
    <td>$OrderItems_record.item_quantity</td>
    <td>$OrderItems_record.related_to_ProductInventory.product_name</td>
    <td>$OrderItems_record.item_price</td>
    <td>$OrderItems_record.total</td>
</tr>
#end

...
</table>
where:
- The <tbody> element is required around the header row.
- The Velocity #foreach directive does the looping.
- The looping construct defines $OrderItems_record as a loop variable.
- The loop variable iterates over the $OrderItems array.
- The $OrderItems array is automatically available in the template, because OrderItems is a Related Object. (All related objects are available. Each is an array.)
Special Considerations for Subform Variables
Totals and additional computation fields defined for a Subform are also available in the Template Variable Tool. To find them, you access the main object (not the object displayed in the Subform), because those fields are added to the object that contains the Subform.
For example, the Subform for OrderItems totals the $Amount column, and then does additional computations on it to add a surcharge. Those values are shown in the $Orders Fields category as Total $Amount and Shipping for $Amount, respectively. (The final total is shown as Net Total $Amount.)
Sample Print Template for an Order Invoice
This sample:
- Creates an invoice for an order, showing all items in it
- Gets the name and price of order items from the ProductInventory object
- Uses Velocity #foreach processing to process OrderItems records for an Order
- Uses Velocity #if conditionals to display surcharge and discount rows only if those values are present
<html><head> <title></title> <style> div { padding-top: 5px; padding-bottom: 5px; padding-right: 5px; padding-left: 30px; border: 3px; margin-top: 5%; margin-right: 40%; margin-bottom: 5%; margin-left: 5%; } </style> </head><body bgcolor="#FFFFFF" text="#000000" link="#0000FF" vlink="#800080" alink="#FF0000"> <div style="width:100%"> <img width="100" height="100" src="http://justanothermobilemonday.com/Wordpress/wp-content/uploads/2009/10/android-robot-logo2.jpg" alt="Company logo" /> <---- Company Logo Here<br/> <font size="5"><b>$company.name</b></font><b><br /> <br/> $company.street <br> $company.city, $company.state, <br> $company.country - $company.zip <br> (Phone): $user.phone <hr width="100%" size="1" /> <br /> <h2 align="center">Order<b> Invoice</b></h2> <p></p> <p align="center"><b>Invoice Date:</b> $Orders.date_created </p> <br/><br/> <b><u>Bill To: </u></b><br /> <font size="2">$Orders.account.name - $Orders.account.number</font></b> <br />$Orders.account.street<br /> $Orders.account.city, $Orders.account.state, <br> $Orders.account.country - $Orders.account.zip<br /> (Phone): $Orders.account.phone <br /> <br /> <br /> <b>Invoice #: $Orders.order_number <br /> </b> </p> <table border="1" cellpadding="5" cellspacing="0" width="600"> <!-- HEADER --> <tbody> <tr> <th>Quantity</th> <th>Product </th> <th>Unit Price</th> <th>Amount</th> </tr> </tbody> #foreach( $OrderItems_record in $OrderItems ) <tr> <td width="350">$OrderItems_record.item_quantity</td> <td width="100" align="CENTER">$OrderItems_record.related_to_ProductInventory.product_name</td> <td width="100" align="CENTER"> $OrderItems_record.item_price</td> <td width="100" align="CENTER"> $OrderItems_record.total </td> </tr> #end <tr> <td colspan="2"> </td> <td style="border: solid 1px #000000;" align="Right">Sub Total</td> <td style="border: solid 1px #000000;" align="center">$Order.grid_comptn_f5631e34b39f4ba39a98559c7215a3b4</td> </tr> #if( $Orders.grid_surcharge_031f67dd4b3946949df2da276e5c82a6 > 0 ) <tr> <td colspan="2"> </td> <td style="border: solid 1px #000000;" align="Right">Surcharge</td> <td style="border: solid 1px #000000;" align="center">$Orders.grid_surcharge_f5631e34b39f4ba39a98559c7215a3b4</td> </tr> #end #if( $Orders.grid_discount_031f67dd4b3946949df2da276e5c82a6 > 0 ) <tr> <td colspan="2"> </td> <td style="border: solid 1px #000000;" align="Right">Discount</td> <td style="border: solid 1px #000000;" align="center">$Orders.grid_discount_f5631e34b39f4ba39a98559c7215a3b4</td> </tr> #end <tr> <td colspan="2"> </td> <td style="border: solid 1px #000000;" align="Right">Tax</td> <td style="border: solid 1px #000000;" align="center">$Orders.grid_tax_f5631e34b39f4ba39a98559c7215a3b4</td> </tr> <tr> <td colspan="2"> </td> <td style="border: solid 1px #000000;" align="Right">Shipping</td> <td style="border: solid 1px #000000;" align="center">$Orders.grid_shipping_f5631e34b39f4ba39a98559c7215a3b4</td> </tr> <tr> <td colspan="2"> </td> <td style="border: solid 1px #000000;" align="Right"><b>TOTAL AMOUNT DUE</b></td> <td style="border: solid 1px #000000;" align="center"><b>$Orders.grid_net_total_f5631e34b39f4ba39a98559c7215a3b4</b></td> </tr> </table> <br /><br /> Payment Due upon reciept<br /> Thank you for your business! </div> <p></p> </body> </html>
The Subform part of the resulting invoice then looks something like this:

(The Order Invoice template and the Order Invoice sample file are both available in the downloads area.) [[Category:Template:Features]]