Difference between revisions of "Part 2: Implementing a Java API Class"
From AgileApps Support Wiki
Wikieditor (talk | contribs) (Created page with "In this part of the exercise, you implement a new service on the Orders Object to iterate through all the Line Items and update the Line Item count on the order. You are given...") |
Wikieditor (talk | contribs) |
||
| Line 4: | Line 4: | ||
## Log in to AgileApps Cloud as yourself and navigate to '''Configuration''' > '''Customization''' > '''Developer Resources'''. | ## Log in to AgileApps Cloud as yourself and navigate to '''Configuration''' > '''Customization''' > '''Developer Resources'''. | ||
## Click '''Developer Configuration''', and then '''Edit'''. | ## Click '''Developer Configuration''', and then '''Edit'''. | ||
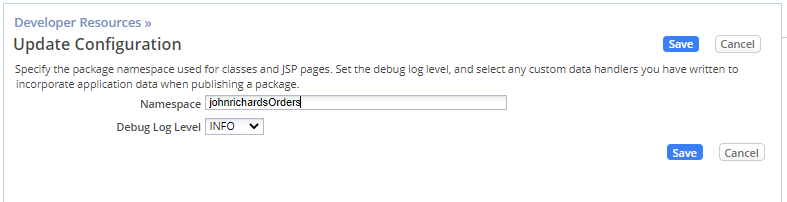
## In the '''Update Configuration''' page, for the '''Namespace''', type '''<your_ subdomain>Orders''' where you replace <your_subdomain> with your webMethods AgileApps Cloud tenant subdomain name. For example: '''johnrichardsOrders'''. Leave the Debug Log Level unchanged. | ## In the '''Update Configuration''' page, for the '''Namespace''', type '''<your_ subdomain>Orders''' where you replace <your_subdomain> with your webMethods AgileApps Cloud tenant subdomain name. For example: '''johnrichardsOrders'''. Leave the Debug Log Level unchanged.<br><br>[[File:Developer_Resources_Update_Configuration_Namespace.PNG|500px]]<br><br> | ||
##: '''Note:''' The chosen Namespace will become a part of the Package name of the Java classes you add later. You will also define subspaces, when you add classes. | ##: '''Note:''' The chosen Namespace will become a part of the Package name of the Java classes you add later. You will also define subspaces, when you add classes. | ||
## Click '''Save'''. | ## Click '''Save'''. | ||
# Select '''Classes''' and click '''New Class'''. | # Select '''Classes''' and click '''New Class'''. | ||
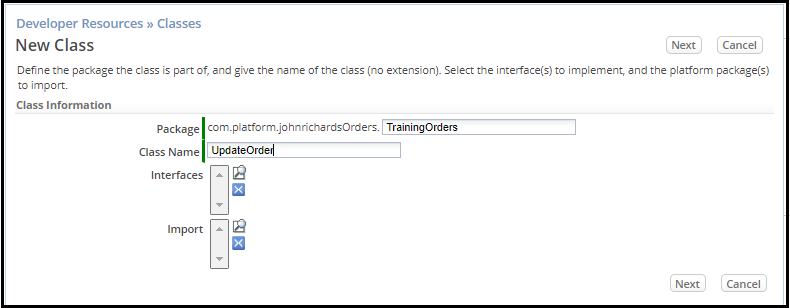
# Provide the values for a new Class named '''UpdateOrder''' in a package sub-folder '''TrainingOrders''' as shown: | # Provide the values for a new Class named '''UpdateOrder''' in a package sub-folder '''TrainingOrders''' as shown:<br><br>[[File:Developer_Resources_Classes_New_Class.PNG|500px]]<br><br> | ||
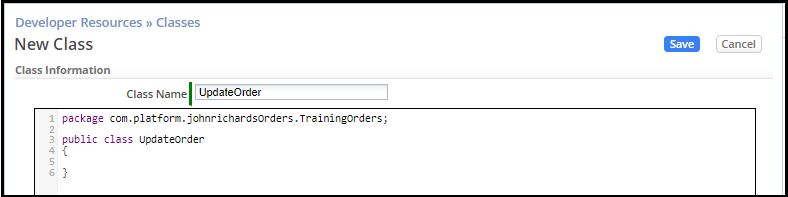
# Click '''Next'''. The '''Class Editor''' opens already providing a skeleton of the class implementation: | # Click '''Next'''. The '''Class Editor''' opens already providing a skeleton of the class implementation:<br><br>[[File:New_Class_johnrichardsOrders.PNG|500px]]<br><br> | ||
# In Windows Explorer, navigate to the <workshop_dir> folder and open the file '''UpdateOrderClass.txt''' using a text editor, such as Notepad. | # In Windows Explorer, navigate to the <workshop_dir> folder and open the file '''UpdateOrderClass.txt''' using a text editor, such as Notepad. | ||
# In the editor, select all the content of the file. Copy the entire content and replace all the content in the webMethods AgileApps Cloud Class Editor by pasting the copied code. | # In the editor, select all the content of the file. Copy the entire content and replace all the content in the webMethods AgileApps Cloud Class Editor by pasting the copied code.<br><br>[[File:New_Class_UpdateOrder.png|800px]]<br><br> | ||
# Adapt the package name: change <your_subdomain>Orders to the Namespace you defined in step 1c) of this exercise, for example: <code>package com.platform.johnrichardsOrders.TrainingOrders;</code> | # Adapt the package name: change <your_subdomain>Orders to the Namespace you defined in step 1c) of this exercise, for example: <code>package com.platform.johnrichardsOrders.TrainingOrders;</code> | ||
# Click '''Save'''. | # Click '''Save'''. | ||
# To set up a test to validate the Class, create a new Business Rule that runs whenever an order is updated to Resolved status: | # To set up a test to validate the Class, create a new Business Rule that runs whenever an order is updated to Resolved status: | ||
## Navigate to '''Configuration''' > '''Customization''' > '''Objects''' > '''Orders''' > '''Business Rules'''. | ## Navigate to '''Configuration''' > '''Customization''' > '''Objects''' > '''Orders''' > '''Business Rules'''. | ||
## On the '''Event Rules''' tab, select '''Updated(0)''' from the '''On Record''' drop-down list, and then click '''New Rule'''. | ## On the '''Event Rules''' tab, select '''Updated(0)''' from the '''On Record''' drop-down list, and then click '''New Rule'''.<br><br>[[File:Objects_Orders_Business_Rules_Event_Rules.png|800px]]<br><br> | ||
## Configure a new '''Event Rule''' named '''Total Line Items''' that: | ## Configure a new '''Event Rule''' named '''Total Line Items''' that: | ||
##:* Only fires when an Order is updated with a new Status of Resolved | ##:* Only fires when an Order is updated with a new Status of Resolved | ||
##:* Performs two actions: | ##:* Performs two actions: | ||
##: o Sets the status to '''Closed''' (to prevent the Update Event Rule from firing recursively) | ##: o Sets the status to '''Closed''' (to prevent the Update Event Rule from firing recursively) | ||
##: o Invokes the '''UpdateLineItems''' method within class '''UpdateOrder''', which calculates and updates the '''Line Items Total''' field for an Order. | ##: o Invokes the '''UpdateLineItems''' method within class '''UpdateOrder''', which calculates and updates the '''Line Items Total''' field for an Order.<br><br>[[File:New_Record_Updated_Event_Rule.png|800px]]<br><br> | ||
## Click '''Save'''. | ## Click '''Save'''. | ||
# Test the new class: | # Test the new class: | ||
## Create a new Order record related to the '''SouthEast''' region. Provide valid values for '''Currency''' and '''New Currency'''. Assign the order to account '''Fred Supplies''' and click '''Save'''. | ## Create a new Order record related to the '''SouthEast''' region. Provide valid values for '''Currency''' and '''New Currency'''. Assign the order to account '''Fred Supplies''' and click '''Save'''.<br><br>[[File:New_Order_Test_Java_Class.png|800px]]<br><br> | ||
## Add three Line Items to the order: | ## Add three Line Items to the order:<br><br>[[File:Three_Line_Items.png|500px]]<br><br> | ||
## Change the status of the order to '''Resolved''', show the '''Order details''', and click '''Save Changes'''. | ## Change the status of the order to '''Resolved''', show the '''Order details''', and click '''Save Changes'''. | ||
##: Here is the resulting Order after running the Rule: the '''Order Status''' is '''Closed''' and the '''Number Line Item''' field is updated. | ##: Here is the resulting Order after running the Rule: the '''Order Status''' is '''Closed''' and the '''Number Line Item''' field is updated.<br><br>[[File:Record_Test_Java_Class.png|800px]]<br><br> | ||
==Taking It Further== | ==Taking It Further== | ||
Revision as of 08:51, 12 December 2022
In this part of the exercise, you implement a new service on the Orders Object to iterate through all the Line Items and update the Line Item count on the order. You are given an example Java API that uses the “Search API” as well as the “Update Object API”. (See the http://agileappscloud.info/aawiki/Java_API for information on these APIs.)
- Set up your package namespace:
- Log in to AgileApps Cloud as yourself and navigate to Configuration > Customization > Developer Resources.
- Click Developer Configuration, and then Edit.
- In the Update Configuration page, for the Namespace, type <your_ subdomain>Orders where you replace <your_subdomain> with your webMethods AgileApps Cloud tenant subdomain name. For example: johnrichardsOrders. Leave the Debug Log Level unchanged.
- Note: The chosen Namespace will become a part of the Package name of the Java classes you add later. You will also define subspaces, when you add classes.
- Click Save.
- Select Classes and click New Class.
- Provide the values for a new Class named UpdateOrder in a package sub-folder TrainingOrders as shown:
- Click Next. The Class Editor opens already providing a skeleton of the class implementation:
- In Windows Explorer, navigate to the <workshop_dir> folder and open the file UpdateOrderClass.txt using a text editor, such as Notepad.
- In the editor, select all the content of the file. Copy the entire content and replace all the content in the webMethods AgileApps Cloud Class Editor by pasting the copied code.
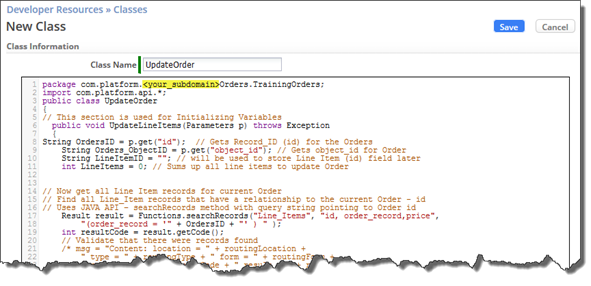
- Adapt the package name: change <your_subdomain>Orders to the Namespace you defined in step 1c) of this exercise, for example:
package com.platform.johnrichardsOrders.TrainingOrders; - Click Save.
- To set up a test to validate the Class, create a new Business Rule that runs whenever an order is updated to Resolved status:
- Navigate to Configuration > Customization > Objects > Orders > Business Rules.
- On the Event Rules tab, select Updated(0) from the On Record drop-down list, and then click New Rule.
800px - Configure a new Event Rule named Total Line Items that:
- Only fires when an Order is updated with a new Status of Resolved
- Performs two actions:
- o Sets the status to Closed (to prevent the Update Event Rule from firing recursively)
- o Invokes the UpdateLineItems method within class UpdateOrder, which calculates and updates the Line Items Total field for an Order.
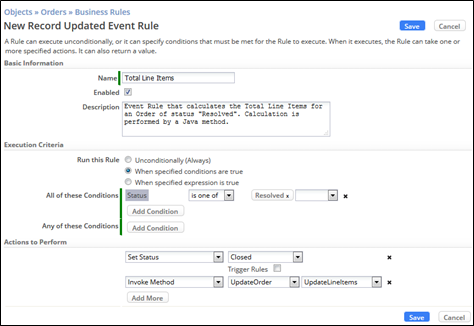
- Click Save.
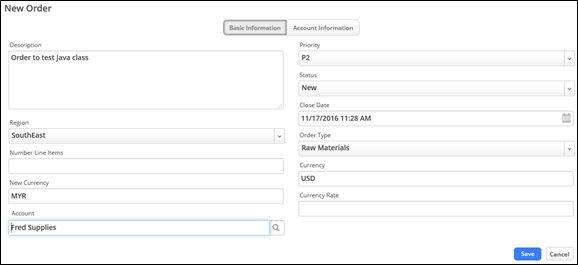
- Test the new class:
- Create a new Order record related to the SouthEast region. Provide valid values for Currency and New Currency. Assign the order to account Fred Supplies and click Save.
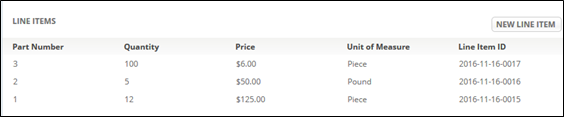
- Add three Line Items to the order:
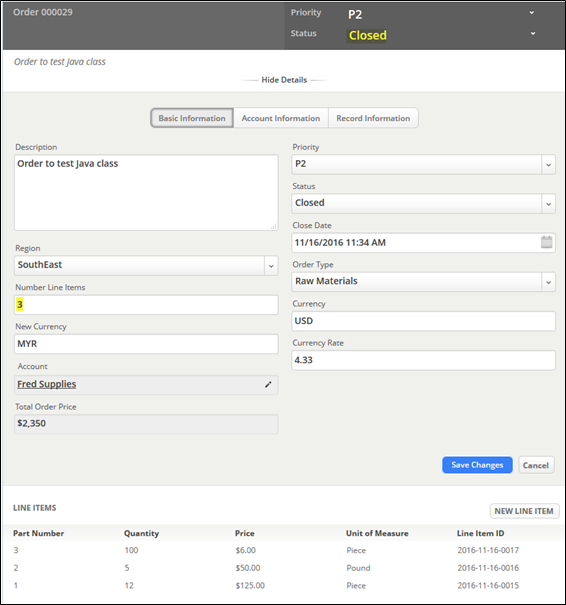
- Change the status of the order to Resolved, show the Order details, and click Save Changes.
- Here is the resulting Order after running the Rule: the Order Status is Closed and the Number Line Item field is updated.
- Here is the resulting Order after running the Rule: the Order Status is Closed and the Number Line Item field is updated.
- Create a new Order record related to the SouthEast region. Provide valid values for Currency and New Currency. Assign the order to account Fred Supplies and click Save.


Taking It Further
- To try another example that uses a Java API class to provide a pattern validation of the Line Item Object’s Part Number field whenever a Line Item is created or updated. Use the steps in Part 2 of this exercise as guidance and the code provided in the <workshop-dir>\FieldValidations.txt file.
- To extend what you learned in this exercise, see these AgileApps Cloud wiki pages:
- For expert Java programmers, learn how to integrate the AgileApps plugin in your Eclipse installations: