Difference between revisions of "How to Create a Custom User Interface (CUI)"
imported>Aeric |
imported>Aeric |
||
| Line 5: | Line 5: | ||
In the current approach, when you design a template, you have to put this template.zip file inside the '''Tomcat > webapps''' folder to access it. The problem with this approach is that a cloud customer does not have access permissions to our system resources. | In the current approach, when you design a template, you have to put this template.zip file inside the '''Tomcat > webapps''' folder to access it. The problem with this approach is that a cloud customer does not have access permissions to our system resources. | ||
With this new approach, the customer uploads a template to our AgileApps platform like any other document and generates an Access URL. When the customer opens this Access URL, the template uploaded to the AgileApps platform is rendered in run time for the selected application. | With this new approach, the customer uploads a template to our AgileApps platform like any other document and generates an Access URL. When the customer opens this Access URL, the template uploaded to the AgileApps platform is rendered in run time for the selected application. | ||
==Who can use this feature?== | |||
Any user with the following permissions can view this feature: | |||
:*In the Manage Tenant Capabilities page for a tenant, the '''Developer Tools''' option should be enabled for the user. For more information, see [[Tenant Capabilities]]. | |||
:*Under '''Access Management''' '''> Access Profiles > Administrative Permissions > Development Controls''', the '''Use Development Features''' option should be enabled. For more information, see [[Access Profiles]]. | |||
==Prerequisites== | ==Prerequisites== | ||
To | To use this Templates feature, you should meet the following prerequisites: | ||
:*In the '''Configure Service Settings > Template Configuration''' section, provide the list of file extensions that you want to support for template installation. This allows the administrator to allow only some file extensions template installation. For more information, see [[Service Configuration]]. | :*In the '''Configure Service Settings > Template Configuration''' section, provide the list of file extensions that you want to support for template installation. This allows the administrator to allow only some file extensions template installation. For more information, see [[Service Configuration]]. | ||
:*The recommended file structure for packaging the custom user interface is shown in the following image: | :*The recommended file structure for packaging the custom user interface is shown in the following image: | ||
| Line 52: | Line 55: | ||
===Configuring the Access URL=== | ===Configuring the Access URL=== | ||
:1. After you install the template, from the Templates list page, click Configure Access URL as shown in the following image: | :1. After you install the template, from the Templates list page, click '''Configure Access URL''' as shown in the following image: | ||
::[[File:configure_access_url.png|600px]] | ::[[File:configure_access_url.png|600px]] | ||
:2. In the All Configured Access URLs page, you will see a list of all the configured access URLs. You can enable or disable an access URL from this page. To configure a new access URL, click '''New Access URL'''. | |||
{{Note|If you have not updated a namespace in the '''Developer Configuration''' section of the Developer Resources page, then the system prompts you with a message to update the namespace. Click the URL to update the namespace. Provide a name and save it. This is a mandatory step as every tenant should have a unique namespace. For more information about the namespace, see [[Developer Configuration]].}} | |||
:3. In the Configure Access URL page, provide the following details in the '''Access URL Information''' section: | |||
:{| border="1" cellpadding="5" cellspacing="1" | |||
! align="center" width="180em"| Field!! align="center"| Description | |||
|- | |||
| Select Application | |||
| Select an application from the drop-down list for which you want to apply this custom template. | |||
|- | |||
| Application Alias | |||
| Provide an application alias. This alias gets appended to the '''Access URL''' which is used to access the application. | |||
|- | |||
| Select Template | |||
| Select a template for the drop-down list. This is the custom template which the platform applies to your application. | |||
|- | |||
| Mandatory User Login | |||
| If you select this checkbox, the user is by default taken to the platform login page. This happens if the user is opening the Access URL for the first time. After successful login in the platform login page, the user is taken to the template landing page. If you do not select this checkbox, the user is taken directly to the template landing page (the target index.html page) on clicking the '''Access URL'''. | |||
|- | |||
| Enable Access URL | |||
| Use this checkbox to enable or disable the Access URL. | |||
|- | |||
| [[Version 10.1 Platform]] | |||
| [[Version 10.1 Installable (Apr 2014)]] | |||
|- | |||
| [[Version 10.0 Platform]] | |||
| [[Version 10.0 Installable (Feb 2014)]] | |||
|- | |||
|} | |||
Revision as of 14:57, 28 January 2020
Overview
The Templates feature allows you to upload a template designed by a designer to the AgileApps platform. You can use this template to customize the user interface for applications using different Access URLs.
Why do we need this feature?
In the current approach, when you design a template, you have to put this template.zip file inside the Tomcat > webapps folder to access it. The problem with this approach is that a cloud customer does not have access permissions to our system resources. With this new approach, the customer uploads a template to our AgileApps platform like any other document and generates an Access URL. When the customer opens this Access URL, the template uploaded to the AgileApps platform is rendered in run time for the selected application.
Who can use this feature?
Any user with the following permissions can view this feature:
- In the Manage Tenant Capabilities page for a tenant, the Developer Tools option should be enabled for the user. For more information, see Tenant Capabilities.
- Under Access Management > Access Profiles > Administrative Permissions > Development Controls, the Use Development Features option should be enabled. For more information, see Access Profiles.
Prerequisites
To use this Templates feature, you should meet the following prerequisites:
- In the Configure Service Settings > Template Configuration section, provide the list of file extensions that you want to support for template installation. This allows the administrator to allow only some file extensions template installation. For more information, see Service Configuration.
- The recommended file structure for packaging the custom user interface is shown in the following image:
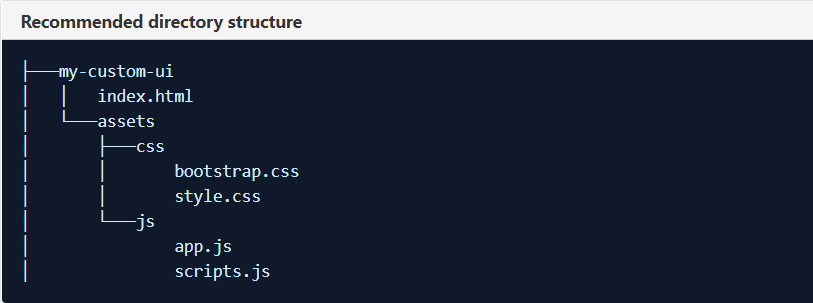
- Further explanation of this folder structure is as follows:
- my-custom-ui: This is the root folder and it always exists.
- index.html: This file is the entry file and is mandatory for successful installation of the template.
- template-details.json: When you install the template in the AgileApps platform, the template name and the version is read from this internal JSON file. If this file is missing, then the template installation fails. This file is available inside the template.zip file and has the following file structure:


Note: The designer of the template is responsible for giving a unique name and version number to the template. AgileApps platform does not update these details as it is designed outside of AgileApps.
   {
    name: '{template unique name}',
    version: '{major.minor}'
   }
Basic Flow
Creating a new custom template for your AgileApps application involves the following steps:
Installing the Template
- 1. Go to Settings > Customization > Developer Resources, and select Templates from the menu as shown in the following image:

- 2. In the All Templates screen, click Install as shown in the following image:

- 3. In the Install Template page, click Choose File and select the zip file for your template. Only .zip file format is supported. Other compression formats like RAR is not supported.
- The template zip file has the following considerations for the characters used in the zip file:
- The zip file name should only contain alphanumeric characters (a-z, A-Z, 0-9), hyphen(-), dot(.), or an underscore(_).
- The folder name inside the zip file should only contain alphanumeric characters (a-z, A-Z, 0-9), hyphen(-), or dot(.), or an underscore (_). Also, the folder name cannot start with a dot(.) symbol.
- The file name inside the zip file should only contain alphanumeric characters (a-z, A-Z, 0-9), hyphen(-), or dot(.), or an underscore (_).
- The template version inside the template-details.json file should be in {major.minor} format. For example, 1.2.
- The template name inside the template-details.json file should only contain alphanumeric characters (a-z, A-Z, 0-9), hyphen(-), or dot(.), or an underscore (_). Also, it should start with an alphabet and end with an alphanumeric character.
- The template zip file has the following considerations for the characters used in the zip file:
- 4. Click Next and then click Install. On successful installation, you will see a message on-screen conveying the same.
-
Note: If any of the above considerations are not met, then the installation fails with the relevant error message.
- 5. To update an existing template, follow the same procedure as above and click Install to overwrite the existing template. The system provides you a warning message with an option to download the existing template before you overwrite.
- This concludes the installation of template.
Configuring the Access URL
- 1. After you install the template, from the Templates list page, click Configure Access URL as shown in the following image:

- 2. In the All Configured Access URLs page, you will see a list of all the configured access URLs. You can enable or disable an access URL from this page. To configure a new access URL, click New Access URL.
-
Note: If you have not updated a namespace in the Developer Configuration section of the Developer Resources page, then the system prompts you with a message to update the namespace. Click the URL to update the namespace. Provide a name and save it. This is a mandatory step as every tenant should have a unique namespace. For more information about the namespace, see Developer Configuration.
- 3. In the Configure Access URL page, provide the following details in the Access URL Information section:
Field Description Select Application Select an application from the drop-down list for which you want to apply this custom template. Application Alias Provide an application alias. This alias gets appended to the Access URL which is used to access the application. Select Template Select a template for the drop-down list. This is the custom template which the platform applies to your application. Mandatory User Login If you select this checkbox, the user is by default taken to the platform login page. This happens if the user is opening the Access URL for the first time. After successful login in the platform login page, the user is taken to the template landing page. If you do not select this checkbox, the user is taken directly to the template landing page (the target index.html page) on clicking the Access URL. Enable Access URL Use this checkbox to enable or disable the Access URL. Version 10.1 Platform Version 10.1 Installable (Apr 2014) Version 10.0 Platform Version 10.0 Installable (Feb 2014)